-
Notifications
You must be signed in to change notification settings - Fork 62
UART Connection
To connect to the UART port, you will need to use a serial port adapter to connect to your PC.
Caution
Before you connect that adapter to you camera, make sure that it's working voltage is set to 3.3 volt!
Set the adapter's operating voltage to 3.3 volts before connecting it to the camera. Sometimes this is as simple as moving a jumper.Sometimes you have to solder or connect with a solder dab. Some adapters only support 5 volts: add a logic level converter between the adapter and the camera's UART port.
One of the pads you need to connect your adapter to is GND (ground). This is easy to find with a multimeter in continuity mode.
Place one of the leads on a known exposed ground pad.These are usually large open copper contact areas around mounting screw holes, USB port casings, SD card slot metal walls. Use another wire to lightly touch control pads until you see or hear a message from your multimeter that the circuit is closed. This means you have found the ground. Now you need to find two more: RX and TX, both used to receive and transmit data, respectively. Start with TX. It sends a string of characters and is easy to spot.
Be aware that you are looking for a contact with 3.3V potential between it and ground. Test possible connection points with a multimeter and mark the ones that show 3.3 volts. This way you don't have to test everything and you save yourself from hitting, say, a 12 volt connector intended for an infrared LED array or whatever.
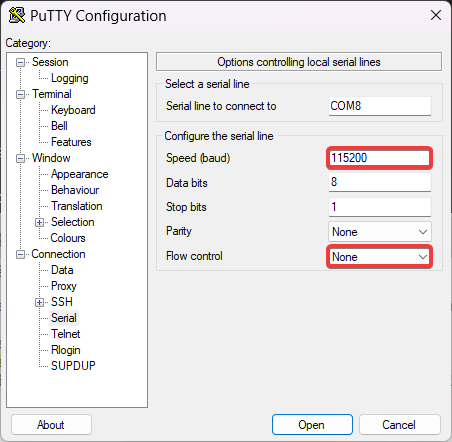
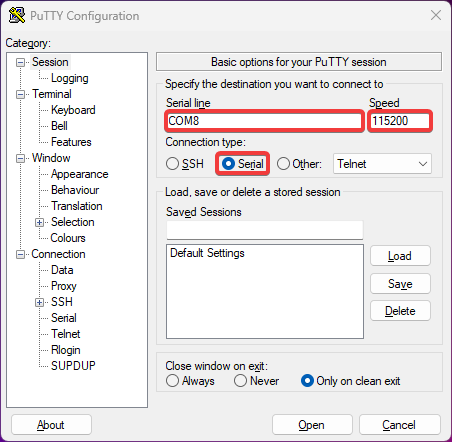
Connect the GND pin of your camera to the GND pad of the adapter, connect RX contact of the adapter to TX contact of the camera, and connect TX contact of the adapter to RX contact of the camera. Then connect the USB connector of the adapter to a USB port on your PC, start a terminal emulator application and connect to your adapter. Set your terminal settings to 115200 bps baud rate, 8 bits, no parity, 1 stop bit, no flow control.
Caution
Do not connect VCC contact! Power the camera with its standard power adapter.
You should start seeing booting log in your terminal window.
Here are some command lines for various terminal programs with session logging. Pick your poison.
screen -L -Logfile ipcam-$(date +%s).log /dev/ttyUSB0 115200Use Ctrl-a followed by \ to exit the session.
minicom -b 115200 -8 --capturefile=ipcam-$(date +%s).log --color=on -D /dev/ttyUSB0Use Ctrl-a followed by x to exit the session.
picocom -b 115200 --databits 8 --parity n --stopbits 1 --flow n --logfile=ipcam-$(date +%s).log /dev/ttyUSB0Use Ctrl-a followed by Ctrl-x to exit the session.
If you opt for a GUI terminal, namely PuTTY, this is how it should look like:

