trzsz-ssh ( tssh ) is an ssh client designed as a drop-in replacement for the openssh client. It aims to provide complete compatibility with openssh, mirroring all its features, while also offering additional useful features not found in the openssh client.
-
Can't remember all server aliases,
tsshlogin prompt supports searching and selecting servers to log in. -
tsshhas built-in support for trzsz ( trz / tsz ), no need to open a new session to transfer files. -
tsshsupports multiple selection and batch login, and supports executing the preset remote command. -
tsshsupports remember password, supports automated interaction, improving your login efficiency. -
Use
tsshinstead oftrzsz sshon Windows, which solves the issue of slow upload speed oftrz.
Here is how to install trzsz-ssh (tssh) on the client side (choose one):
-
Install with scoop / winget / choco on Windows
scoop install tssh/winget install tssh/choco install tsshscoop install tssh
winget install tssh
choco install tssh
-
Install with homebrew on MacOS
brew install trzsz-sshbrew update brew install trzsz-ssh
-
Install with apt on Ubuntu
sudo apt install tsshsudo apt update && sudo apt install software-properties-common sudo add-apt-repository ppa:trzsz/ppa && sudo apt update sudo apt install tssh
-
Install with apt on Debian
sudo apt install tsshsudo apt install curl gpg curl -s 'https://keyserver.ubuntu.com/pks/lookup?op=get&search=0x7074ce75da7cc691c1ae1a7c7e51d1ad956055ca' \ | gpg --dearmor -o /usr/share/keyrings/trzsz.gpg echo 'deb [signed-by=/usr/share/keyrings/trzsz.gpg] https://ppa.launchpadcontent.net/trzsz/ppa/ubuntu jammy main' \ | sudo tee /etc/apt/sources.list.d/trzsz.list sudo apt update sudo apt install tssh
-
Install with yum on Linux
sudo yum install tssh-
Install with gemfury repository.
echo '[trzsz]
name=Trzsz Repo
baseurl=https://yum.fury.io/trzsz/
enabled=1
gpgcheck=0' | sudo tee /etc/yum.repos.d/trzsz.repo

sudo yum install tssh
-
Install with wlnmp repository. It's not necessary to configure the epel repository for tssh.
curl -fsSL "https://sh.wlnmp.com/wlnmp.sh" | bash

sudo yum install tssh
-
-
Install with yay on ArchLinux
yay -S tsshyay -Syu yay -S tssh
-
Install with Go ( Requires go 1.21 or later )
go install github.com/trzsz/trzsz-ssh/cmd/tssh@latestgo install github.com/trzsz/trzsz-ssh/cmd/tssh@latest
The binaries are usually located in ~/go/bin/ ( C:\Users\your_name\go\bin\ on Windows ).
-
Build from source ( Requires go 1.21 or later )
sudo make installgit clone --depth 1 https://github.com/trzsz/trzsz-ssh.git cd trzsz-ssh make sudo make install -
Download from the GitHub Releases, unzip and add to
PATHenvironment.
-
Before use, you need to configure
~/.ssh/config(for Windows, it isC:\Users\xxx\.ssh\config, replacexxxwith your username). -
For how to configure
~/.ssh/config, please refer to the documentation of openssh (Matchsection is not supported yet ). -
Running
tsshwithout arguments will open the login prompt. If there are arguments except destination will also open the login prompt. -
If the destination is part of the aliases in
~/.ssh/config, and can't completely match an alias, the login prompt will also be opened. -
If
#!! HideHost yesis configured, or the alias contains*or?wildcard characters, it will not be displayed in the login prompt. -
tsshsupports shortcuts, supports search, and supports multi-selection when used intmux,iTerm2, andWindows Terminal, etc.Action Global shortcuts Non search shortcuts Shortcuts description Confirm Enter Confirm and login Quit/Exit Ctrl+C Ctrl+Q q Q Cancel and quit Move Prev Ctrl+K Shift+Tab ↑ k K Move cursor up Move Next Ctrl+J Tab ↓ j J Move cursor down Page Up Ctrl+H Ctrl+U Ctrl+B PageUp ← h H u U b B Page up Page Down Ctrl+L Ctrl+D Ctrl+F PageDown → l L d D f F Page down Goto Home Home g Go to the first item Goto End End G Go to the last item EraseKeys Ctrl+E e E Erase search keywords TglSearch / Toggle search function Tgl Help ? Toggle help information TglSelect Ctrl+X Ctrl+Space Alt+Space Space x X Toggle selection SelectAll Ctrl+A a A Select all current items SelectOpp Ctrl+O o O Select the opposite items Open Wins Ctrl+W w W Batch login in new windows Open Tabs Ctrl+T t T Batch login in new tabs Open Pane Ctrl+P p P Batch login in new panes
-
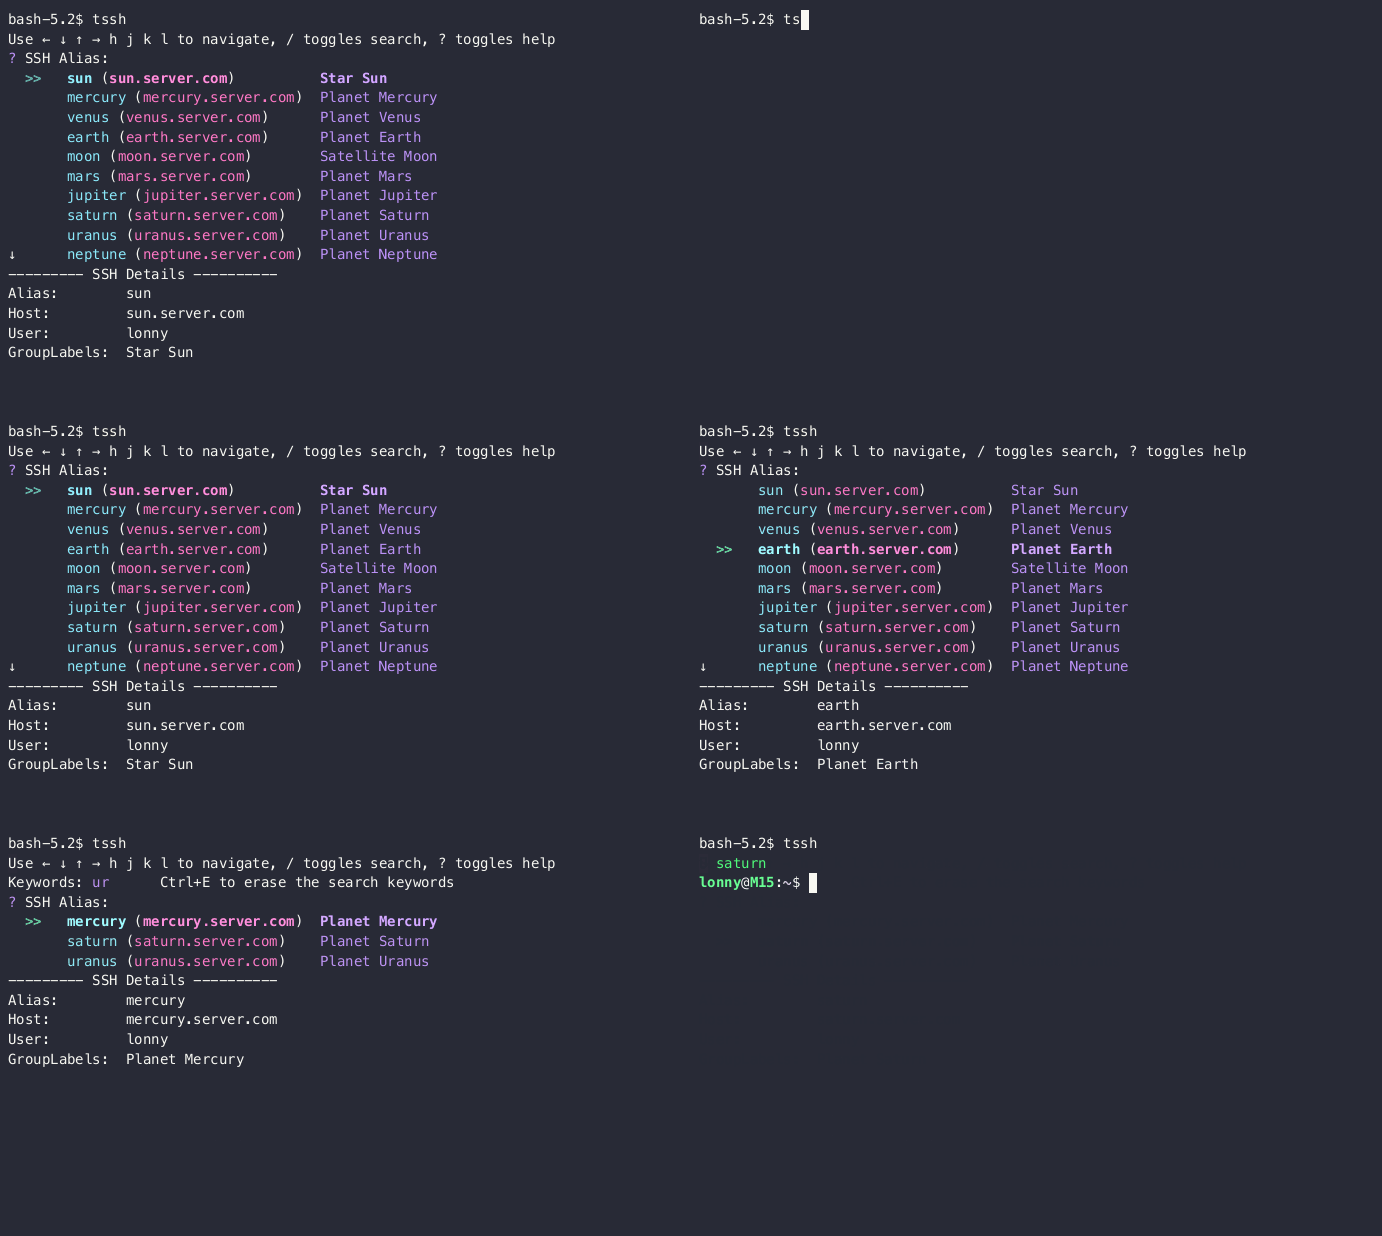
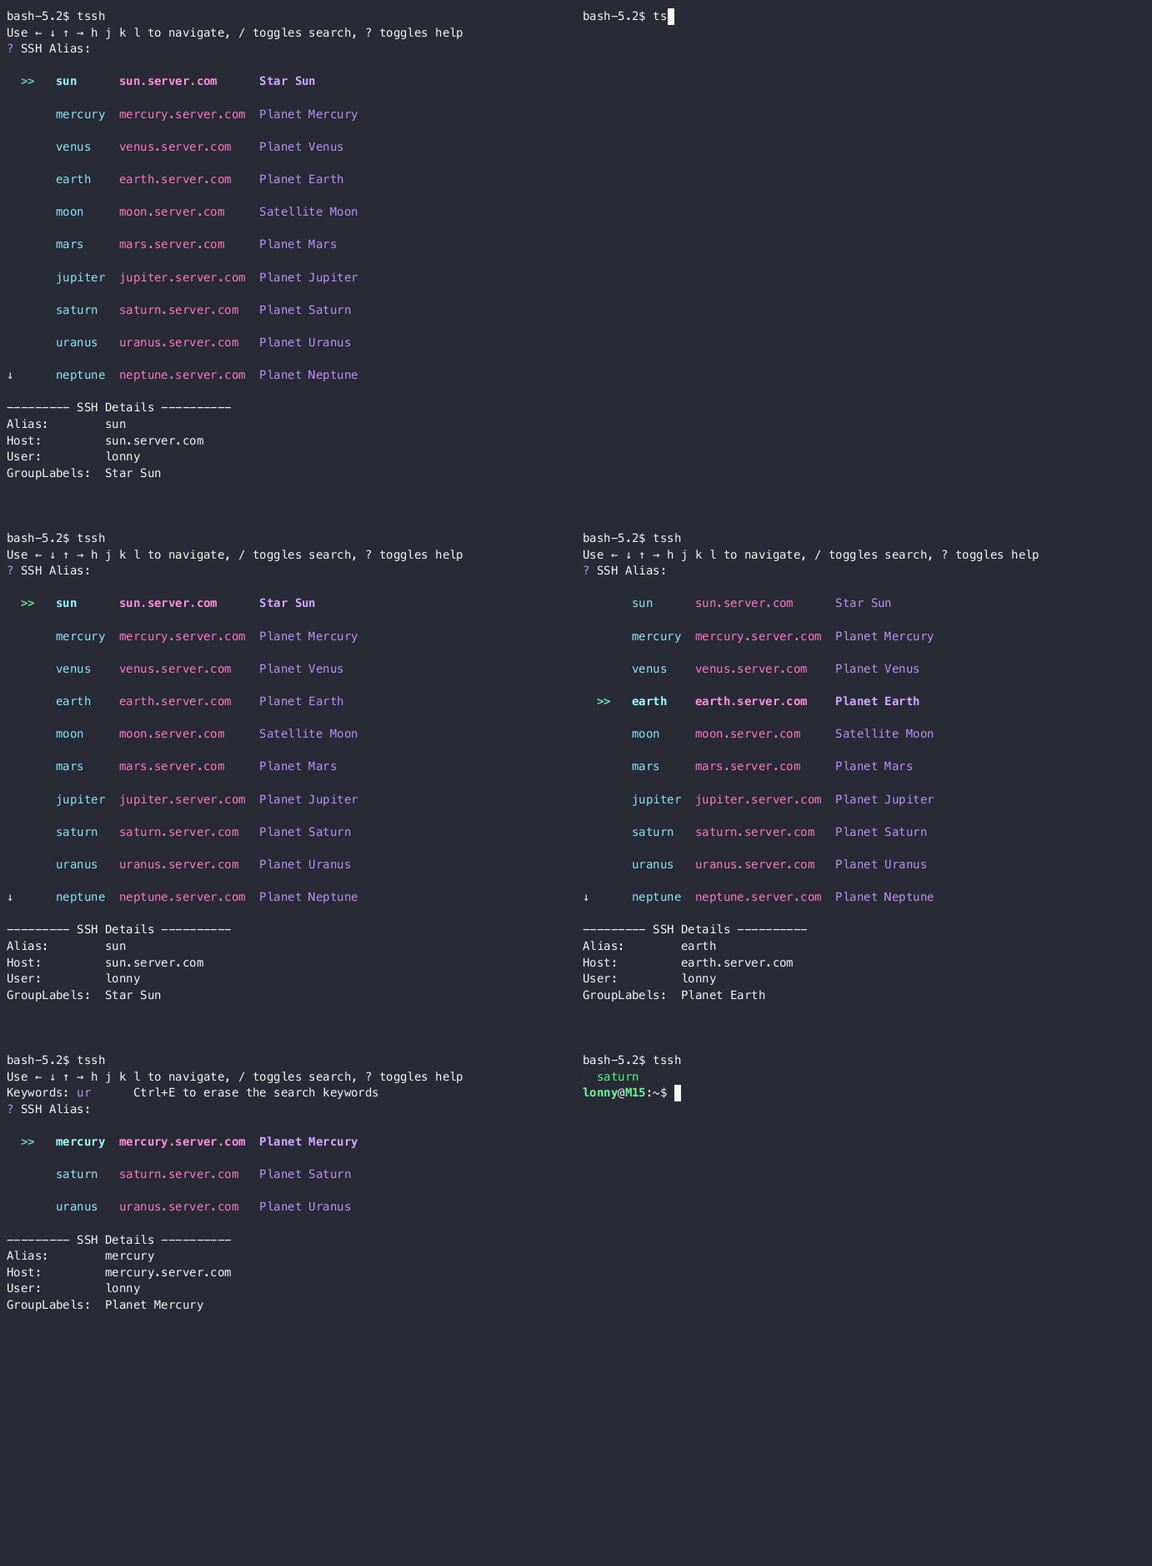
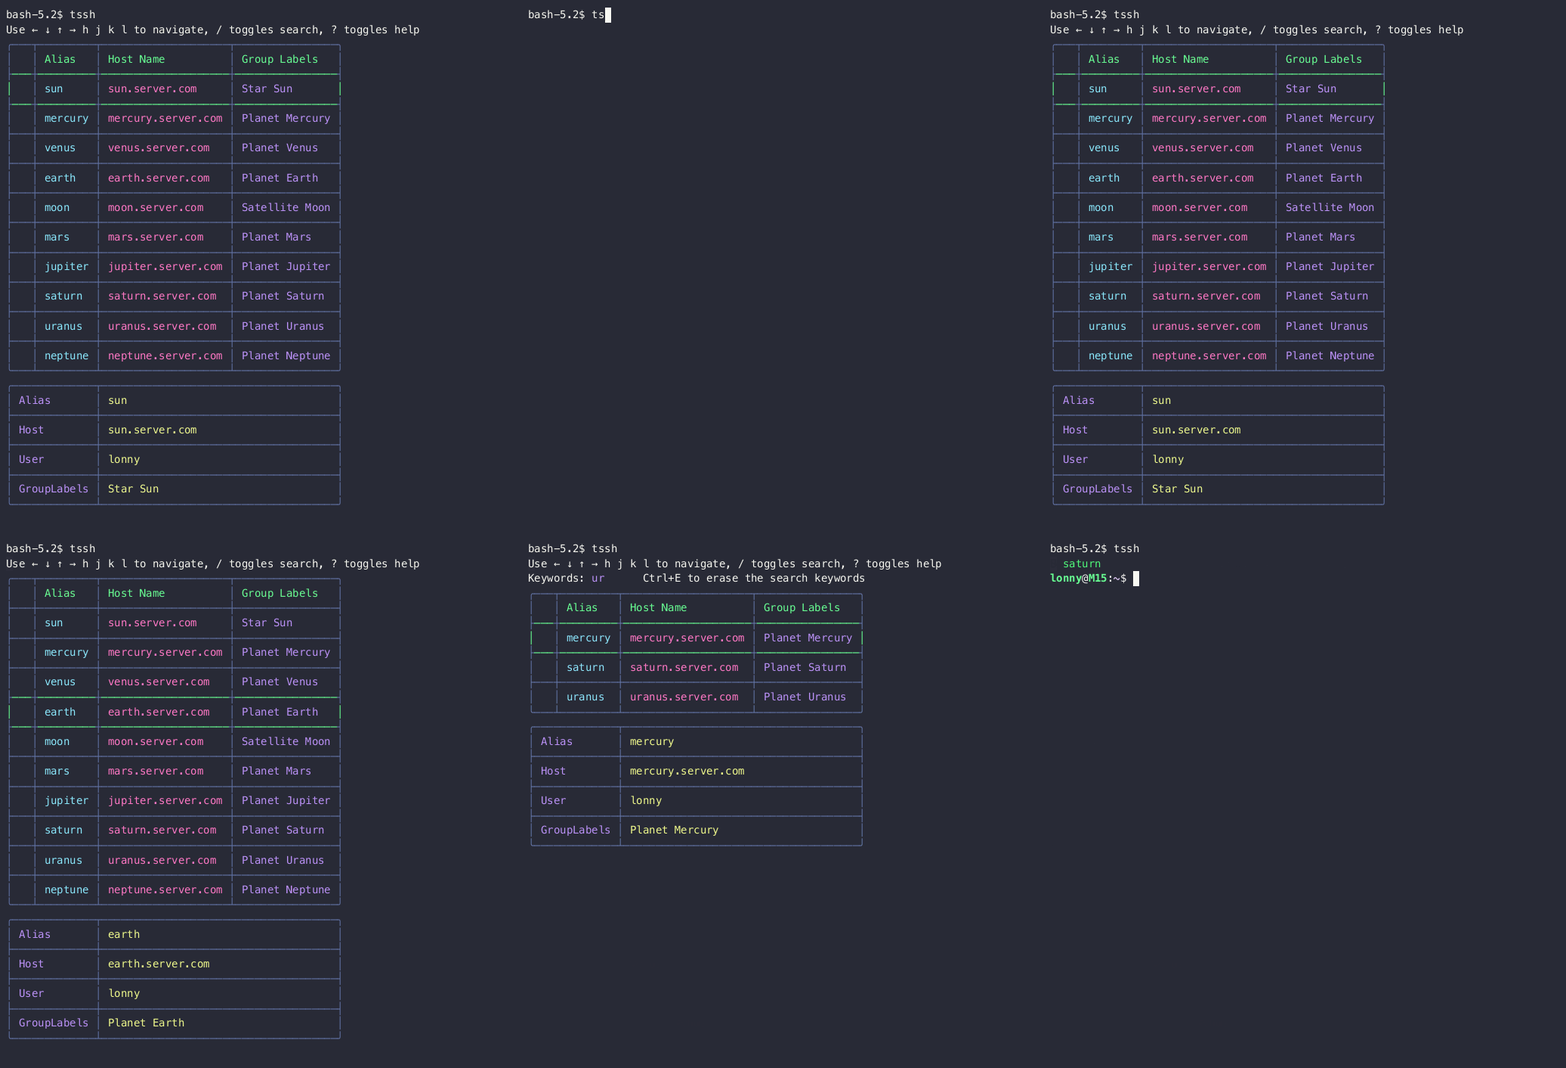
tsshsupports a few themes. Choose one by settingPromptThemeLayoutin~/.tssh.conf. Welcome to create more and better themes together. -
Each theme supports custom colors. Just configure the
PromptThemeColorsin~/.tssh.confto override the default colors as you prefer. -
Please ❤️vote❤️ for your favorite theme. The theme with the highest number of votes will be set as the default theme in the next version.
-
Configure
PromptThemeLayout = tinyin~/.tssh.confto choosetiny theme. -
Configure
PromptThemeColorsin~/.tssh.confand configure it in one line.tiny themesupports the following color items:tiny theme colors and default values:{ "help_tips": "faint", "shortcuts": "faint", "label_icon": "blue", "label_text": "default", "cursor_icon": "green|bold", "active_selected": "green|bold", "active_alias": "cyan|bold", "active_host": "magenta|bold", "active_group": "blue|bold", "inactive_selected": "green|bold", "inactive_alias": "cyan", "inactive_host": "magenta", "inactive_group": "blue", "details_title": "default", "details_name": "faint", "details_value": "default" }tiny theme color enumerations which can be concatenated with `|`:default black red green yellow blue magenta cyan white bgBlack bgRed bgGreen bgYellow bgBlue bgMagenta bgCyan bgWhite bold faint italic underline
-
Configure
PromptThemeLayout = simplein~/.tssh.confto choosesimple theme. -
The custom colors and default values of
simple themeare exactly the same as thetiny theme.
-
Configure
PromptThemeLayout = tablein~/.tssh.confto choosetable theme. -
Configure
PromptThemeColorsin~/.tssh.confand configure it in one line.table themesupports the following color items:table theme colors and default values:{ "help_tips": "faint", "shortcuts": "faint", "table_header": "10", "default_alias": "6", "default_host": "5", "default_group": "4", "selected_icon": "2", "selected_alias": "14", "selected_host": "13", "selected_group": "12", "default_border": "8", "selected_border": "10", "details_name": "4", "details_value": "3", "details_border": "8" } -
For supported color enumerations, please refer to lipgloss, except
help_tipsandshortcutsare the same as thetiny theme.
-
trzsz needs to be installed on the server to use
trz / tszfor uploading and downloading files. Choose either the Go version ( ⭐ Recommended ), Py version, or Js version. -
In the
~/.ssh/configorExConfigPathconfiguration file, configureEnableDragFiletoYesto enable the drag and drop to upload feature.Host * # If configured in ~/.ssh/config, add `#!!` prefix to be compatible with openssh. EnableDragFile Yes -
If you want to overwrite the existing files when dragging files to upload, configure
DragFileUploadCommandtotrz -y:Host xxx # If configured in ~/.ssh/config, add `#!!` prefix to be compatible with openssh. DragFileUploadCommand trz -y -
If you want to temporarily enable the drag and drop to upload feature, use
tssh --dragfileto log in. -
In the
~/.ssh/configorExConfigPathconfiguration file, configureEnableTrzsztoNoto disable the trzsz and zmodem feature.Host no_trzsz_nor_zmodem # If configured in ~/.ssh/config, add `#!!` prefix to be compatible with openssh. EnableTrzsz No -
You can use the
--upload-fileargument to specify file or directory to upload directly in the command line, and you can specify thetrzupload command arguments and save path after the server, such as:tssh --upload-file /path/to/file1 --upload-file /path/to/dir2 xxx_server '~/.local/bin/trz -d /tmp/' -
You can use
tszin the command line to directly download files and directories to your local computer. You can also use the--download-pathargument to specify the path for local saving, such as:tssh -t --client --download-path /tmp/ xxx_server 'tsz -d /path/to/file1 /path/to/dir2'
-
In the
~/.ssh/configorExConfigPathconfiguration file, configureEnableZmodemtoYesto enable the zmodem ( rz / sz ) feature.Host * # If configured in ~/.ssh/config, add `#!!` prefix to be compatible with openssh. EnableZmodem Yes -
If you want to use
rzto upload when dragging files, configureDragFileUploadCommandtorz:Host xxx # If configured in ~/.ssh/config, add `#!!` prefix to be compatible with openssh. EnableDragFile Yes DragFileUploadCommand rz -
Not only the server, but also the local computer needs to install
lrzsz. For Windows, you can download from lrzsz-win32, unzip and add toPATHenvironment, or install it as follows:scoop install lrzszchoco install lrzsz -
If you want to temporarily enable the zmodem ( rz / sz ) feature, use
tssh --zmodemto log in. -
About the progress, the transferred and speed are not precise. It just indicating that the transfer is in progress.
-
You can use the
--upload-fileargument to specify file to upload directly in the command line, andcdto the save path and specify therzcommand with arguments after the server, such as:tssh --upload-file /path/to/file1 --upload-file /path/to/file2 xxx_server 'cd /tmp/ && rz -yeb' -
You can use
szin the command line to directly download files to your local computer. You can also use the--download-pathargument to specify the path for local saving, such as:tssh -t --client --zmodem --download-path /tmp/ xxx_server 'sz /path/to/file1 /path/to/file2'
-
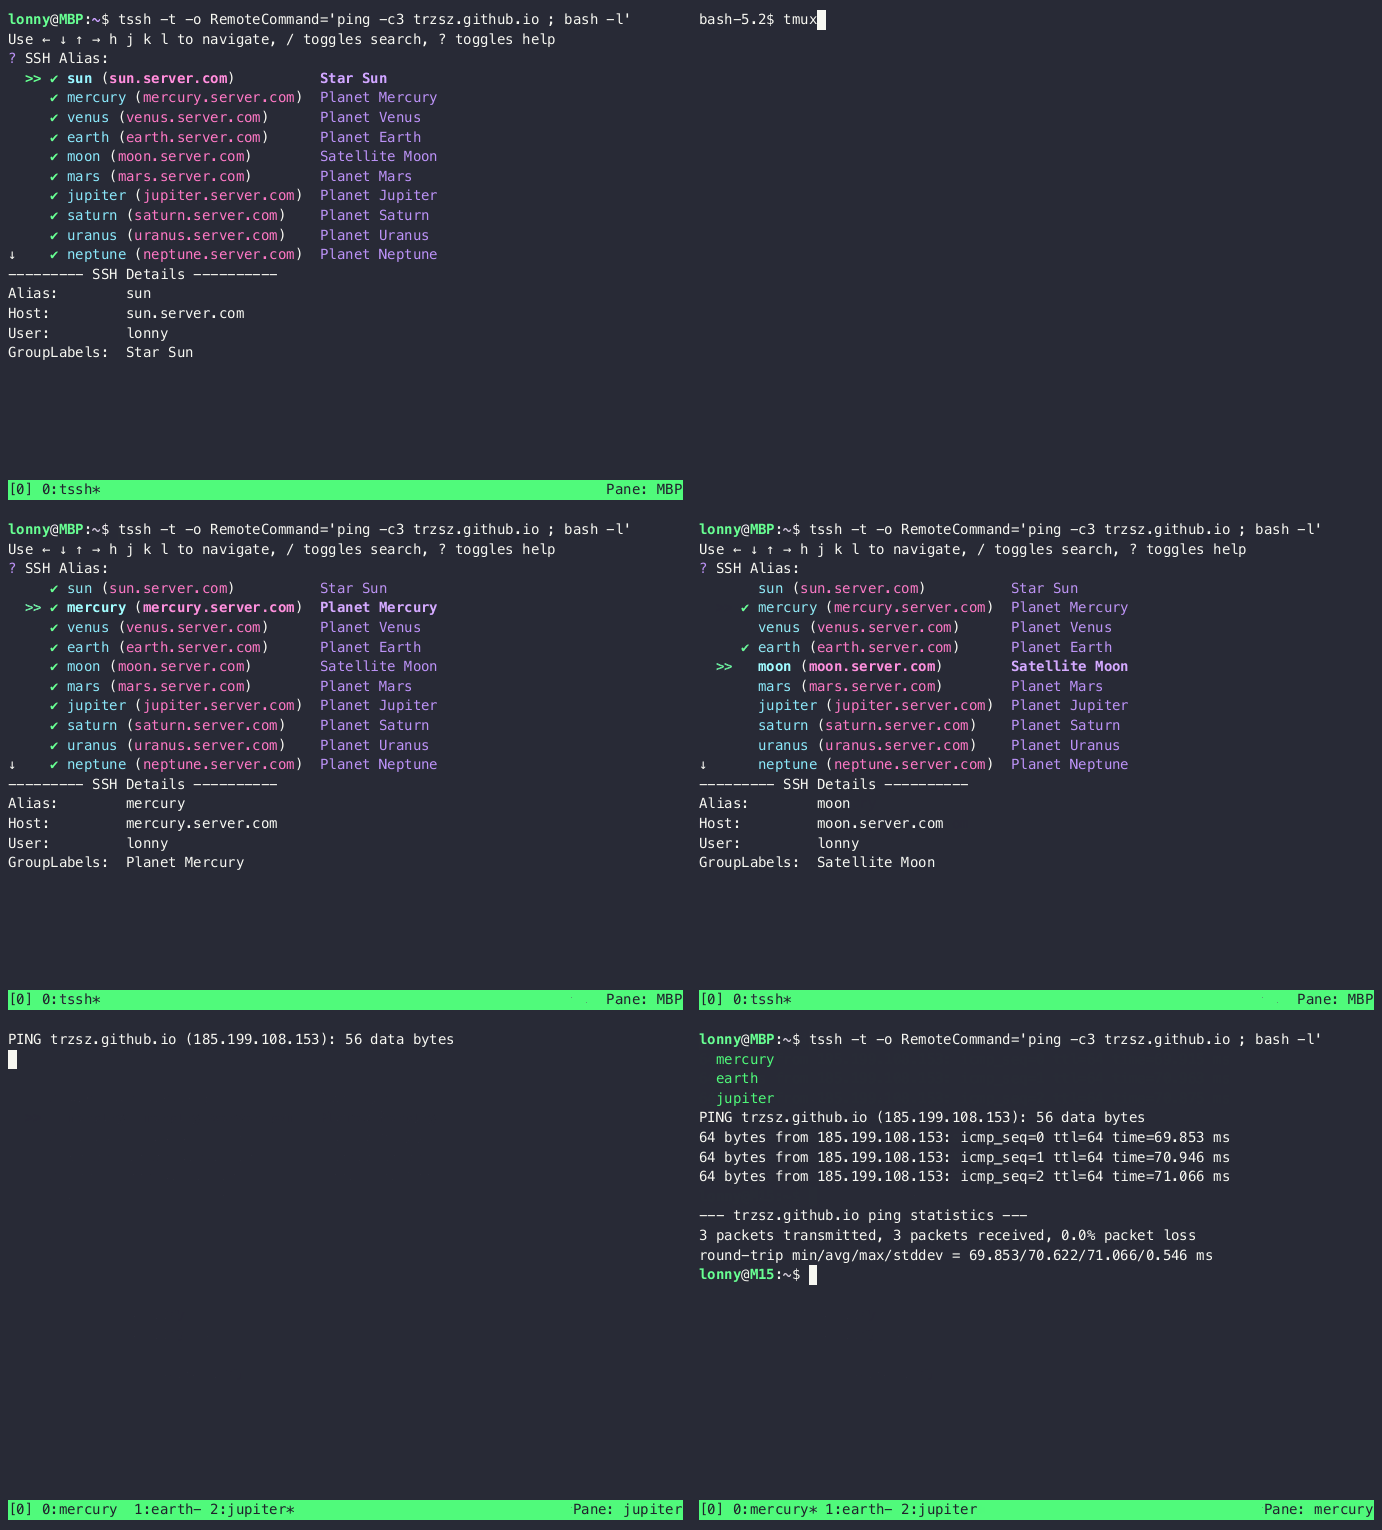
tssh supports selecting multiple servers in
iTerm2( Requires Python API, no need toAllow all apps to connect),tmuxandWindows Terminal, logging in to them in batches, and executing pre-specified commands in batches. -
Press
Space,xorCtrl+Xto toggle select the current host. If it cann't be selected, it means that the current terminal is not supported yet. Please runtmuxfirst. -
Press
aorCtrl+Ato select all the hosts on the current page,oorCtrl+Oto select the opposite hosts on the current page,dorlmove to next page. -
Press
porCtrl+Pwill split panes for batch login,worCtrl+Wwill open new windows for batch login,torCtrl+Twill open new tabs for batch login. -
Execute the
tsshcommand without arguments, you can log in to servers in batches. And you can specify the commands to be executed in batches by-o RemoteCommand. And you can switch to an interactive shell after executing the specified command.Windows Terminaldoes not support semicolon;, you can use|cat&&instead. For example:tssh -t -o RemoteCommand='ping -c3 trzsz.github.io ; bash -l' tssh -t -o RemoteCommand="ping -c3 trzsz.github.io |cat&& bash -l"
-
If there are a lot of servers,
GroupLabelscan be used to quickly find the target server when searching by/. -
After press
/and search for a group label, pressEnterto lock it. You can search for another group label by pressing/again, and pressEnterto lock it too. -
In non-search mode, press
Eto erase the current search group labels. In search mode, pressCtrl + Eto have the same effect. -
Supports configuring multiple group labels separated by spaces in one
GroupLabels. Supports configuring multipleGroupLabels. -
Supports configuring group labels on multiple Host nodes in the form of wildcard *, and
tsshwill summarize all the group labels.# The following testAA has group labels group1 group2 label3 label4 group5. Add `#!!` prefix to be compatible with openssh. Host test* #!! GroupLabels group1 group2 #!! GroupLabels label3 Host testAA #!! GroupLabels label4 group5
-
Supports automated interaction feature similar to
expect. After logging into the server, it automatically matches the server's output and then enters input accordingly.Host auto #!! ExpectCount 2 # Configures the number of automated interactions, default is 0 which means no automated interaction #!! ExpectTimeout 30 # Configures the timeout for automated interaction (in seconds), default is 30 seconds #!! ExpectPattern1 *assword # Configures the first automated interaction match expression # Configures the first automated input (encrypted). It was encoded by `tssh --enc-secret`, `tssh` will send \r (enter) automatically #!! ExpectSendPass1 d7983b4a8ac204bd073ed04741913befd4fbf813ad405d7404cb7d779536f8b87e71106d7780b2 #!! ExpectPattern2 hostname*$ # Configures the second automated interaction match expression #!! ExpectSendText2 echo tssh expect\r # Configures the second automated input (plaintext), specify \r to send enter # Choose either ExpectSendPass? or ExpectSendText? for each interaction; if both are configured, ExpectSendPass? has higher priority -
Before each
ExpectPattern?match, one or multiple optional matches can be configured as follows:Host case #!! ExpectCount 1 # Configures the number of automated interactions, default is 0 which means no automated interaction #!! ExpectPattern1 hostname*$ # Configures the first automated interaction match expression #!! ExpectSendText1 ssh xxx\r # Configures the first automated input, can also use ExpectSendPass1 then configure with encrypted text #!! ExpectCaseSendText1 yes/no y\r # Before matching ExpectPattern1, if encountering yes/no, then send y and enter #!! ExpectCaseSendText1 y/n yes\r # Before matching ExpectPattern1, if encountering y/n, then send yes and enter #!! ExpectCaseSendPass1 token d7... # Before matching ExpectPattern1, if encountering token, then decode d7... and send -
When the server's output is matched, generate the
totp2FA code, and send it:Host totp #!! ExpectCount 2 # Configures the number of automated interactions, default is 0 which means no automated interaction #!! ExpectPattern1 token: # Configures the first automated interaction match expression #!! ExpectSendTotp1 xxxxx # Configure the secret (plain text) of totp, generally obtained by scanning the QR code #!! ExpectPattern2 token: # Configures the second automated interaction match expression # The following ciphertext was generated by encoding the secret of totp with `tssh --enc-secret`. #!! ExpectSendEncTotp2 821fe830270201c36cd1a869876a24453014ac2f1d2d3b056f3601ce9cc9a87023 -
When the server's output is matched, execute the specified command to obtain the one-time password, and send it:
Host otp #!! ExpectCount 2 # Configures the number of automated interactions, default is 0 which means no automated interaction #!! ExpectPattern1 token: # Configures the first automated interaction match expression #!! ExpectSendOtp1 oathtool --totp -b xxxxx # Configure the command line to obtain the one-time password #!! ExpectPattern2 token: # Configures the second automated interaction match expression # The following ciphertext was generated by encoding `oathtool --totp -b xxxxx` with `tssh --enc-secret`. #!! ExpectSendEncOtp2 77b4ce85d087b39909e563efb165659b22b9ea700a537f1258bdf56ce6fdd6ea70bc7591ea5c01918537a65433133bc0bd5ed3e4 -
Some servers may not support sending data continuously. For example, sending
1\rrequires a slight delay after1before sending\r. You can use\|to separate them.Host sleep #!! ExpectCount 2 # Configures the number of automated interactions, default is 0 which means no automated interaction #!! ExpectSleepMS 100 # Number of milliseconds to sleep between separate inputs, default is 100ms #!! ExpectPattern1 x> # Configures the first automated interaction match expression #!! ExpectSendText1 1\|\r # Configures the first automated input, send 1, sleep 100ms, send \r. #!! ExpectPattern2 y> # Configures the second automated interaction match expression #!! ExpectSendText2 \|1\|\|\r # Configures the second automated input, sleep 100ms, send 1, sleep 200ms, send \r. -
Some servers may not support sending password continuously. Then you need to configure
ExpectPassSleep, which isnoby default, and can be configured aseachorenter:- Configuring
ExpectPassSleep eachwill sleep for a short period of time for each character send, the default is 100 milliseconds, and you can configureExpectSleepMSto adjust it. - Configuring
ExpectPassSleep enterwill only sleep for a short period of time before\rsend, the default is 100 milliseconds, and you can configureExpectSleepMSto adjust it.
- Configuring
-
If you don’t know how to configure
ExpectPattern2, you can first configureExpectCountto2, then usetssh --debugto log in, you will see the output captured byexpect, and you can directly copy the last part of the output to configureExpectPattern2. Replacing2with any other number will also work.
-
It is recommended to use public key authentication to log in. Please refer to openssh documentation.
-
If you can only log in with a password, it is recommended to at least set the permissions of the configuration file:
chmod 700 ~/.ssh && chmod 600 ~/.ssh/password ~/.ssh/config
-
The passwords configured below for
test1andtest2are123456, and the passwords for other aliases starting withtestare111111:# If configured in ~/.ssh/config, you can add `#!!` prefix to be compatible with openssh. Host test1 # The following ciphertext was generated by encoding `123456` with `tssh --enc-secret`. #!! encPassword 756b17766f45bdc44c37f811db9990b0880318d5f00f6531b15e068ef1fde2666550 # If configured in ~/.ssh/password, there is no need to consider whether it's compatible with openssh. Host test2 # The following ciphertext was generated by encoding `123456` with `tssh --enc-secret`. encPassword 051a2f0fdc7d0d40794b845967df4c2d05b5eb0f25339021dc4e02a9d7620070654b # ~/.ssh/config and ~/.ssh/password support wildcards, and tssh will use the first matched value. # Here we want test2 to use a different password from other test*, so we put test* behind test2. Host test* Password 111111 # supports plain text, but it is recommended to encrypt with `tssh --enc-secret`. -
- If
ControlMastermultiplexing is enabled or usingWarpterminal, you will need to use theAutomated Interactionmentioned earlier to achieve remembering password. Please refer to the earlierAutomated Interactionsection, simply add aCtrlprefix as follows:
Host ctrl #!! CtrlExpectCount 1 # Configure the number of automated interactions, typically only requires entering the password once #!! CtrlExpectPattern1 *assword # Configure the matching expression for the password prompt #!! CtrlExpectSendPass1 d7983b... # Configure the password encoded by `tssh --enc-secret` - If
-
Support remember
Passphrasefor private keys ( It's recommended to usessh-agent). Support configuringPassphrasetogether withIdentityFile. Support configuringPassphraseusing private key filename instead of host alias. For example:# Configuring Passphrase together with IdentityFile. Add `#!!` prefix to be compatible with openssh. Host test1 IdentityFile /path/to/id_rsa # The following ciphertext was generated by encoding `123456` with `tssh --enc-secret`. #!! encPassphrase 6f419911555b0cdc84549ae791ef69f654118d734bb4351de7e83163726ef46d176a # Configure the Passphrase corresponding to the private key ~/.ssh/id_ed25519 in ~/.ssh/config # The wildcard * can be added to prevent the filename from appearing in the tssh server list. Host id_ed25519* # The following ciphertext was generated by encoding `111111` with `tssh --enc-secret`. #!! encPassphrase 3a929328f2ab1be0ba3fccf29e8125f8e2dac6dab73c946605cf0bb8060b05f02a68 # If configured in ~/.ssh/password, the wildcard * is not required and will not appear in the server list. Host id_rsa Passphrase 111111 # supports plain text, but it is recommended to encrypt with `tssh --enc-secret`. -
Still ask for password after
Remember Password? Maybe it'skeyboard interactive authentication, please refer toRemember Answersbelow.
-
In addition, there is a keyboard interactive authentication. The server returns some questions, and log in by providing the correct answers. Many custom one-time passwords are implemented by it.
-
For those with one question and a fixed answer, just configure
QuestionAnswer1. For those with multiple questions, the answer to each question can be configured by serial number, or by the hex code of the question. -
Login with
tssh --debug, the hex code of the questions will be output, so that you will know how to configure with the hex code. For example:# If configured in ~/.ssh/config, add `#!!` prefix to be compatible with openssh. Host test1 # The following ciphertext was generated by encoding `TheAnswer1` with `tssh --enc-secret`. encQuestionAnswer1 4f6b79d0e4e48fc56ee29c61bd19559a322cd07f7d27f2a7f33978671be1b522d549252b22ee Host test2 # The following ciphertext was generated by encoding `TheAnswer1` with `tssh --enc-secret`. encQuestionAnswer1 09d6936c104f7bbd62e3b4dc43d746496a368776b85d37b1ce8cecc2ace1b920af0ca5a1812b QuestionAnswer2 TheAnswer2 # supports plain text, but it is recommended to encrypt with `tssh --enc-secret`. QuestionAnswer3 TheAnswer3 Host test3 # The `6e616d653a20` is the hex code of `name: `, the `enc` prefix indicates that it's ciphertext. # The following ciphertext was generated by encoding `my_name` with `tssh --enc-secret`. enc6e616d653a20 775f2523ab747384e1661aba7779011cb754b73f2e947672c7fd109607b801d70902d1 636f64653a20 my_code # The `636f64653a20` is the hex code of `code: `, `my_code` is plain answer. -
For
totp2FA code, you can configure them as follows (configure by serial number or hex code of the question):Host totp TotpSecret1 xxxxx # Configure the secret (plain text) of totp by serial number totp636f64653a20 xxxxx # Configure the secret of totp by the hex code of the question `code: ` that is `636f64653a20` # The following ciphertext was generated by encoding the secret of totp with `tssh --enc-secret`. Add the `enc` prefix for configuration. encTotpSecret2 8ba828bd54ff694bc8c4619f802b5bed73232e60a680bbac05ba5626269a81a00b enctotp636f64653a20 8ba828bd54ff694bc8c4619f802b5bed73232e60a680bbac05ba5626269a81a00b -
For one-time password that can be obtained by the command line, you can configure them as follows (configure by serial number or hex code of the question):
Host otp OtpCommand1 oathtool --totp -b xxxxx # Configure the command line to obtain the one-time password by serial number otp636f64653a20 oathtool --totp -b xxxxx # Configure the command line by the hex code of the question `code: ` that is `636f64653a20` # The following ciphertext was generated by encoding `oathtool --totp -b xxxxx` with `tssh --enc-secret`. Add the `enc` prefix for configuration. encOtpCommand2 77b4ce85d087b39909e563efb165659b22b9ea700a537f1258bdf56ce6fdd6ea70bc7591ea5c01918537a65433133bc0bd5ed3e4 encotp636f64653a20 77b4ce85d087b39909e563efb165659b22b9ea700a537f1258bdf56ce6fdd6ea70bc7591ea5c01918537a65433133bc0bd5ed3e4 -
You can write a program to obtain the one-time password. Specify the
%qargument if you want to get the question. Just output the one-time password to stdout and exit with 0, and the debugging information can be output to stderr (you can see it when runningtssh --debug). Configuration example (the serial number represents the number of questions, generally there is only one question, just configureOtpCommand1):Host custom_otp_command #!! OtpCommand1 /path/to/your_own_program %q #!! OtpCommand2 python C:\your_python_code.py %q -
If
ControlMastermultiplexing is enabled or usingWarpterminal, you will need to use theAutomated Interactionmentioned earlier to achieve remembering answers.Host ctrl_totp #!! CtrlExpectCount 1 # Configure the number of automated interactions #!! CtrlExpectPattern1 code: # Configure the matching expression for the password prompt (totp 2FA) #!! CtrlExpectSendTotp1 xxxxx # Configure the secret (plain text) of totp, generally obtained by scanning the QR code #!! CtrlExpectSendEncTotp1 622ada31cf... # Or configure the encrypted secret of totp encoded using `tssh --enc-secret` Host ctrl_otp #!! CtrlExpectCount 1 # Configure the number of automated interactions #!! CtrlExpectPattern1 token: # Configure the matching expression for the password prompt (one-time password) #!! CtrlExpectSendOtp1 oathtool --totp -b xxxxx # Configure the command line to obtain the one-time password #!! CtrlExpectSendEncOtp1 77b4ce85d0... # Or configure the encrypted command line encoded using `tssh --enc-secret`
-
The following custom configurations are supported in
~/.tssh.conf(C:\Users\your_name\.tssh.confon Windows):# SSH configuration path, the default is ~/.ssh/config ConfigPath = ~/.ssh/config # Extended configuration path, the default is ~/.ssh/password ExConfigPath = ~/.ssh/password # The default path of the file dialog for trz uploading, the default is empty which opening the last path. DefaultUploadPath = ~/Downloads # The automatically save path for tsz downloading, the default is empty which poping up a folder dialog. DefaultDownloadPath = ~/Downloads # The global drag file upload command, note that the priority configured in ~/.ssh/config is higher. DragFileUploadCommand = trz -y # The trzsz progress bar will gradient from the first color to the second color. Don't include `#`. ProgressColorPair = B14FFF 00FFA3 # When searching and selecting servers with tssh, the theme and colors. PromptThemeLayout = simple PromptThemeColors = {"active_host": "magenta|bold", "inactive_host": "magenta"} # When searching and selecting servers with tssh, the number of records displayed on each page, the default is 10. PromptPageSize = 10 # When searching and selecting servers with tssh, default is normal mode similar to vim. Configure to search mode as follows: PromptDefaultMode = search # When searching and selecting servers with tssh, the items displayed in details. The default is as follows: PromptDetailItems = Alias Host Port User GroupLabels IdentityFile ProxyCommand ProxyJump RemoteCommand # When searching and selecting servers with tssh, you can customize the cursor and selected icon: PromptCursorIcon = 🧨 PromptSelectedIcon = 🍺 # Auto set terminal title after login. It will not be reset after exiting. Please set PROMPT_COMMAND in local shell. SetTerminalTitle = Yes
-
The comments in the
tsshconfiguration are basically the same asopenssh, with some additional extended support, see the following table for details:Comments openssh tssh Starting with #Is a comment Is a comment Starting with #!!Is a comment Not a comment Key Value # CommentIt depends Is a comment Key=Value # CommentIt depends Not a comment -
Configuration starting with
#are always considered byopensshto be a comment;tsshconsiders configuration starting with#!!not to be a comment, and other configurations starting with#are comments. -
Key Value # Commentconfiguration (without=sign),opensshconsiders the content after#to be a comment in some cases, and considers it not to be a comment in some other cases;tsshalways considers the content after#to be a comment. -
Key=Value # Commentconfiguration (with=sign),opensshconsiders the content after#to be a comment in some cases, and considers it not to be a comment in some other cases;tsshalways considers the content after#not to be a comment.
-
In the
~/.ssh/configorExConfigPathconfiguration file, configureEnableOSC52toYesto enable the clipboard integration feature.Host * # If configured in ~/.ssh/config, add `#!!` prefix to be compatible with openssh. EnableOSC52 Yes -
Clipboard integration allows remote servers to write to the local clipboard via OSC52 sequences.
-
On Linux, clipboard integration requires
xcliporxselcommand to be installed.
-
Use
-fto run in the background, you can add--reconnect, it will automatically reconnect when the background process exits. -
Run
tssh --enc-secret, enter the password or answer, and you can get the ciphertext for configuration (the encryption result for the same password is different each time):- The
remember passwordandremember answermentioned above can be configured as ciphertext by addingencprefix to prevent screen snooping. - If the password contains special characters such as
#, you have to configure it with ciphertext.
Host server2 # If configured in ~/.ssh/config, add `#!!` prefix to be compatible with openssh. encPassword de88c4dbdc95d85303682734e2397c4d8dd29bfff09ec53580f31dd40291fc8c7755 encQuestionAnswer1 93956f6e7e9f2aef3af7d6a61f7046dddf14aa4bbd9845dbb836fe3782b62ac0d89f - The
-
Run
tssh --new-hostto easily add SSH configuration in the TUI interface, and you can log in immediately after completion. -
Run
tssh --install-trzszto install trzsz to the server automatically.- It is installed to the
~/.local/bin/directory by default. You can specify the installation directory through--install-path /path/to/install. - If the
--install-pathinstallation directory contains~/, single quotes must be added, such as--install-path '~/path'. - If obtaining the latest version of
trzszfails, you can specify it through--trzsz-version x.x.x. - If downloading the
trzszinstallation package fails, you can download and specify it through--trzsz-bin-path /path/to/trzsz.tar.gz. - Note:
--install-trzszdoes not support Windows server, and does not support jump server (unless usingProxyJump).
- It is installed to the
-
About changing the terminal title, it can be achieved without
tssh. It only needs to be configured in the server's shell configuration file (such as~/.bashrc):# Set fixed server title PROMPT_COMMAND='echo -ne "\033]0;Fixed server title\007"' # Dynamically changing title based on environment variables PROMPT_COMMAND='echo -ne "\033]0;${USER}@${HOSTNAME}: ${PWD}\007"'
- If
SetTerminalTitle = Yesis set in~/.tssh.conf, the terminal title is automatically set after login, butPROMPT_COMMANDon the server overrides the title set bytssh. tsshdoes not reset to the original title after exiting, you need to setPROMPT_COMMANDin the local shell so that it overrides the title set bytssh.
- If
-
Install tsshd on the server, use
tssh --udp xxxto login to the server, or configure as follows to omit--udp:Host xxx #!! UdpMode yes #!! UdpPort 61000-62000 #!! TsshdPath ~/go/bin/tsshd -
The
tsshplays the role ofsshon the client side, and thetsshdplays the role ofsshdon the server side. -
The
tsshwill first login to the server normally as an ssh client, and then run a newtsshdprocess on the server. -
The
tsshdprocess listens on a random udp port between 61000 and 62000 (can be customized byUdpPort), and sends its port number and a secret key back to thetsshprocess over the ssh channel. The ssh connection is then shut down, and thetsshprocess communicates with thetsshdprocess over udp. -
The
tsshdsupportsQUICprotocol andKCPprotocol (the default isQUIC), which can be specified on the command line (such as-oUdpMode=KCP), or configured as follows:Host xxx #!! UdpMode KCP
-
In the Warp terminal, the features like blocks requires renaming
tsshtossh. It is recommended to create a soft link (friendly for updates):sudo ln -sv $(which tssh) /usr/local/bin/ssh-
After the soft link,
ssh -Vshould outputtrzsz sshplus the version number. If not, it means that the soft link is unsuccessful, oropensshhas a higher priority inPATH, and you need to soft link to another path or adjust the priority ofPATH. -
In order to make
tsshsearch login also support the blocks feature, you need to create atsshfunction in~/.bash_profile( bash ) or~/.zshrc( zsh ):tssh() { if [ $# -eq 0 ]; then ssh FAKE_DEST_IN_WARP else ssh "$@" fi }
-
The
--dragfileargument may disable the Warp features, please refer to the previous section to configureEnableDragFileto enable the drag and drop to upload feature. -
After dragging files and directories into the Warp terminal, the upload may not be triggered immediately. You need to press the
Enterkey once to make it upload.
-
-
If you are using Windows7 or an older version of Windows10, and getting an error
enable virtual terminal failed. -
If the
tsshspecific configuration items are configured in~/.ssh/config, and openssh report an errorBad configuration option.- You can add
#!!prefix to the items, openssh will treat it as a comment, whiletsshwill treat it as one of the valid configurations.
- You can add
Feel free to email the author lonnywong@qq.com, or create an issue. Welcome to join the QQ group: 318578930.
❤️ Sponsor trzsz ❤️, buy the author a drink 🍺 ? Thank you for your support!


