Advanced usage
In this section, we will describe some more advanced features of XMI-MSIM, which may useful for some users with specific needs.
- X-ray sources
- Batch simulations
- Generate XRMC input-files
- Using the XMI-MSIM API from Python
- Custom detector response functions
In the Excitation section, we have shown how one can introduce the necessary components of the X-ray excitation spectrum, through a number of discrete energies and intervals of continuous energies. XMI-MSIM tries to facilitate the process of defining the excitation spectrum through its X-ray sources dialog, which can be invoked by clicking the corresponding button (with the radiation warning symbol) in the toolbar. Currently two types of sources can be defined this way: X-ray tubes and radionuclides. Switching between both types can be accomplished easily by clicking on the desired tab in the dialog. It is possible to add user-defined sources to this dialog by writing custom plug-ins. Documentation on how to do this will be added soon.
After adjusting the required parameters of the selected source, click Update spectrum to obtain a new excitation spectrum in the plot window. Using Export spectrum, it is possible to save the generated spectrum to an ASCII file, while Save image will allow the user to save the plot window to an image file. Clicking About will display some information regarding the origins of the model or dataset. Using the Ok button one can close the window while replacing the contents of the Excitation section with the newly generated spectrum.
In many cases, one will perform X-ray experiments using an X-ray tube generator as source, which corresponds to a combination of discrete part (the anode element specific XRF lines) and a continuous part (the Bremsstrahlung generated through electron-nucleus interactions). Such excitation spectra are typically quite difficult to obtain experimentally and instead one relies quite often on theoretical calculations to obtain (an approximation) of the spectrum. One popular model is the one derived by Horst Ebel in his manuscripts X-ray Spectrometry 28 (1999), 255-266 and X-ray Spectrometry 32 (2003), 46-51. XMI-MSIM's implementation of this model is based on the similar dialog in PyMca. The X-ray tube dialog should be similar to the following screenshot (click the X-ray tube tab if the Radionuclide panel showing):
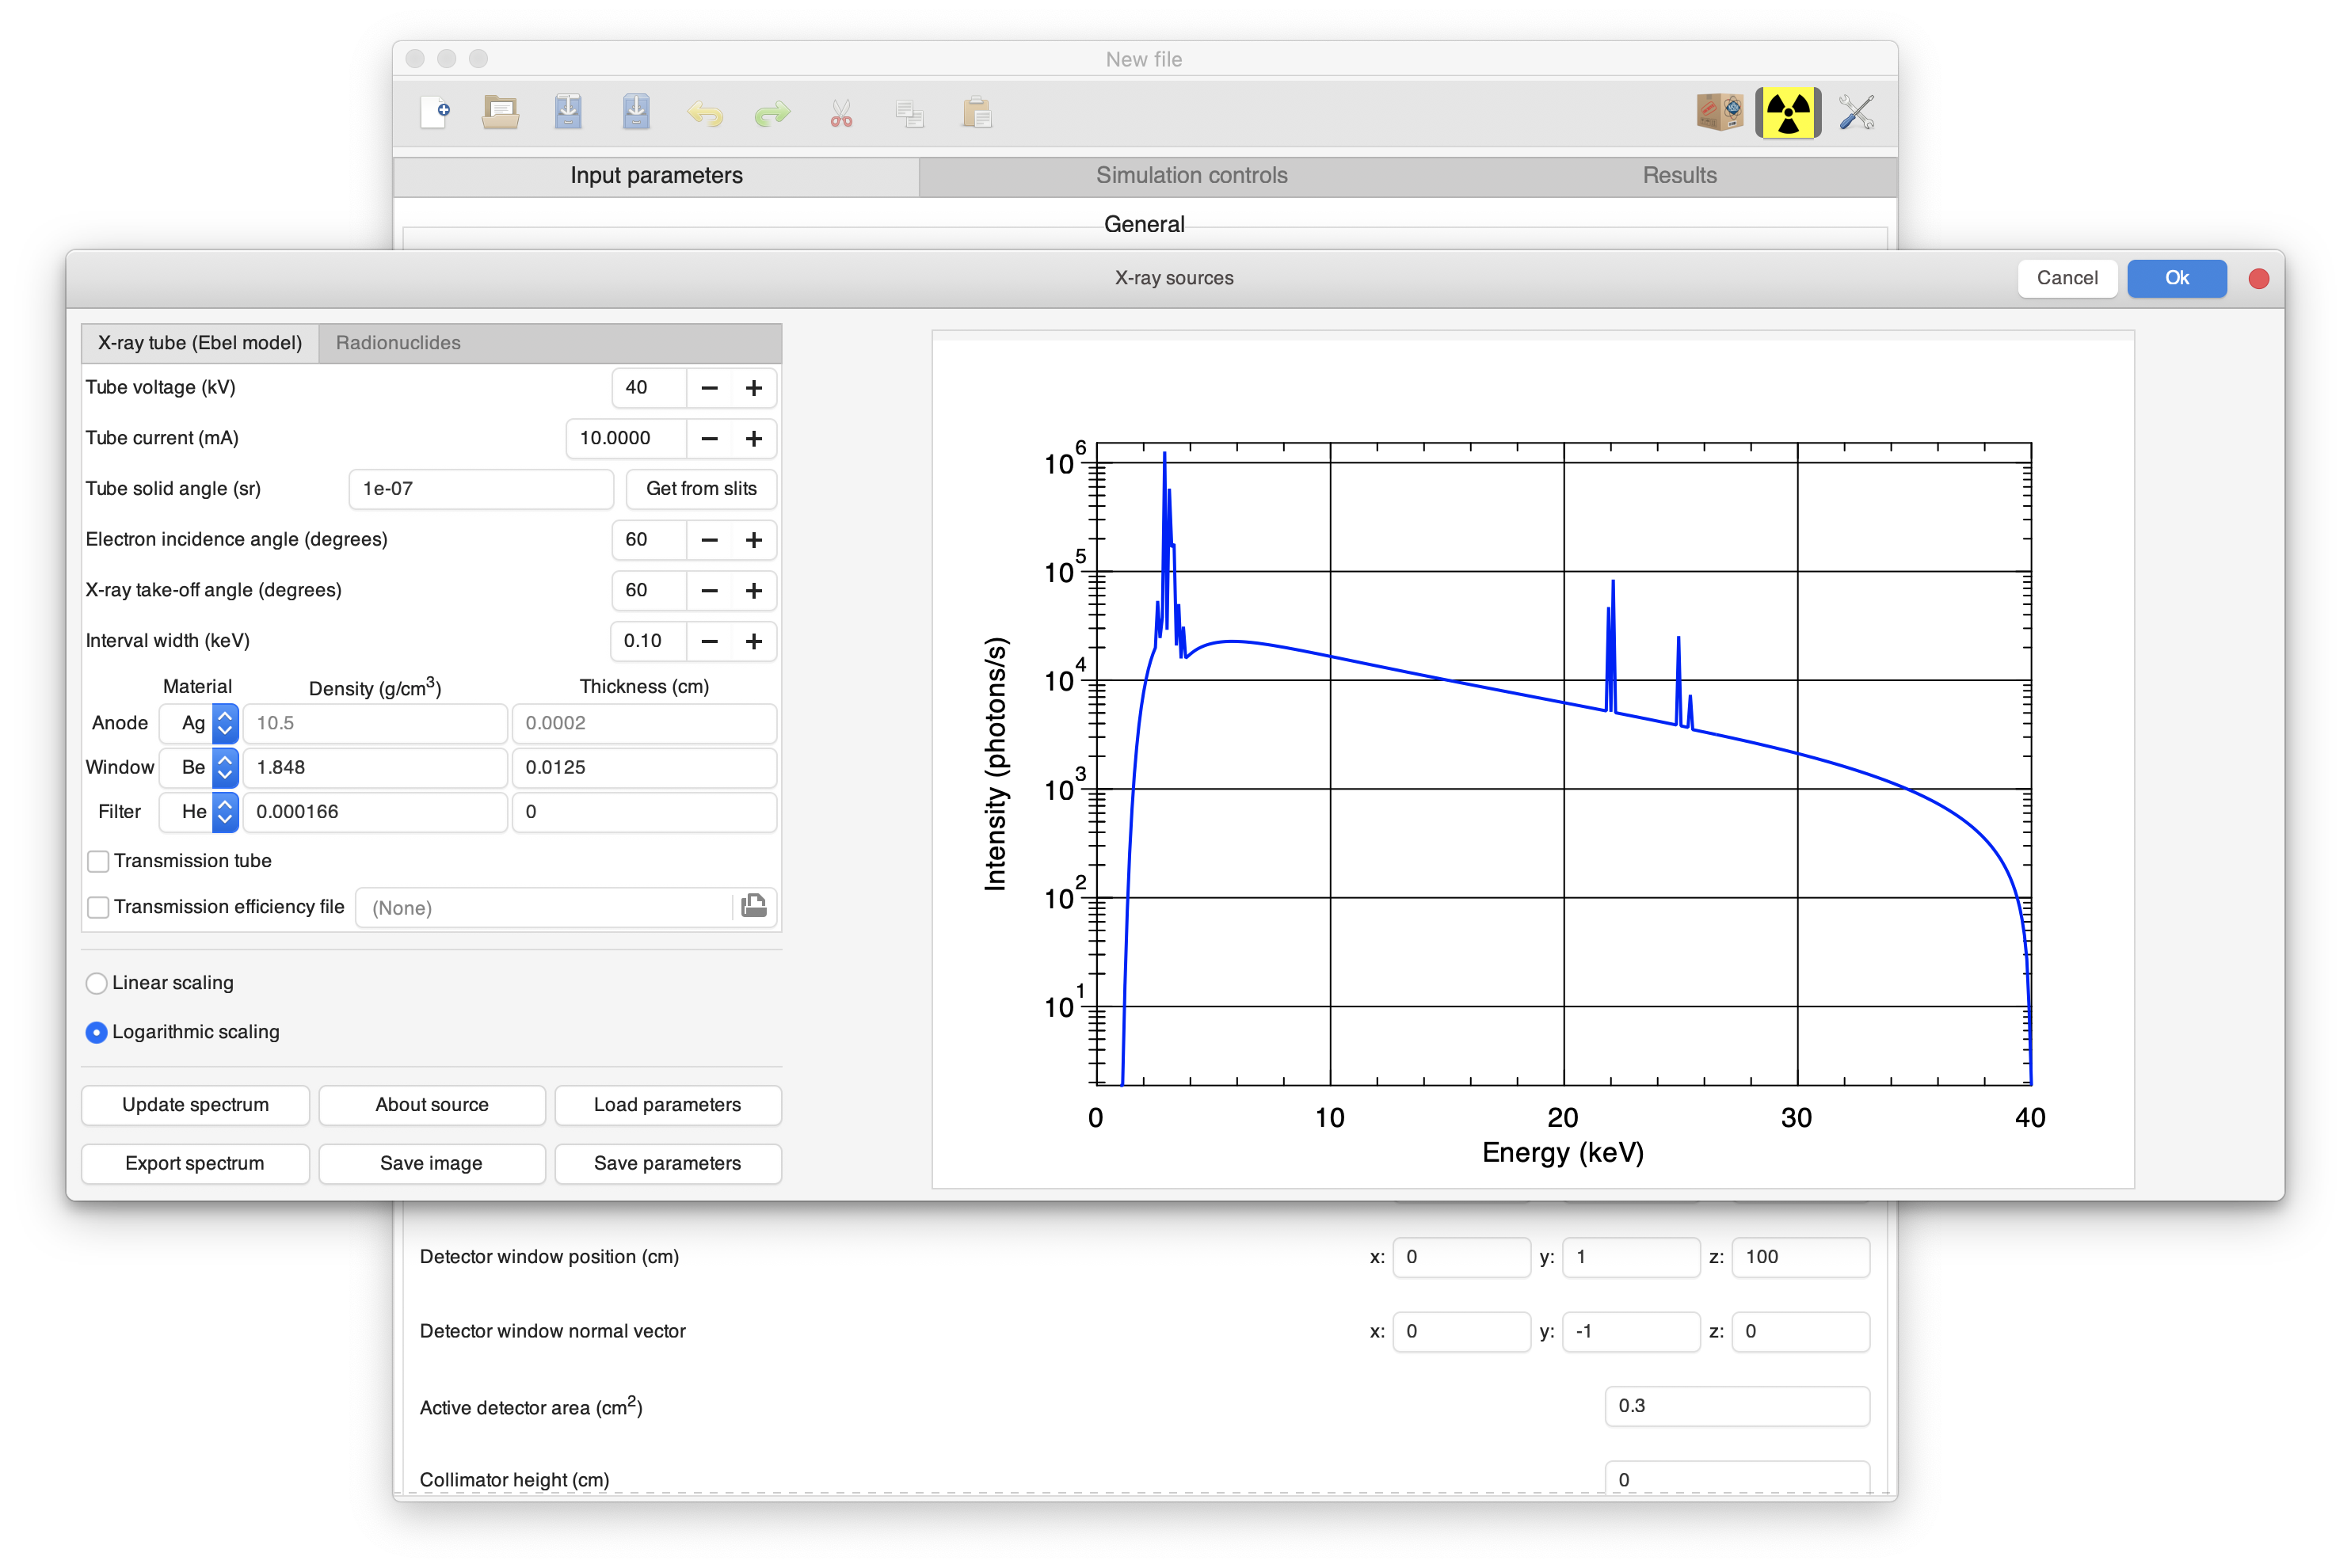
By changing the different parameters to values appropriate for the X-ray tube that the user would like to simulate, one obtains an approximate model for the corresponding X-ray tube excitation spectrum. The following parameters can be changed:
- Tube voltage: the voltage in kV at which the X-ray tube is supposed to operate. This will determine the extent of the Bremsstrahlung contribution and through this which XRF lines (discrete energies) that will be present in the spectrum.
- Tube current: the current in mA at which the X-ray tube is supposed to operate. The this value is directly proportional to the intensity of the spectrum components.
- Tube solid angle: the solid angle in sr (steradian) under which the beam emerges from the X-ray tube. The default value here is determined by the Source-slits distance and the Slits size, taken from the [Geometry section].
- Electron incidence angle and X-ray tube take-off angle: X-ray tube geometry parameters
- Interval width: the width of the continuous energy intervals of Bremsstahlung part of the spectrum. Decreasing this value will lead to a better simulation, but will increase the computational time.
- Anode: the material that the tube anode is made of. The density and the thickness become sensitive when Transmission tube is activated.
- Window and Filter: tube filtration materials. Set the thickness and/or the density to zero to ignore.
- Transmission tube: activating this option effectively places the tube exit-window on the opposite side of the anode with respect to the cathode, thereby operating in transmission mode.
- Transmission efficiency file: it is possible to load a two column ASCII file (first column energies and second column efficiencies between 0 and 1), with at least 10 lines that will be used to multiply the generated intensities and intensity densities with using interpolation of the supplied efficiencies.
A second type of X-ray sources offered by XMI-MSIM concerns radionuclides. Through xraylib's radionuclide API, one can gain access to the excitation profiles (X- and gamma-rays) of several radionuclides that are commonly used as X-ray sources. After clicking on the Radionuclide tab, the following dialog should be visible:
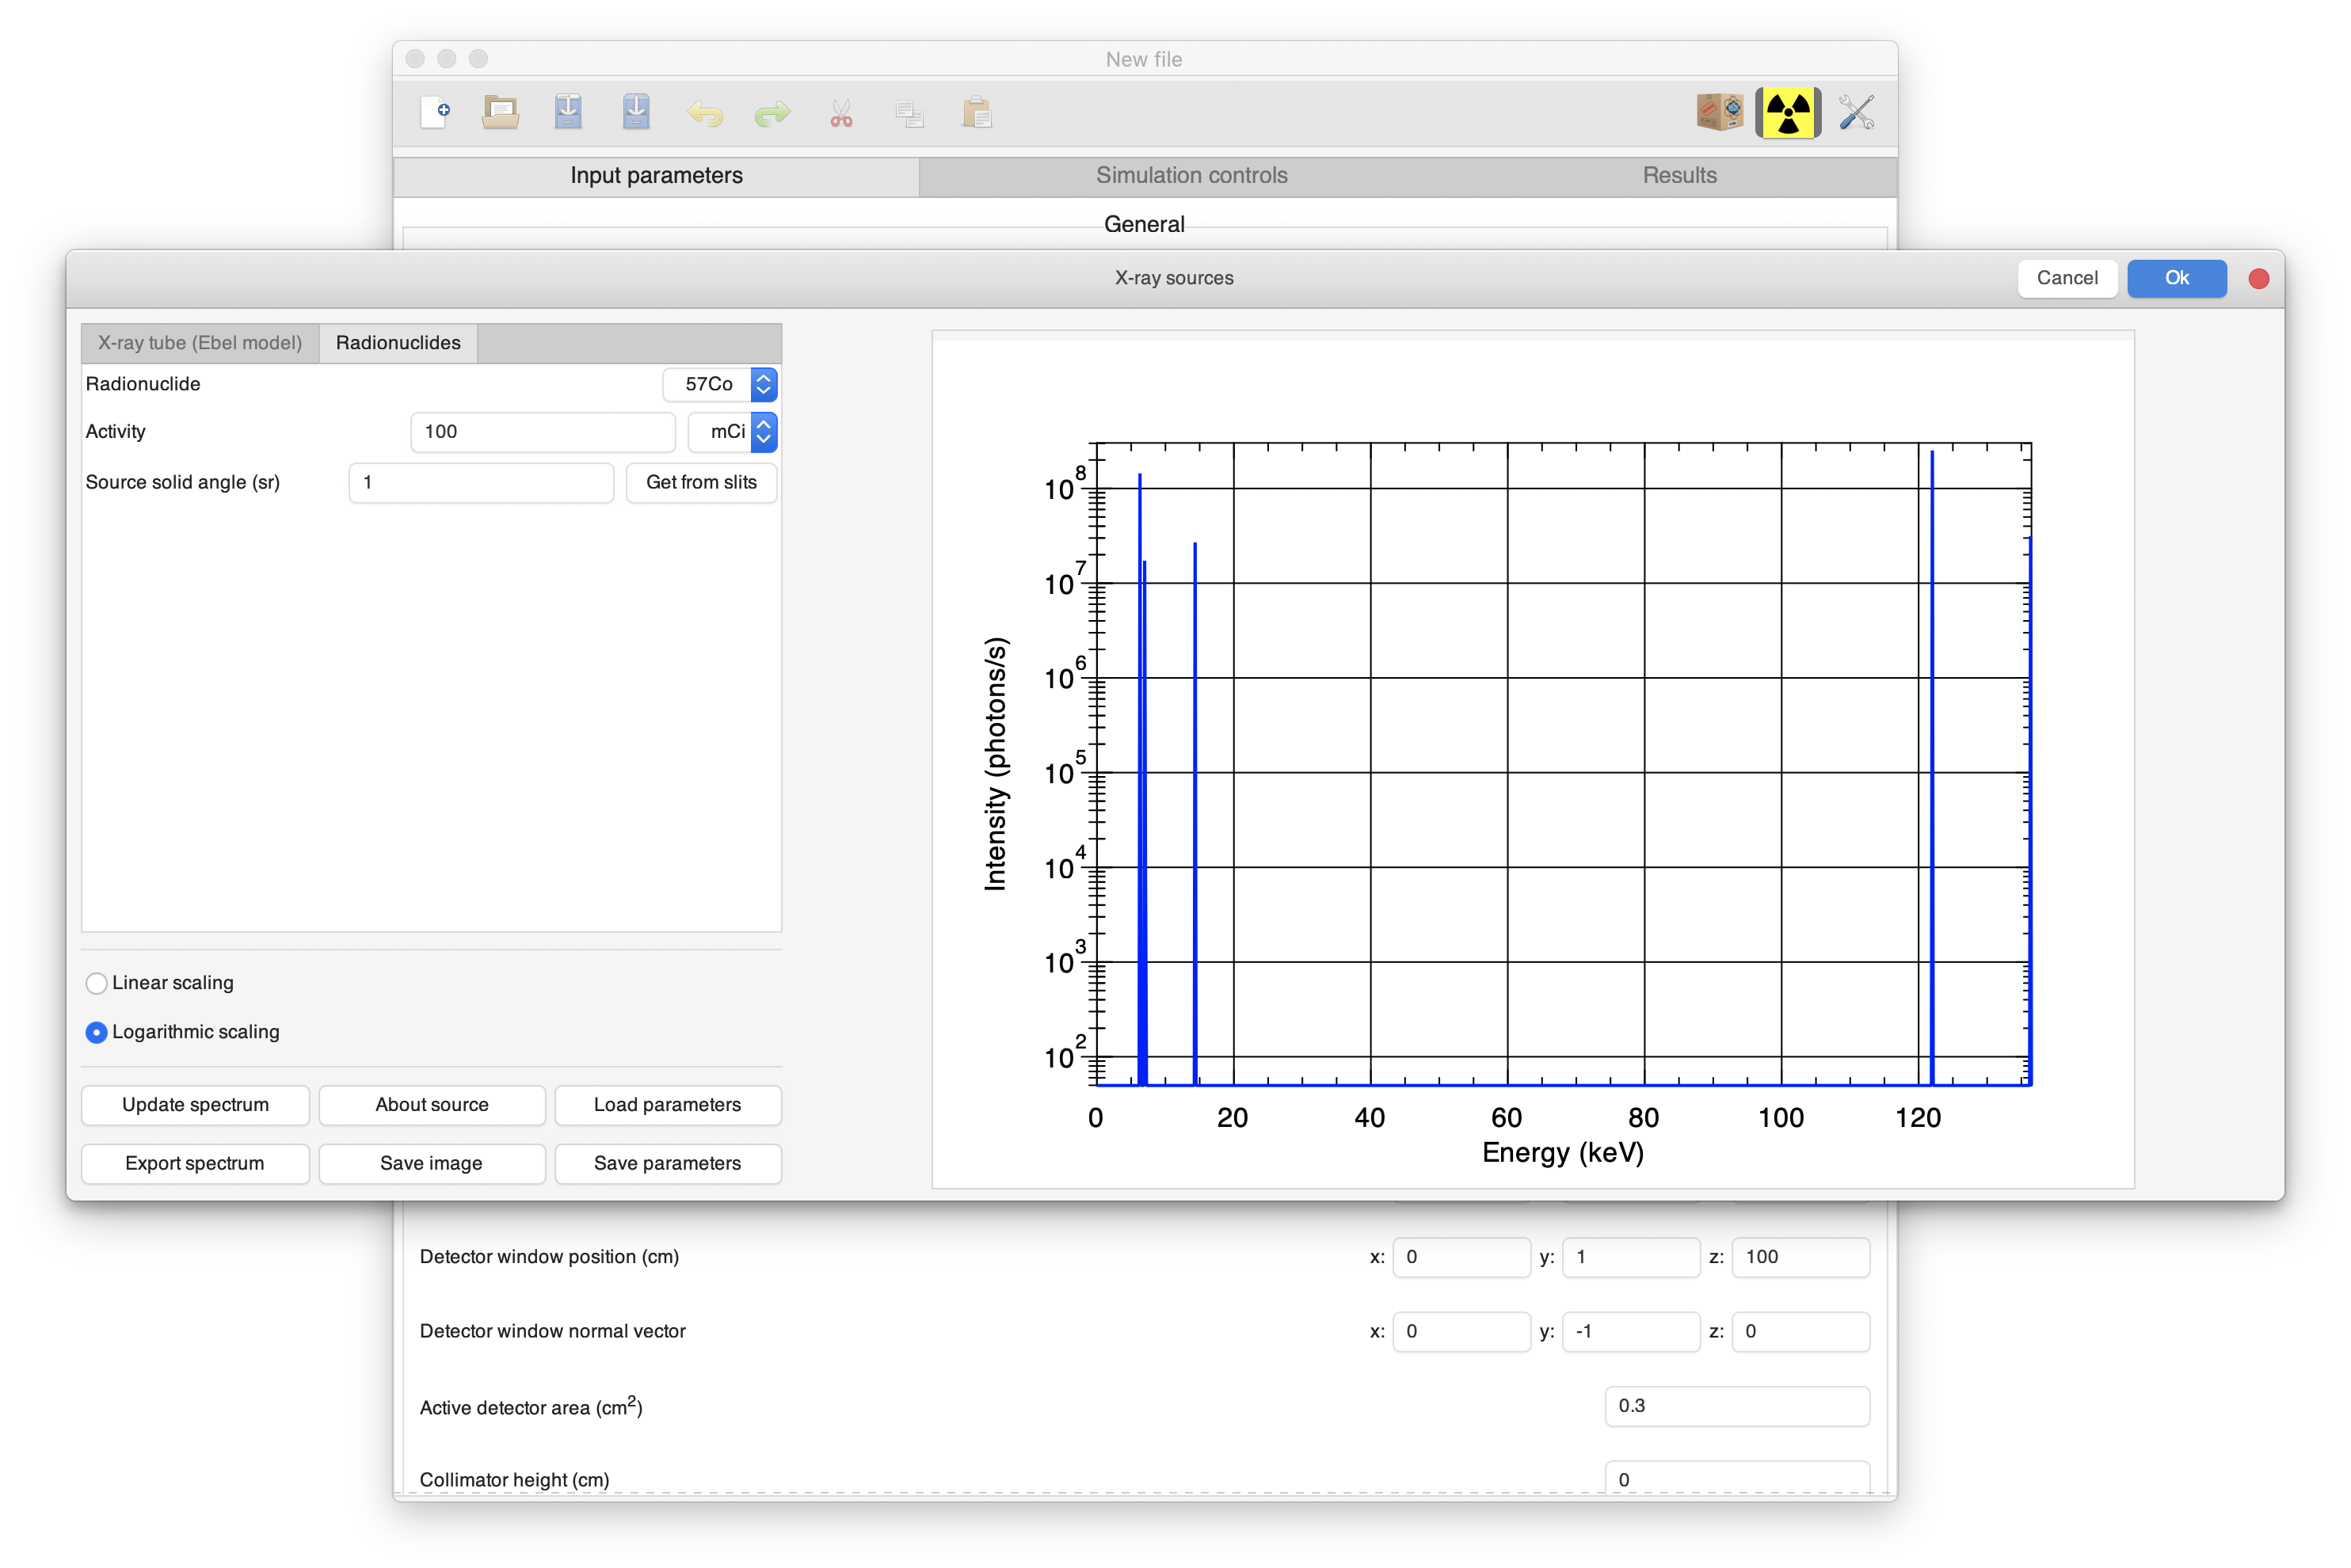
The following parameters will determine the excitation spectrum:
- Radionuclide: select the desired radionuclide
- Activity: set the activity (disintegrations per second) of the radionuclide, as well as its unit (mCi, Ci, Bq, GBq)
Clicking the Ok button will produce a dialog asking whether to add the radionuclide to the excitation spectrum or to replace it entirely. Clicking Add allows the user ultimately to define a source composed of several radionuclides, which may be useful when the different sources are positioned on a ring, positioned perpendicular to the detector axis.
The two aforementioned sources are implemented as libpeas plugins, written in C, and are derived from the abstract base class [XmiMsimGuiSourceAbstract](https://github.com/tschoonj/xmimsim/blob/master/bin/xmimsim-gui-source-abstract.h). While it is certainly possible to write new plug-ins in C or C++ that extend this class, this is certainly not trivial. Interested parties may want to have a look at the source code of the X-ray tube, radionuclide plug-ins, as well as the random spectrum example.
I recommend instead to write plugins in Python 3, which is made possible through GObject-Introspection and PyGobject. Large parts of the exposed libxmimsim and libxmimsim-gui API can be called directly from Python, in a manner that will feel familiar to Python coders.
An example (which is part of the examples folder of the installation) follows:
from gi.repository import XmiMsimGui, XmiMsim, Gtk, GLib
import sys
import numpy as np


class TestSource(XmiMsimGui.SourceAbstract):
    # Optional, will not affect GUI in any way if left out...
    __gtype_name__ = "TestSourcePython"

    # initialize parent first, and add GUI elements
    def __init__(self):
        XmiMsimGui.SourceAbstract.__init__(self)
        print("Calling __init__")
        button = Gtk.Button.new_with_label("Click me!")
        self.add(button)
        self.counter = 1000

    # source name: this will end up in the tab label
    def do_get_source_name(self):
        return "Python Source"

    # the about text: will be shown in the Source About Dialog
    def do_get_about_text(self):
        return "This could very well be some clever text about this source"

    # this method is executed whenever "Update Spectrum" is clicked
    def do_generate(self):
        print("Calling do_generate")
        # if something goes wrong: initialize a new GLib.Error instance and send it along with the after-generate signal
        #    error = GLib.Error.new_literal(XmiMsimGui.SourceAbstractError.quark(), "Error message from Python!", XmiMsimGui.SourceAbstractError.INVALID_FILENAME)
        #    self.emit("after-generate", error)
        #    return
        x = np.linspace(1.0, 50.0, num=2000, dtype=np.double)
        y = self.counter * np.exp(-1.0 * (x - 20.0) * (x - 20.0) / 2.0) / np.sqrt(2.0 * np.pi)
        y[y < 1.0] = 1.0
        self.counter += 100

        excitation = XmiMsim.Excitation.new(discrete=[XmiMsim.EnergyDiscrete.new(20.0, 1E9, 1E9, 0.0, 0.0, 0.0, 0.0, XmiMsim.EnergyDiscreteDistribution.MONOCHROMATIC, 0.0)])

        # this updates the source internal data: raw, plot_x, and plot_y
        self.set_data(excitation, x.tolist(), y.tolist())

        # afterwards emit after-generate with None argument to update the plot window
        self.emit("after-generate", None)
As shown in this example, the class you define (TestSource here...), must extend XmiMsimGui.SourceAbstract. The class must implement 4 methods:
-
__init__: the constructor, which should be used to define the GUI elements that will be added to the GUI, as well as initialize any member variables you may need.XmiMsimGui.SourceAbstractsextends [Gtk.Box], so you will need to use its API to add new widgets to it. -
do_get_source_name: This method must return a string containing a short name of the source, and will be used to populate the tab label. -
do_get_about_text: This method must return a string with a (long) description of the source. It will be displayed when in the dialog that is shown after clicking the About button. -
do_generate: This method gets called whenever the Update spectrum button is clicked, and is meant to extract the currently introduced information from the widgets that were added by the constructor. Based on this data, if valid (write code to check!), create a newXmiMsim.Excitationobject, as well as two Python lists of doubles that will contain the X- and Y-values that will be plotted. Ensure that the Y-values are greater than zero, as they may be plotted logarithmically. Afterwards, call theset_datamethod on the source object, followed by an emission of theafter-generatesignal to trigger an update the plot window. If the data is invalid, aGLib.Errorobject should be instantiated, followed by the error object being added to anafter-generatesignal emission.
I strongly recommend that people with no experience in coding Gtk based apps in Python, to have a look at this tutorial.
When you have written a source plug-in, make sure to copy to it to Documents\XMI-MSIM\sources in your home directory, which will be searched at run-time for usable source plug-ins. It is not sufficient to merely copy the Python source file, you will also need to write a short .plugin file that will contain the following:
[Plugin]
Module=test-source
Name=Test source
Loader=python3
Important here is that the name of the Python source file, without its .py extension is assigned to Module.
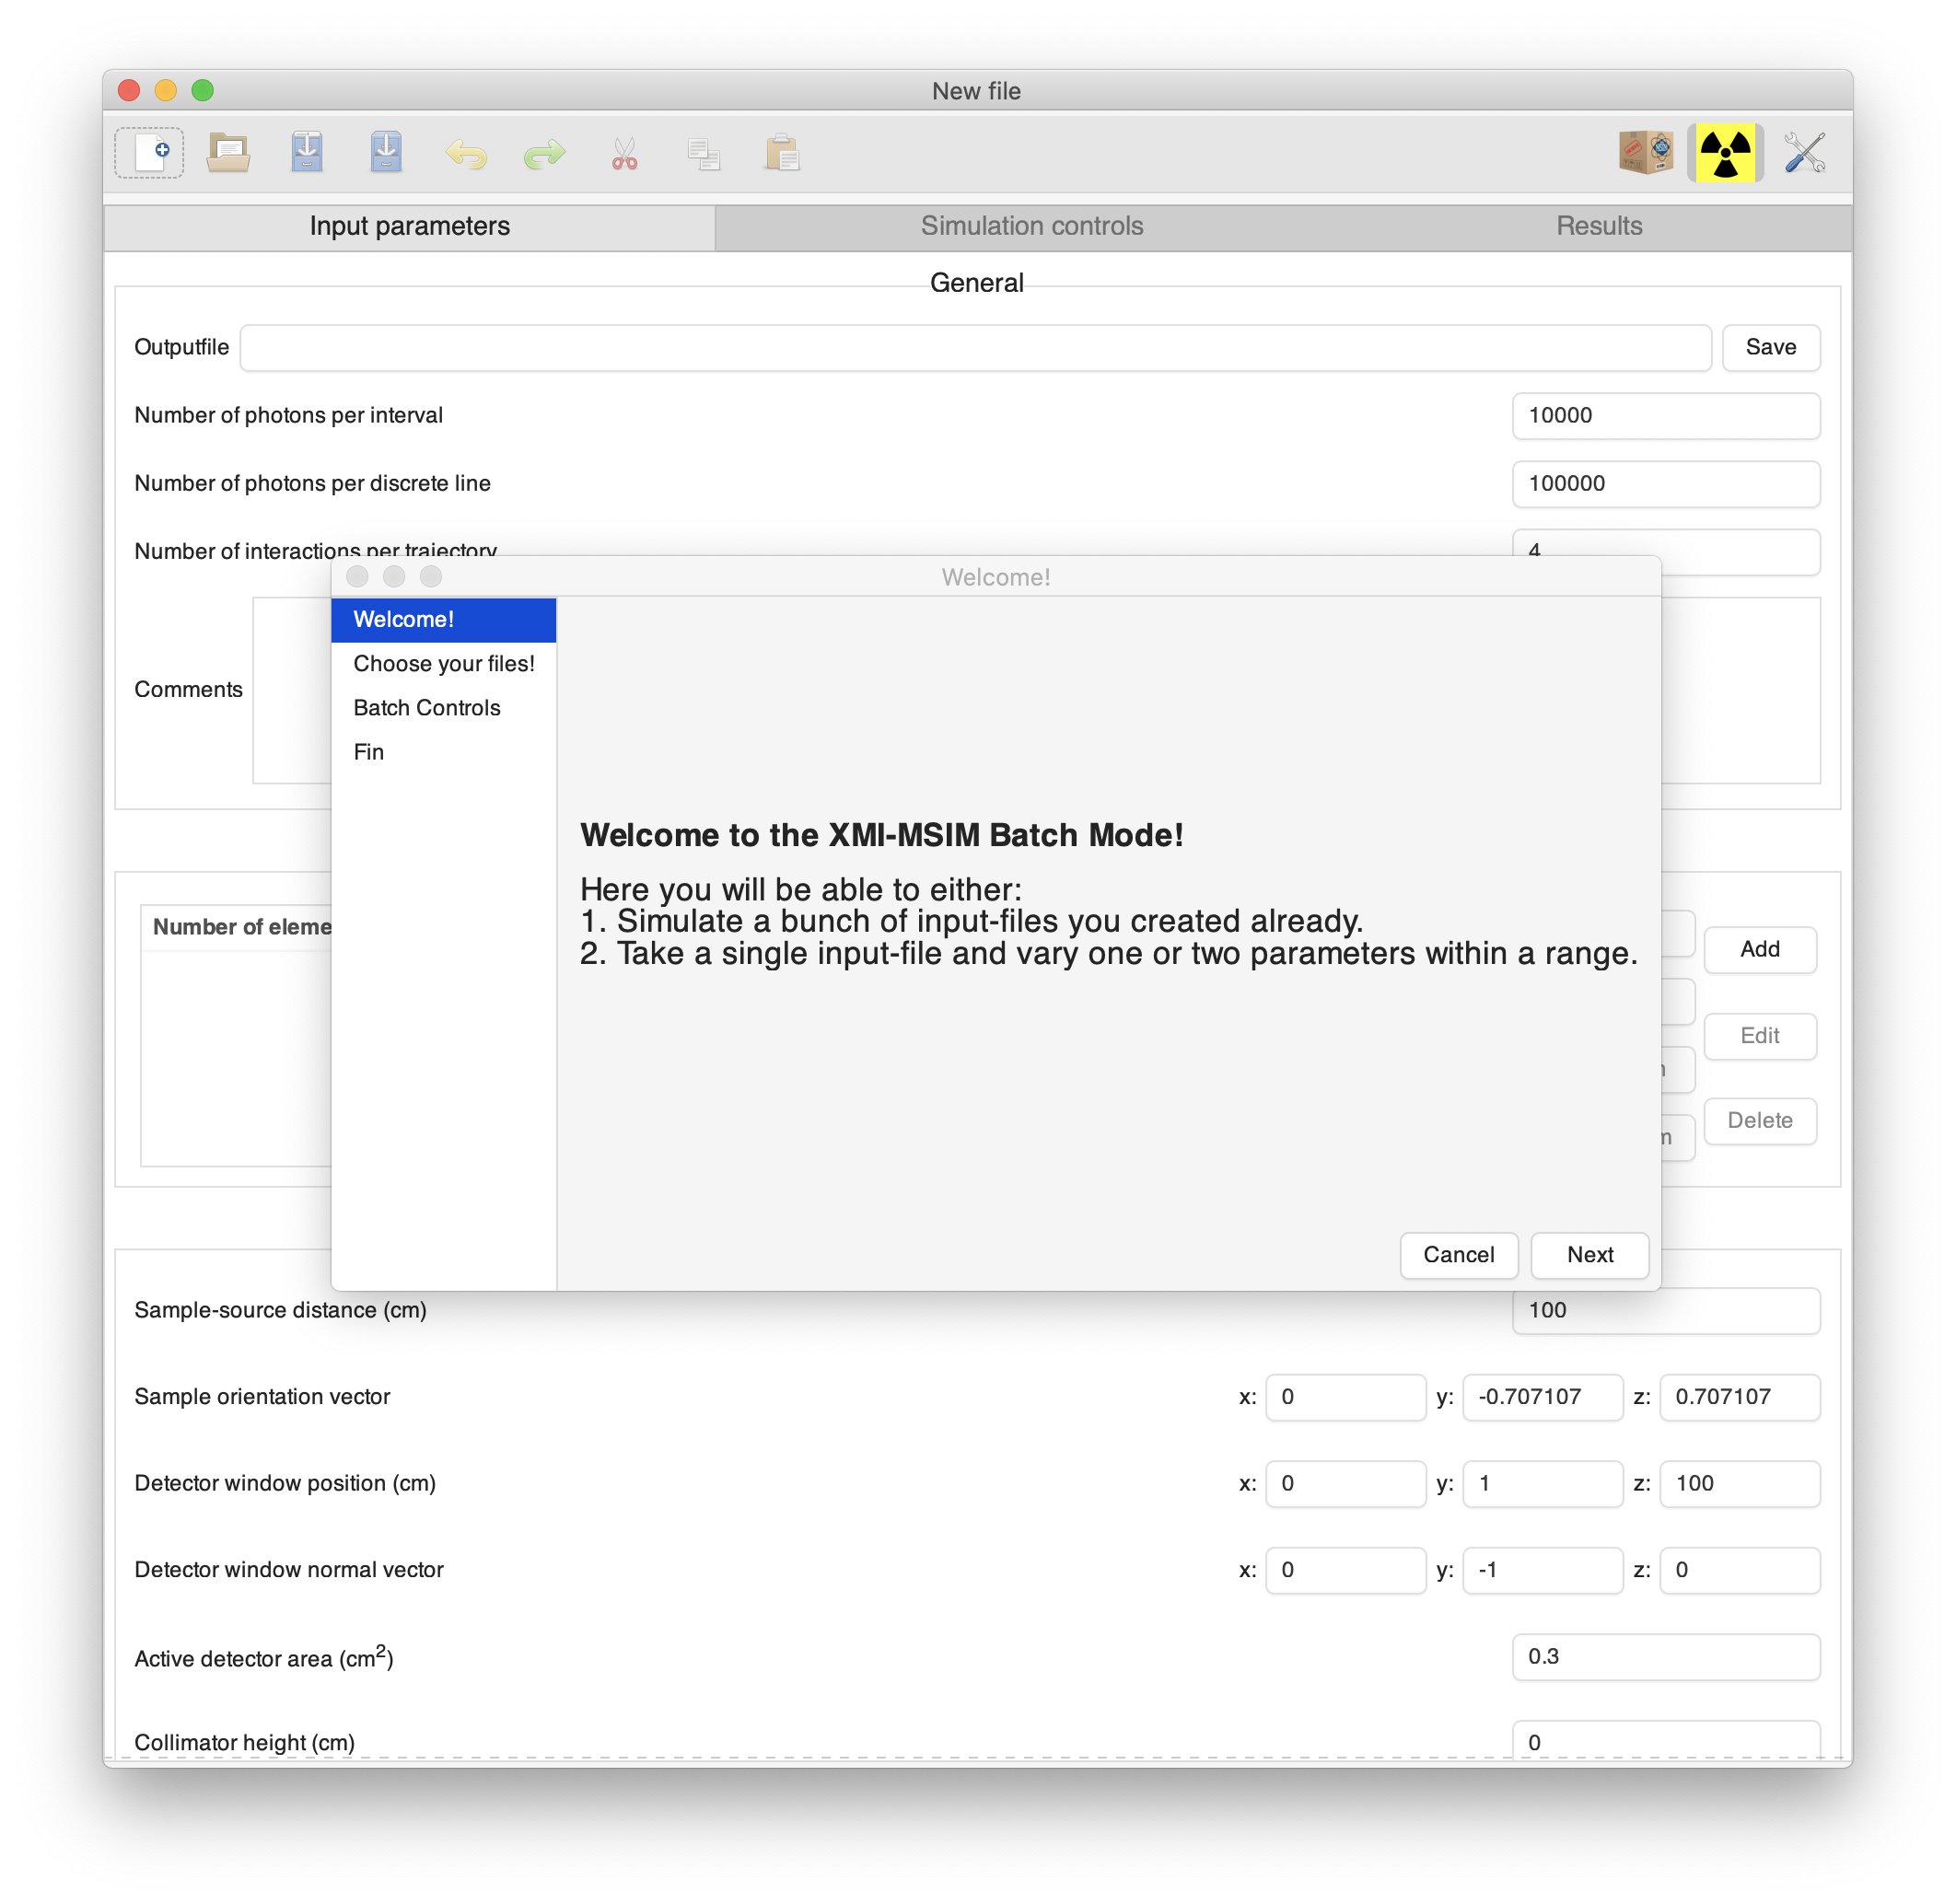
XMI-MSIM version 3.0 introduced the possibility to perform batch simulations. Activate this feature by clicking the Batch mode button in the toolbar. This will produce a wizard as shown here:
Clicking Next will move the wizard to a filechooser dialog:
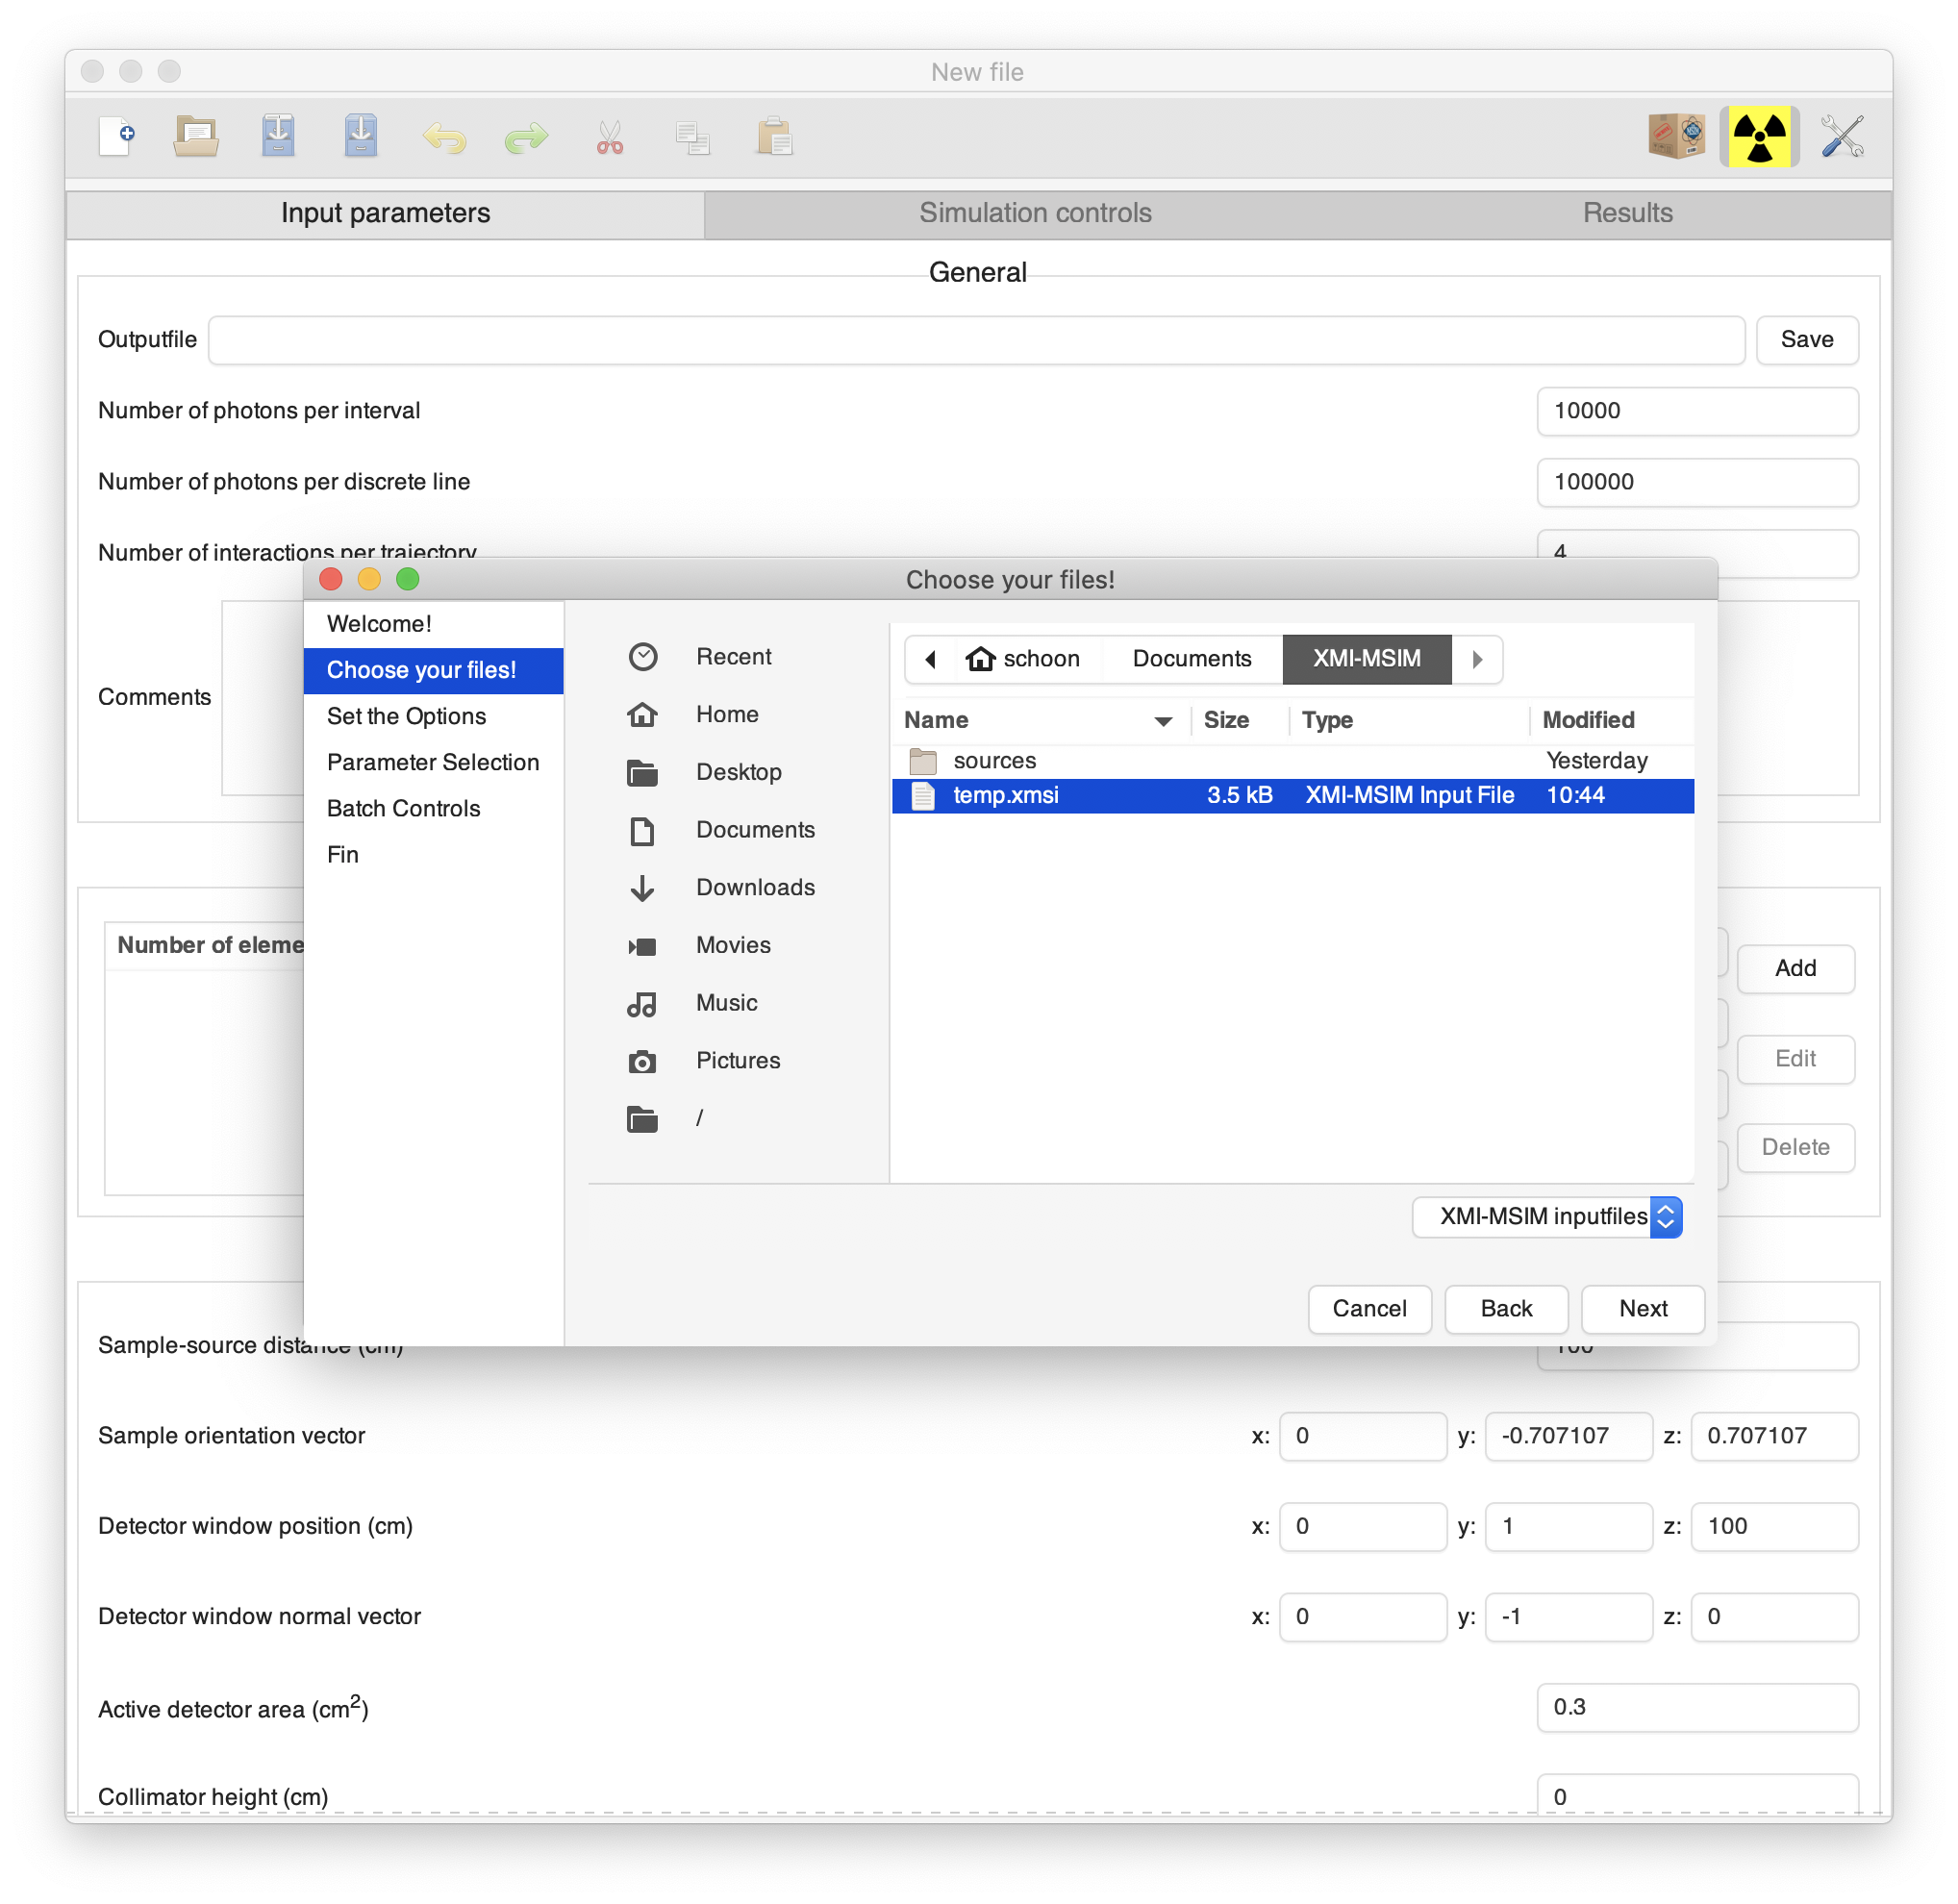
At this point it becomes very important to distinguish between two different possible outcomes that depend on whether the user selects either one or multiple files.
If the user has selected multiple files, then these files will be used as input-files for a round of successive unrelated simulations. After the file selection, the user will be presented with a question regarding whether the options should be set for each input-file separately. The options refer to the same options that can be seen in the Control panel of the main interface window. Either way, after setting the options, one will end up with the Batch simulation controls window:
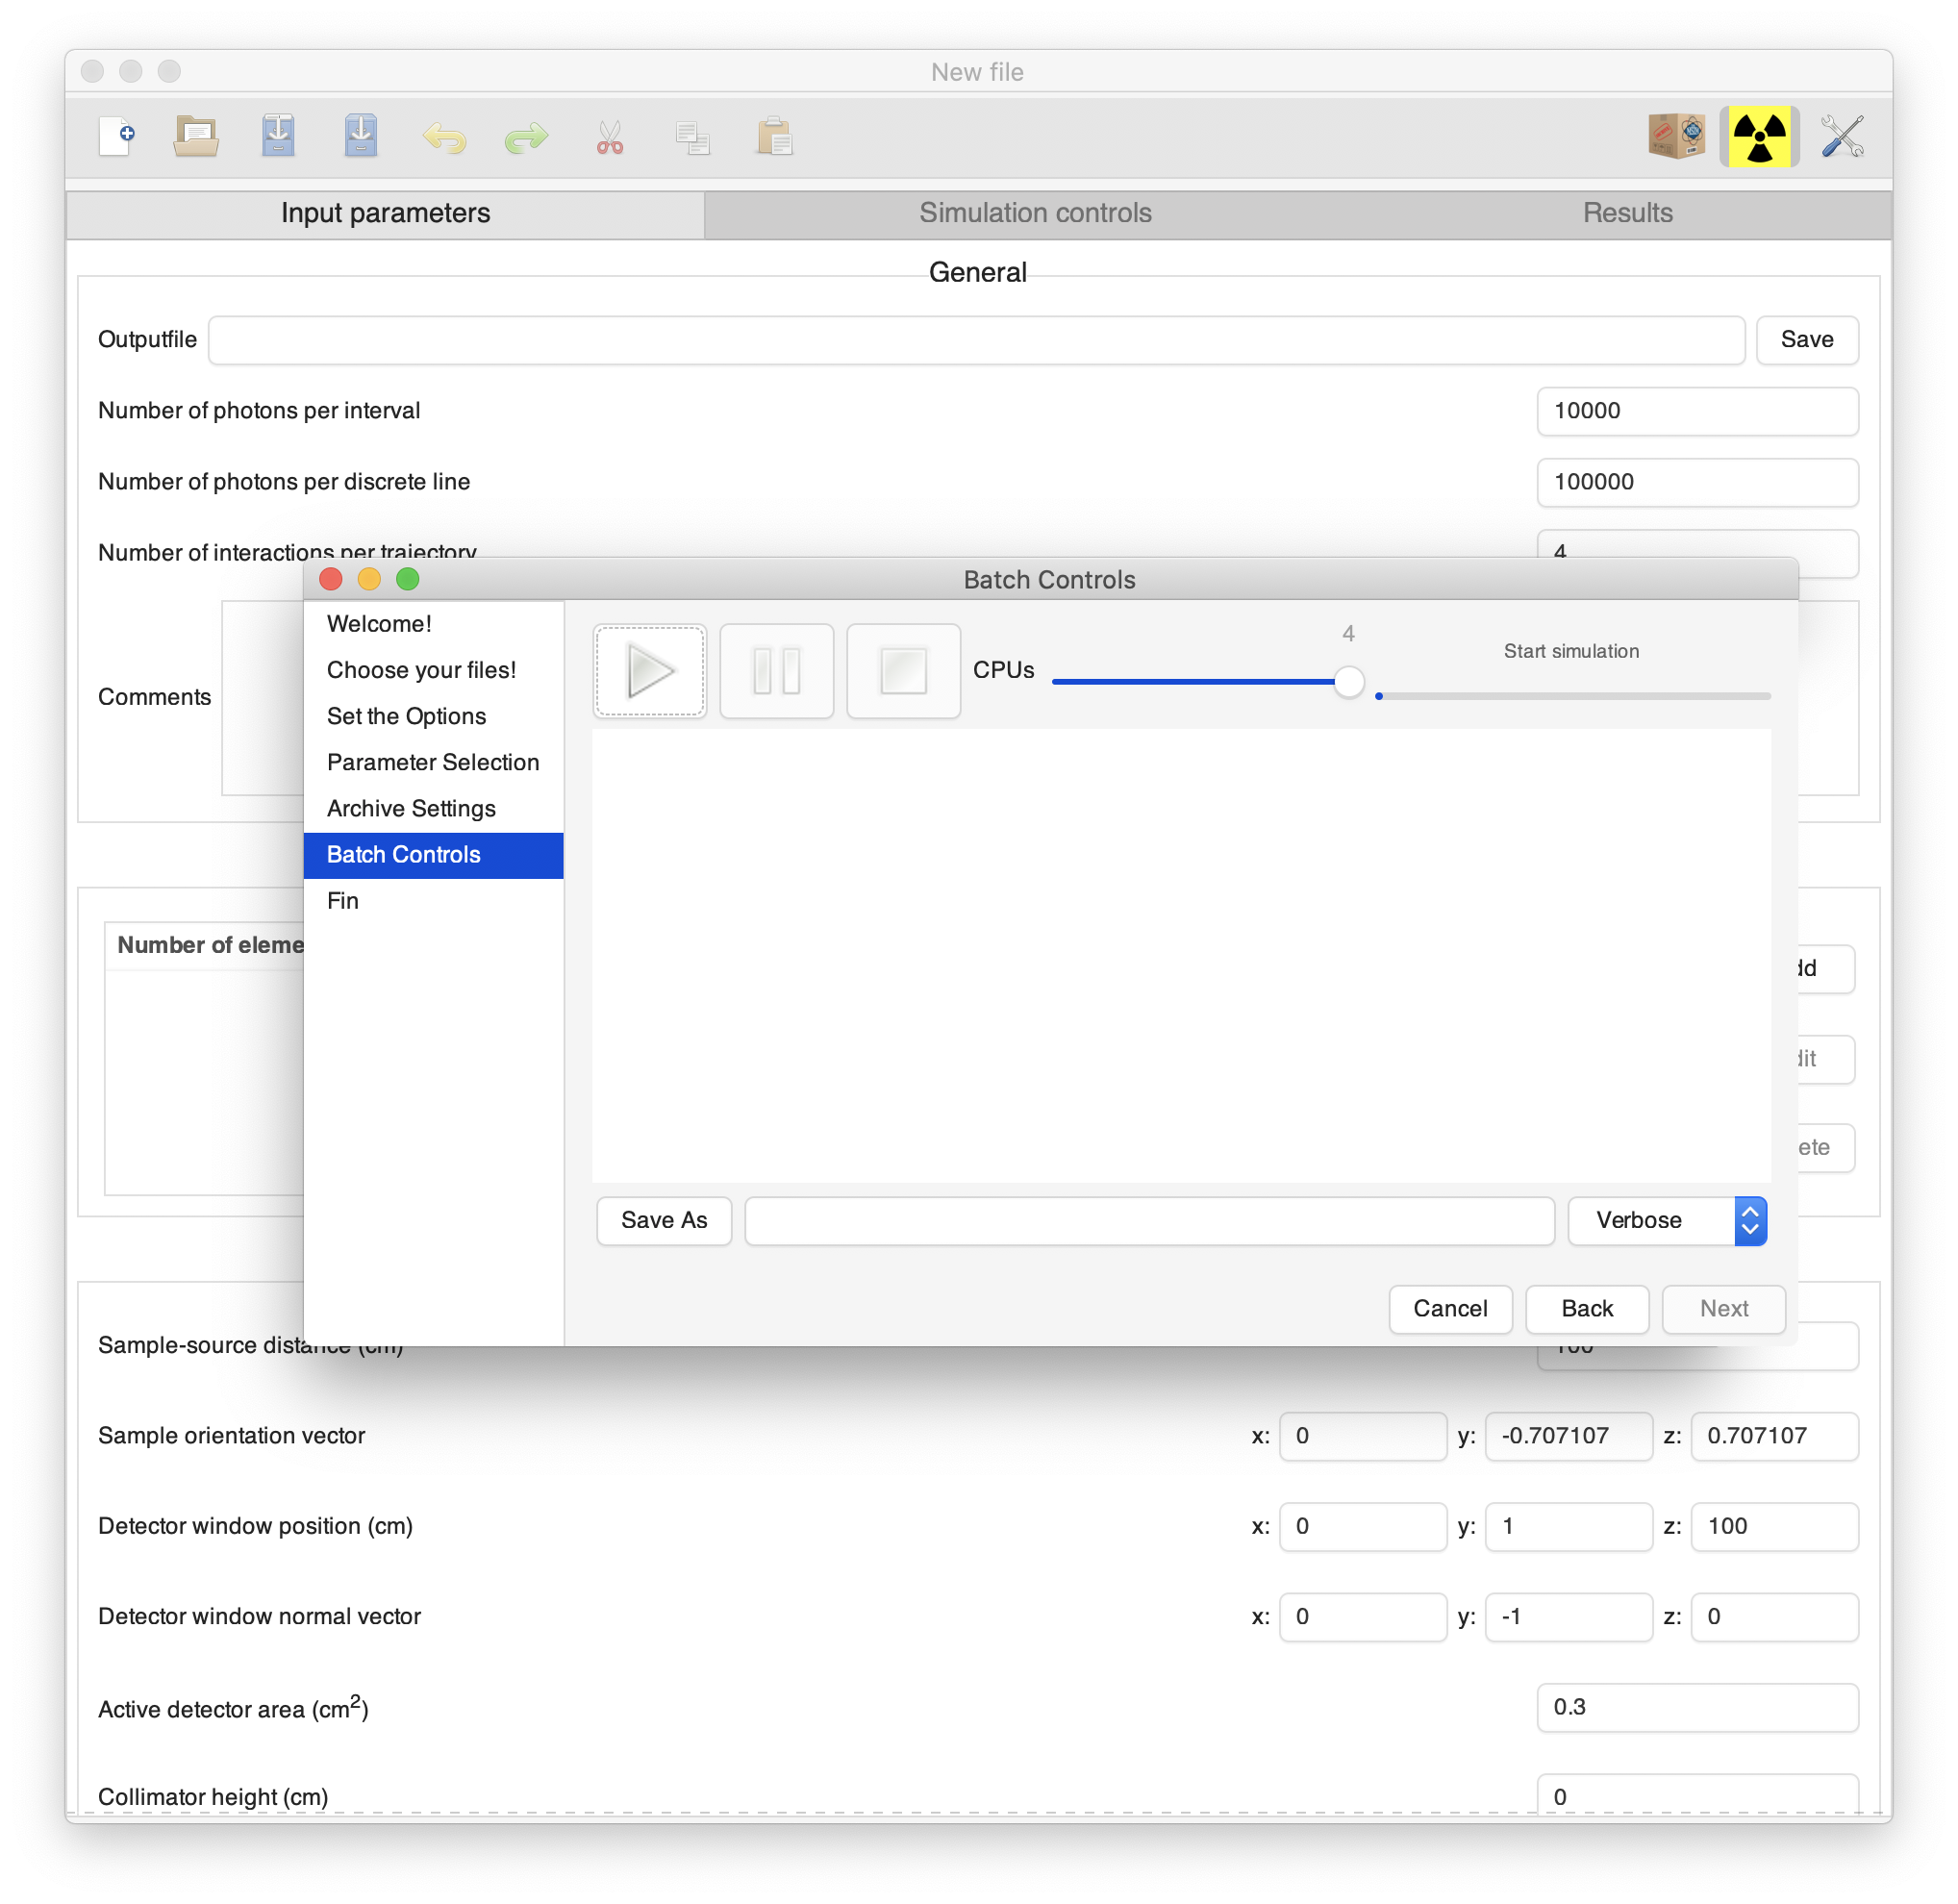
Similar to the Control panel of the main interface window, this widget features Play, Stop and Pause to control the execution. The number of threads that will be used for the simulations may be set using the CPUs slider. During execution, all output will be shown in the central area. The verbosity level can be changed from the default Verbose to Very verbose for even more information about the runs. While running the simulations, it is possible to save all output that is placed on the screen to a file that will be continuously updated. Click the Save As button to choose a filename.
A considerably more interesting feature of the batch simulation is its second operational mode: if the user selects a single file from the filechooser page, and selecting the desired options, he will be presented with a new page in which he is asked to select one or two parameters that will be varied during a series of simulations based on the initially selected input-file, as is seen in the following screenshot:
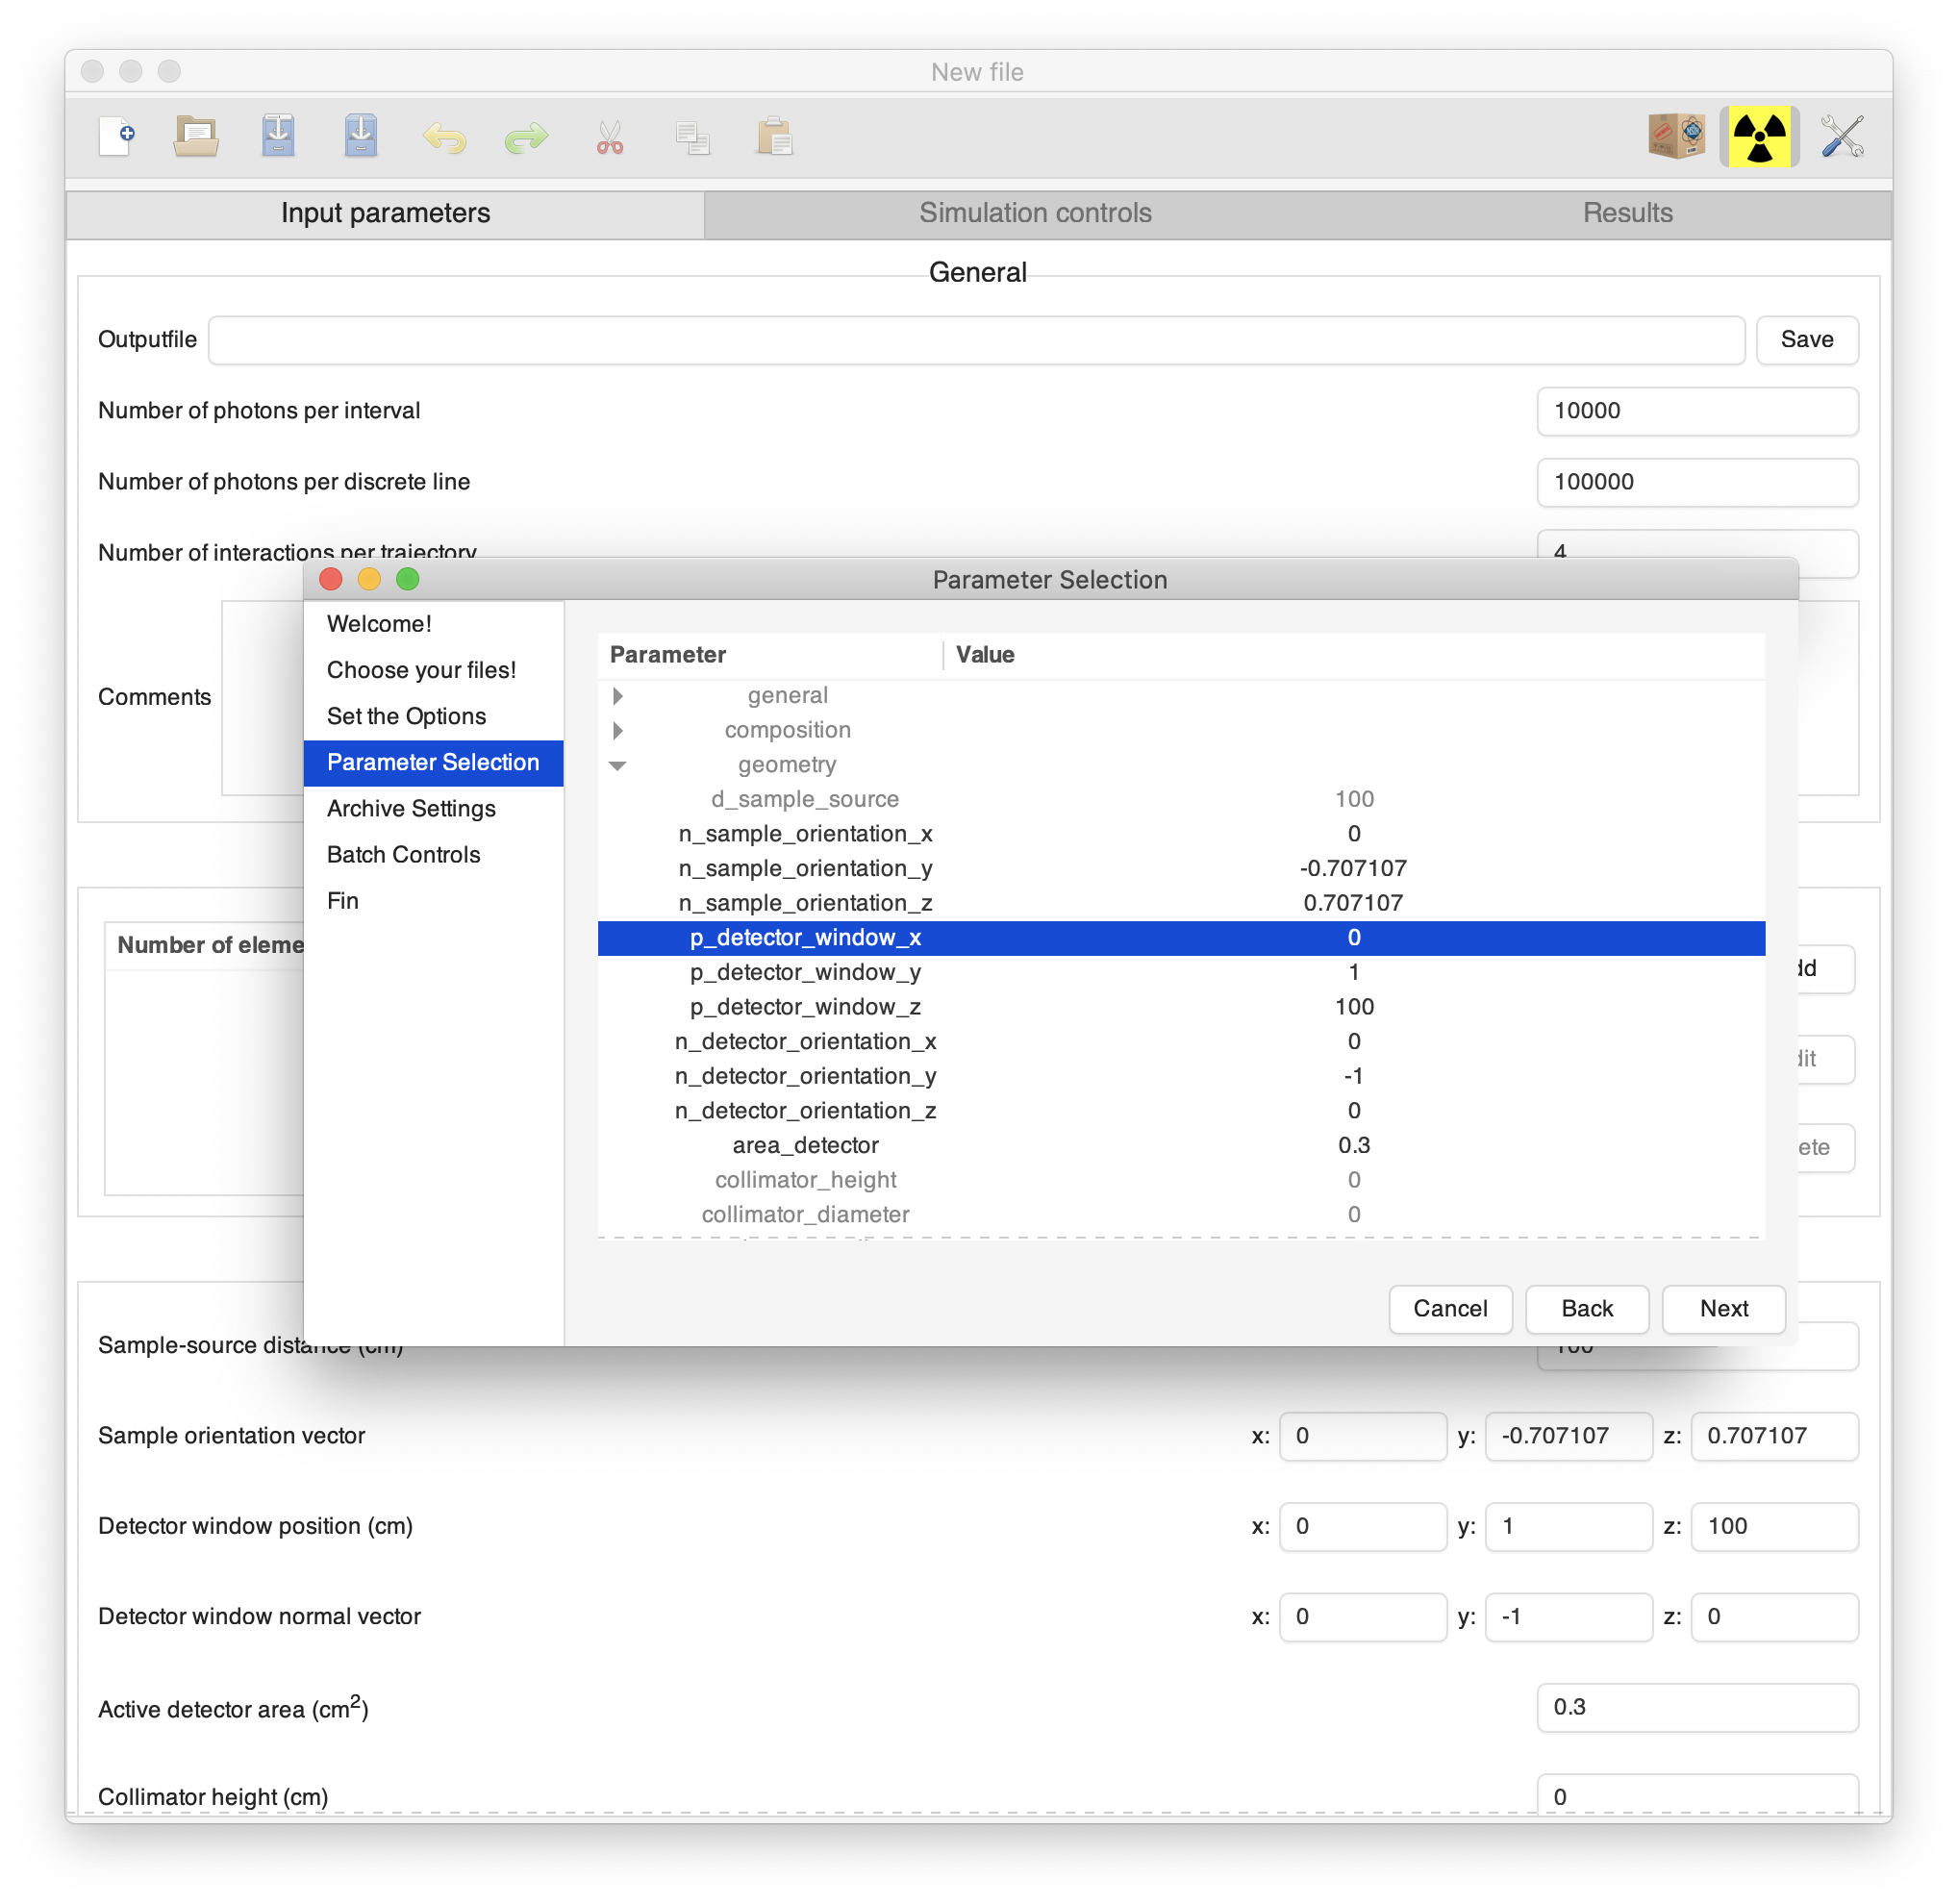
After expanding the different components of the tree structure representing the initial input-file contents, rows describing the input-file contents will emerge: only the clickable components are eligible as variable parameters! Furthermore, it should be noted that within a layer, one can only select an element's weight_fraction if there are at least two elements available: this is necessary because at any given moment, the sum of the weight fractions needs to be equal to 100% after rescaling. If two weight fractions within the same layer need to te varied, then at least three elements need to be present in that layer for the same reason.
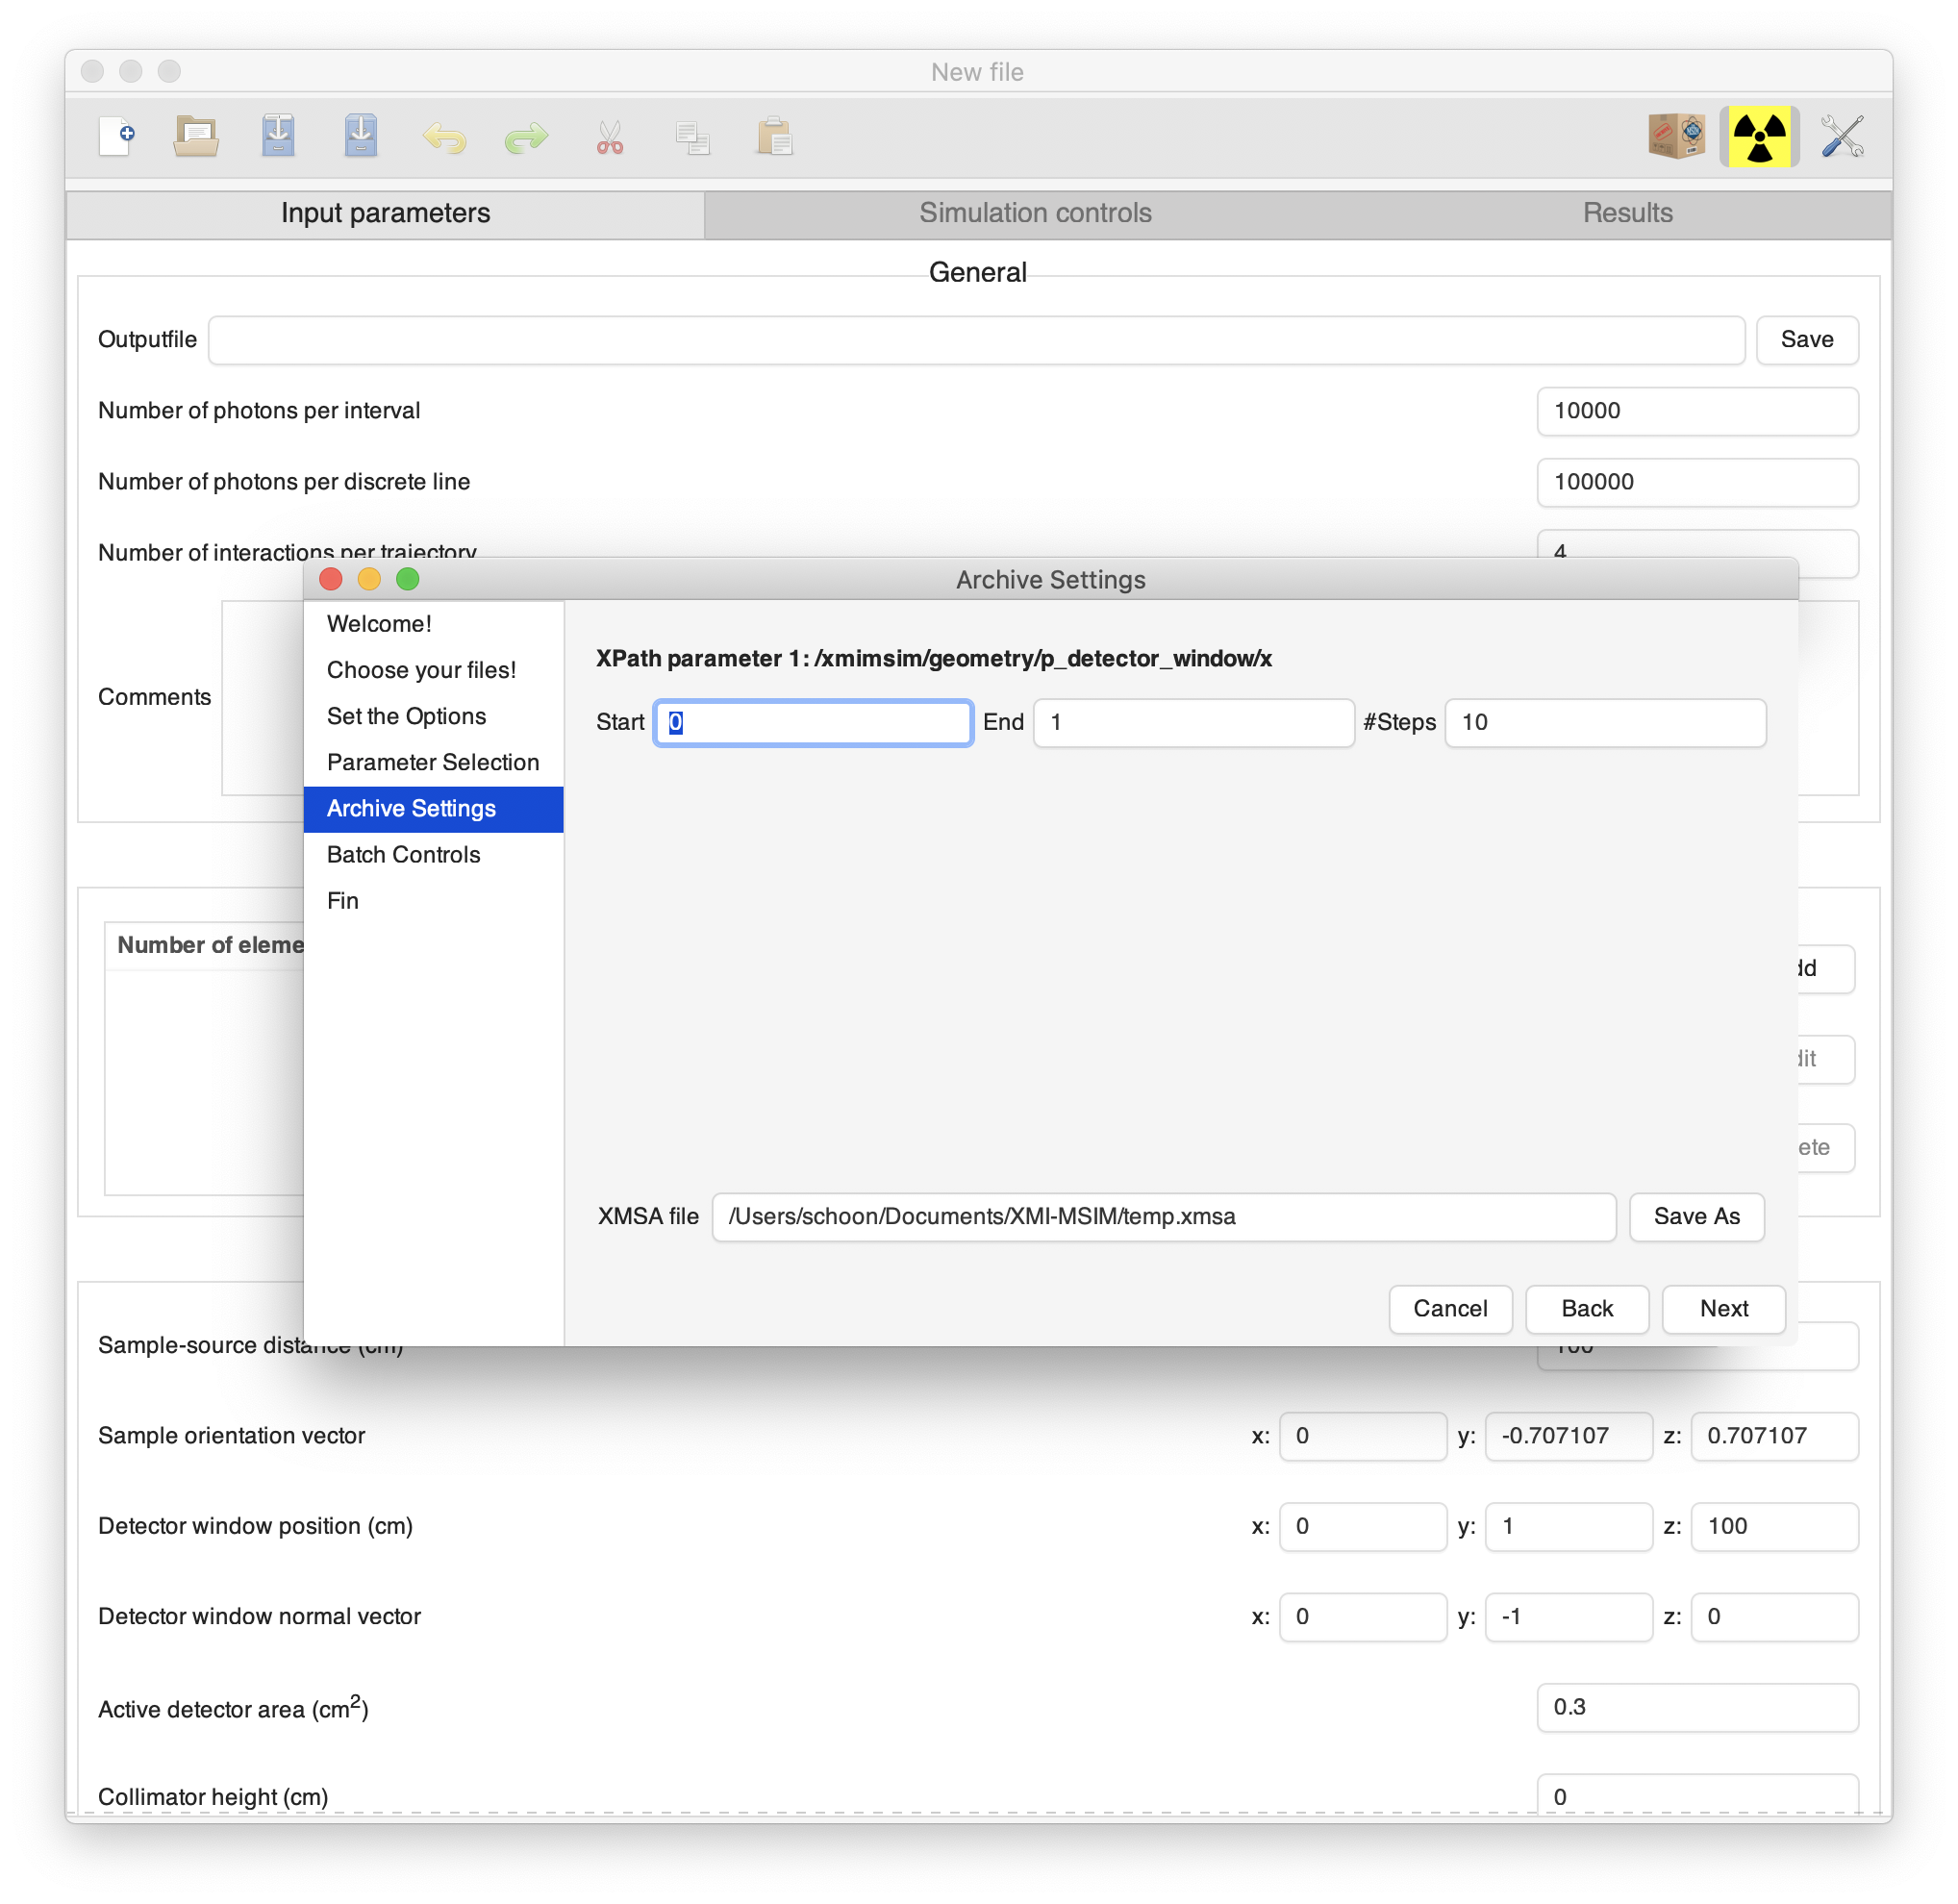
Clicking _Nextafter selecting the required parameter(s), will move the wizard to to a page that will allow users to define the range and the number of steps that will be used to determine the parameter(s) values in the different input-files that will be produced and later on, simulated. In bold, above the Start, End and #Steps entries, are the name(s) of the selected parameter expressed in its XPath notation, which corresponds to an internal description of the parameter's location in the XMI-MSIM input-file. This page also contains a Save As button that will launch a file chooser dialog, which will ask the user to determine the XMI-MSIM archive that will eventually be produced containing all results from the simulation. This is shown (for a case with one selected variable parameter) in the following screenshot:
After confirming the introduced values by clicking Next, a Batch simulation controls page will appear, as was already described and shown in the preceding section. Clicking the Play button will launch the simulations. After all simulations have been successfully performed, click the Next button to proceed to the final page, which can be closed. In the meantime, a window should have popped up that allows the user to analyze the results of the batch simulation.
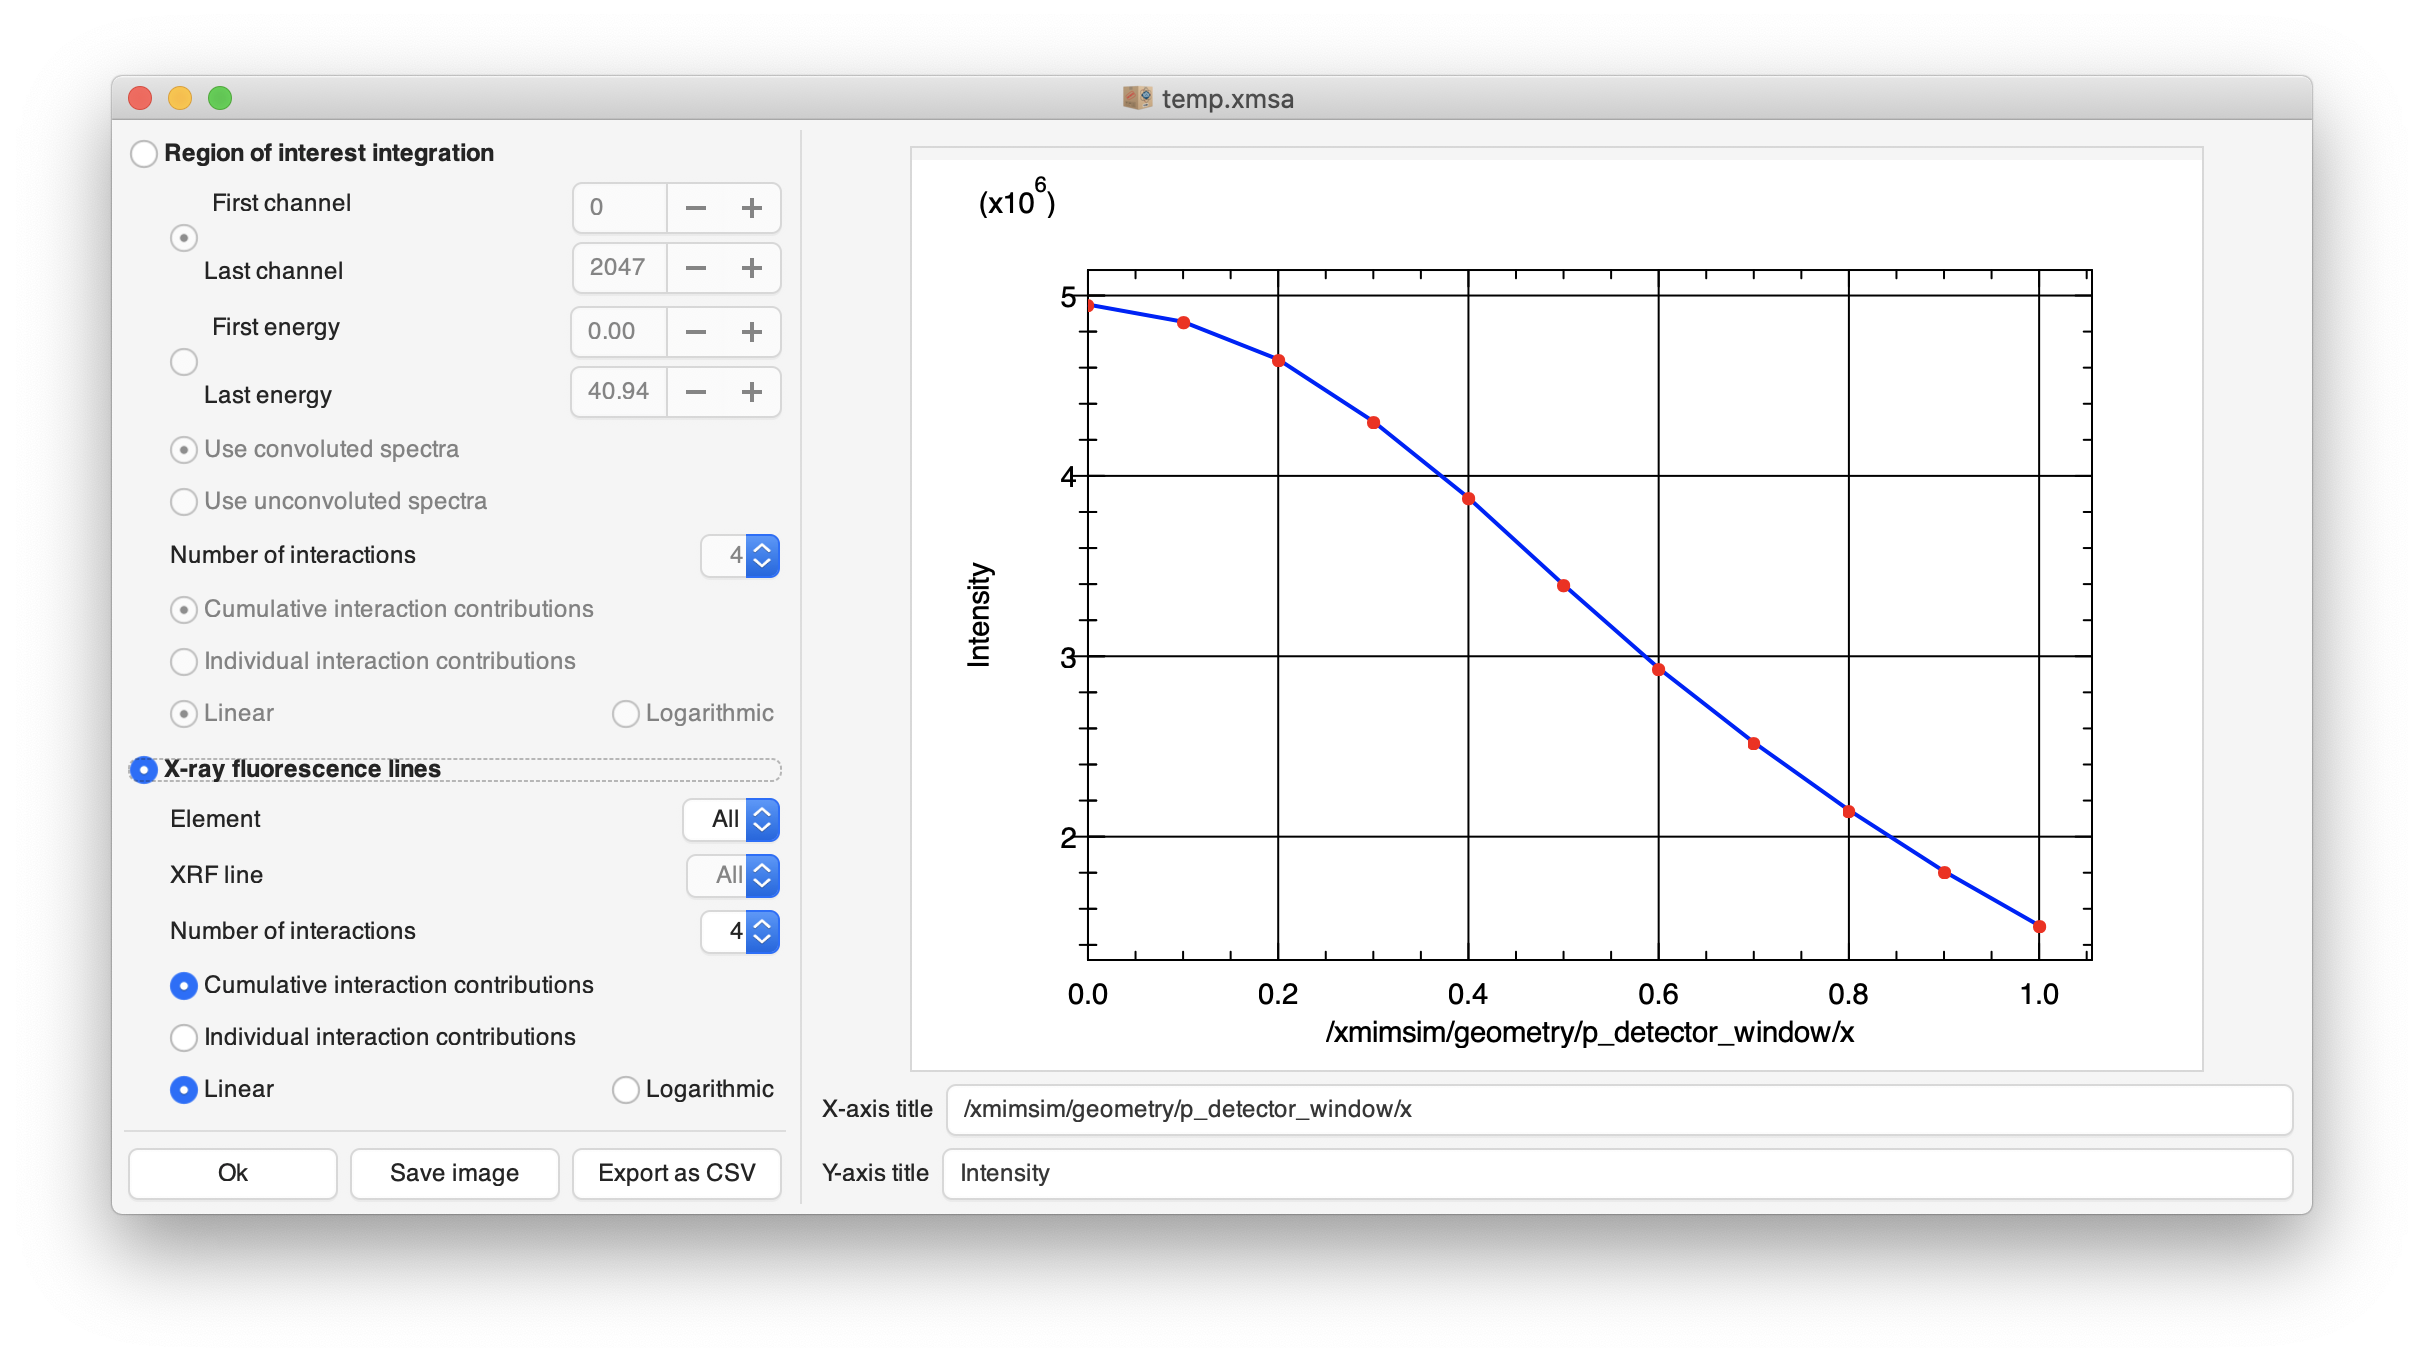
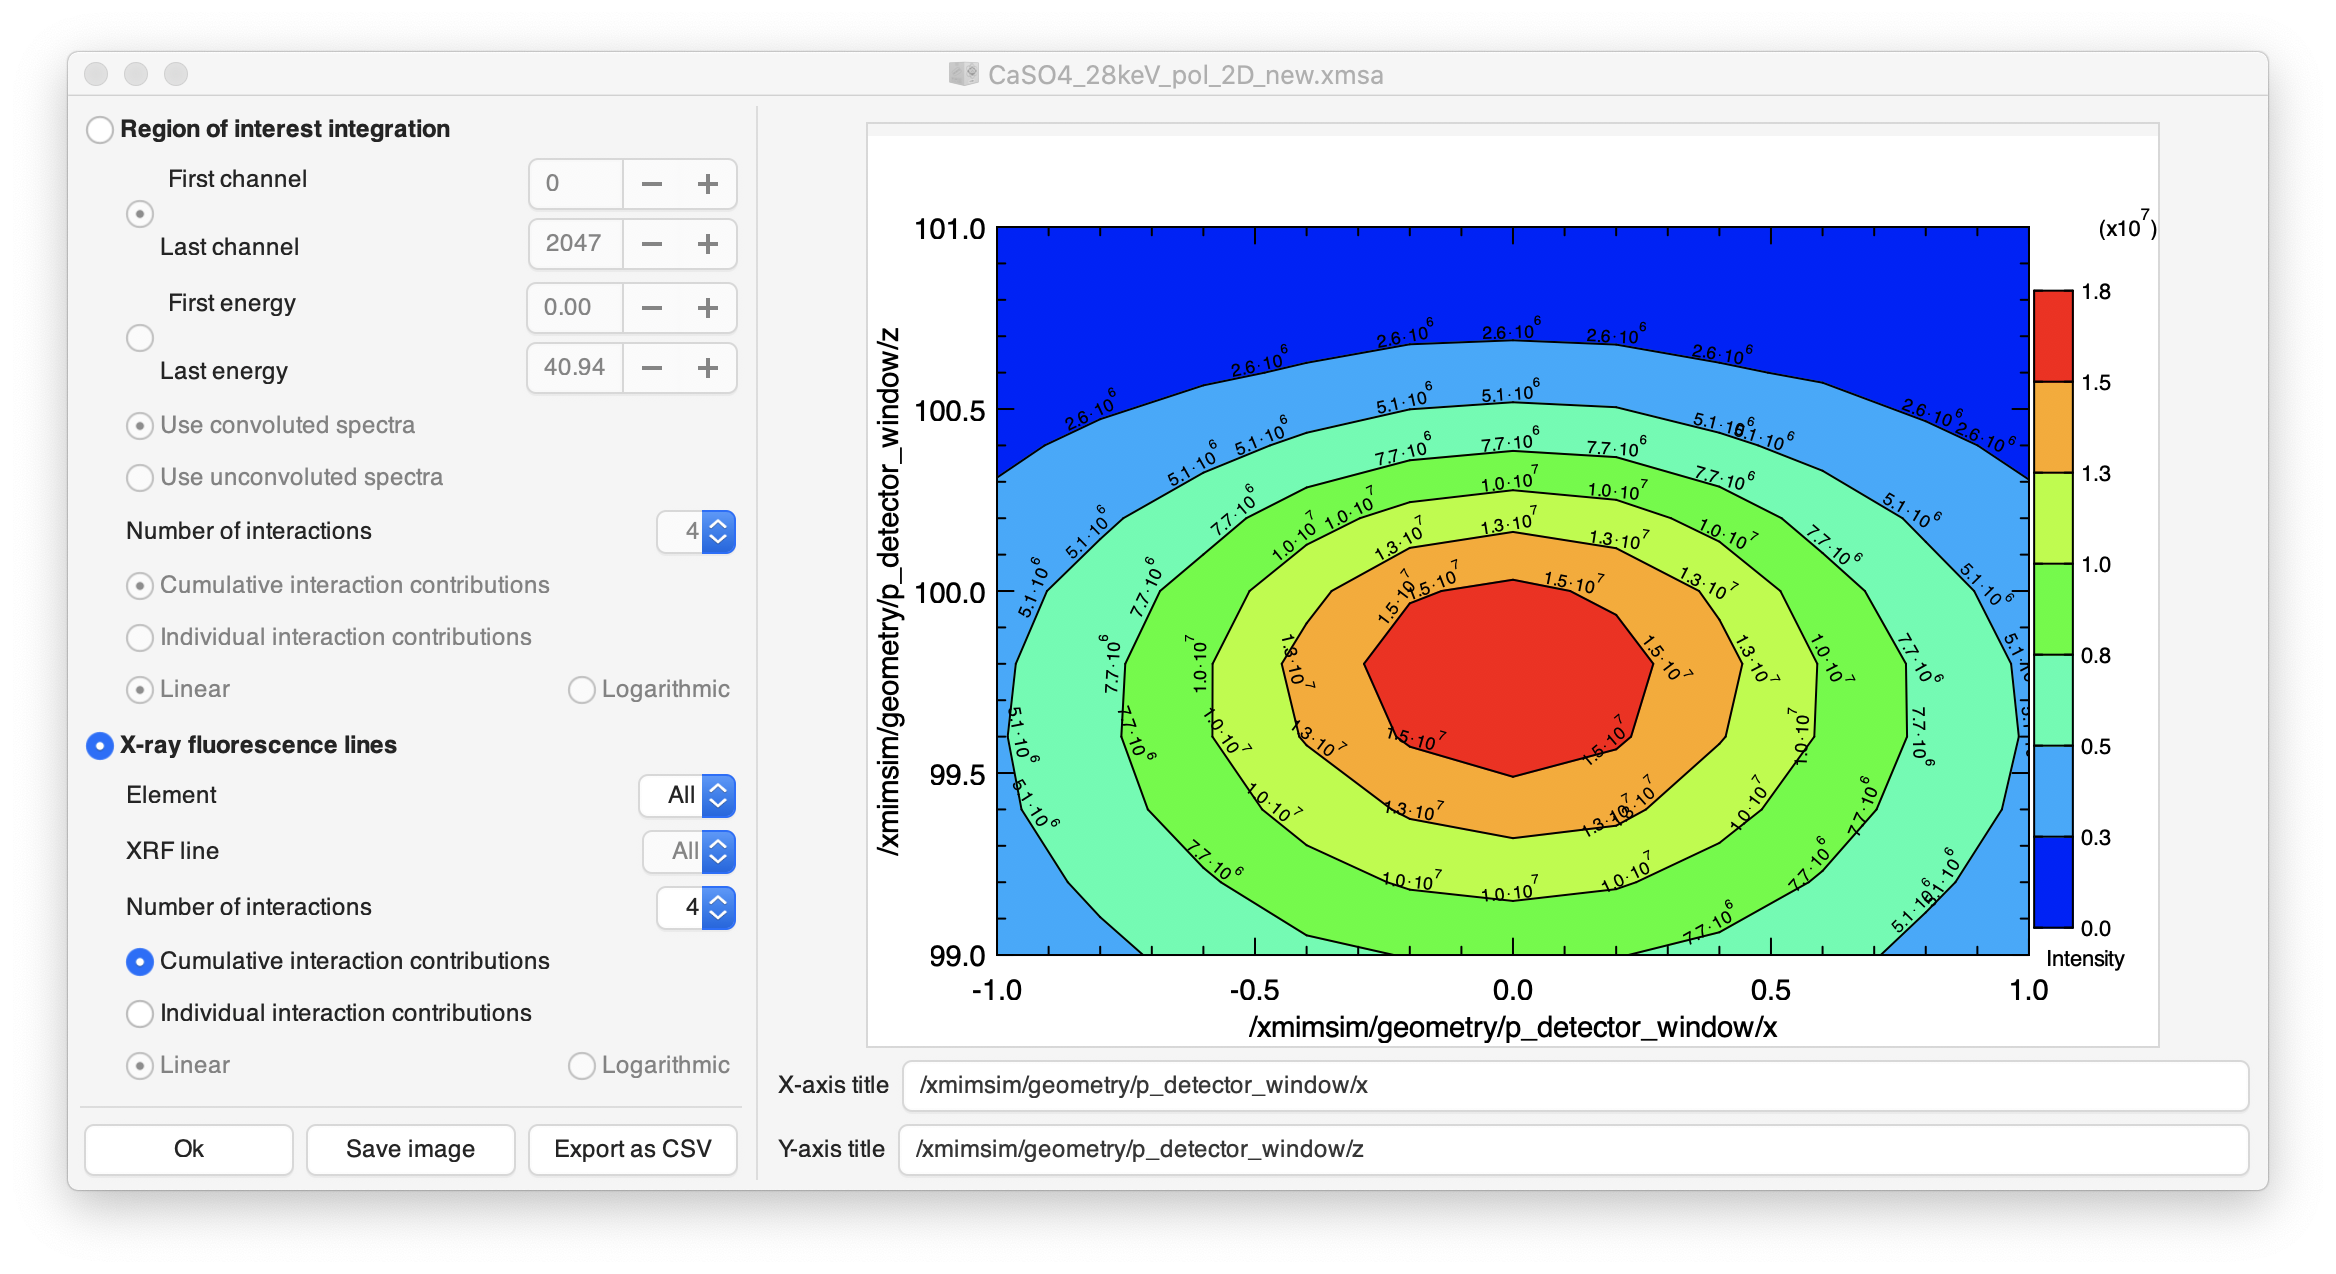
In this window, one can analyze the results of the batch simulation by selecting specific elements, lines, regions of interest etc for individual or cumulative interaction contributions. It is possible to save the plot as an image file using Save image, while the data that makes up the currently shown plot can be exported in a CSV file. Change the axes titles to a more appropriate description if deemed necessary. The following screenshot shows a case where two variable parameters were chosen:
All information that was produced in the batch simulation has been stored in an XMI-MSIM archive file (.xmsa extension). If one would like to inspect its contents again with the Batch mode plot window, just double-click such a file from your favorite file manager, or open it from within XMI-MSIM by clicking Open in the toolbar or menubar and setting the filter to XMI-MSIM archives, and then selecting the desired file.
Using the Convert XMSI file to XRMC option from the Tools menu, one can produce input-files for the XRMC software package, a Monte Carlo simulation tool for X-ray imaging and spectroscopy experiments. This should be of particular interest to those users that are interested in a simulation that includes scattering and XRF that is generated by the collimator, which is being ignored by XMI-MSIM. Keep in mind though that simulations with XRMC typically will take considerably longer compared to XMI-MSIM for a result with equivalent statistical variance.
In order to use the produced input-files, install XRMC including its XMI-MSIM plug-in, which will be used for the detector response function.
One can also generate the XRMC input-files using the command-line utility xmsi2xrmc.
The section on custom X-ray sources mentioned that large parts of the libxmimsim and libxmimsim-gui libraries may be called from Python. Apart from creating these custom sources, it is also an interesting feature to exploit in regular Python scripts. Consider the following example, which sets up a batch simulation that varies the atomic number in a layer across he periodic table, saves the results to an XMSA archive, and opens it into an XmiMsimGui.XmsaViewerWindow instance:
import xraylib as xrl
import sys
import os
import math
import logging
logging.basicConfig(format='%(asctime)s %(message)s', level=logging.DEBUG)

import gi
gi.require_version('XmiMsim', '1.0')
gi.require_version('XmiMsimGui', '1.0')
from gi.repository import XmiMsim, XmiMsimGui, GLib, Gio, Gtk

OUTPUTFILE = 'mendeljev.xmsa'

XmiMsim.xmlLoadCatalog()

main_loop = GLib.MainLoop.new(None, False)
input = XmiMsim.Input.init_empty()
general = input.general.copy()
general.n_photons_line = 100000 # 1M photons
input.set_general(general)
options = XmiMsim.MainOptions.new()

single_data = [XmiMsim.BatchSingleData.new("/xmimsim/composition/layer[1]/element[1]/atomic_number", 1, 92, 91)]
xmsi_data = list()

for Z in range(1, 93):
    input_copy = input.copy()
    layer = XmiMsim.Layer.new([Z], [1.0], 1.0, 1.0)
    composition = XmiMsim.Composition.new([layer], reference_layer=1)
    input_copy.set_composition(composition)
    xmsi_data.append(input_copy)

batch = XmiMsim.BatchSingle.new(xmsi_data, single_data, options)

assert batch.is_valid_object() == True

def _test_succeed_finished_cb(batch, result, buffer):
    logging.debug("message: {}".format(buffer))
    assert result == True
    main_loop.quit()

def _print_stdout(batch, string):
    logging.debug("stdout: {}".format(string))

def _print_stderr(batch, string):
    logging.debug("stderr: {}".format(string))

batch.connect('finished-event', _test_succeed_finished_cb)
batch.connect('stdout-event', _print_stdout)
batch.connect('stderr-event', _print_stderr)

batch.start()

main_loop.run()

assert batch.was_successful() == True

batch.write_archive(OUTPUTFILE)

XmiMsimGui.init()

archive = batch.props.archive

win = XmiMsimGui.XmsaViewerWindow.new(archive)
win.set_position(Gtk.WindowPosition.CENTER)
win.connect("destroy", Gtk.main_quit)
win.show_all()
Gtk.main()
To use this functionality on Windows, launch an XMI-MSIM prompt from the Start Menu: the terminal will give you access to a Python3 interpreter (python3.exe) as well as launching the GUI (xmimsim-gui.exe). The Python installation contains xraylib, numpy, scipy and matplotlib, and should be enough to get you started. If not sufficient, use pip in this shell to install additional Python packages from PyPI (at your own risk!).
To do this on macOS, you will need to install XMI-MSIM using Homebrew (or from source!), and use it entirely from the command line. The app bundle and the Homebrew installation may be installed simultaneously, they won't conflict.
Linux users can do this using their terminals. You may need to install PyGobject first with your package manager though.
As already mentioned in simulation options, it has become possible to use custom detector response functions in XMI-MSIM, thereby replacing its built-in routines with your own alternatives.
Basically, you will have to write your own routine called xmi_detector_convolute_all_custom and compile this function into a plug-in (dynamically loadable module). This routine should follow the prototype:
void xmi_detector_convolute_all_custom(xmi_inputFPtr inputFPtr, double **channels_noconv, double **channels_conv, double *brute_history, double *var_red_history, xmi_main_options, xmi_escape_ratios *escape_ratios, int n_interactions_all, int zero_interaction);or in Fortran:
INTERFACE
SUBROUTINE xmi_detector_convolute_all_custom(&
        inputFPtr,&
        channels_noconvPtr,&
        channels_convPtr,&
        brute_historyPtr,&
        var_red_historyPtr,&
        options,&
        escape_ratiosCPtr,&
        n_interactions_all,&
        zero_inter) &
        BIND(C,NAME='xmi_detector_convolute_all')
        IMPLICIT NONE
        TYPE (C_PTR), INTENT(IN), VALUE :: inputFPtr
        TYPE (C_PTR), INTENT(IN), VALUE :: channels_noconvPtr
        TYPE (C_PTR), INTENT(IN), VALUE :: channels_convPtr
        TYPE (C_PTR), INTENT(IN), VALUE :: var_red_historyPtr
        TYPE (C_PTR), INTENT(IN), VALUE :: brute_historyPtr
        TYPE (xmi_escape_ratiosC), INTENT(IN) :: escape_ratiosCPtr
        TYPE (xmi_main_options), VALUE, INTENT(IN) :: options
        INTEGER (C_INT), VALUE, INTENT(IN) :: n_interactions_all, zero_inter
ENDSUBROUTINE
ENDINTERFACE
Clearly for this to work you will have to make use of the datatypes exposed in the headers and the fortran module files. I recommend also to make as much as possible of the functions that are already contained within XMI-MSIM (a fully documented API will follow at some point...). For now, the best source of information would be the code itself, along with the two examples that are included in the distribution (Fortran and C).
Probably it will be easiest to write such a plug-in in Fortran: you will be able to easily reuse a lot of the existing code with minimal effort. However, if you're willing to write some simple wrappers in Fortran first, you can also use all Fortran functions from C. When writing a plug-in in C, you will probably want to use the following function:
void xmi_input_F2C(xmi_inputFPtr Ptr, struct xmi_input **xmi_inputC);This function extracts from the Fortran datatype TYPE (xmi_input) (which is useless in C), the corresponding C datatype struct xmi_input, which contains all the easily accessable information from the simulation.
It should also be possible to write plug-ins in C++, just make sure the exported function gets the extern "C" attribute.
Here are some instructions on how to compile these modules on the three supported platforms. The resulting module.so (Mac OS X and Linux) or module.dll (Windows) should be loadable by XMI-MSIM.
I recommend to make use of OpenMP as shown in the Fortran example (but possible in the C example too). If not desired, then remove the -fopenmp flags.
You are of course free to make use of any other libraries that are necessary to implement your detector response functions. In this case however, do not forget to add the required header and linker flags.
The following instructions apply to the XMI-MSIM app bundle only, and assume it is installed in /Applications. If compiled from source, follow the instructions for Linux instead.
The latest release of XMI-MSIM (8.0) has been compiled with gfortran 9, installed using Homebrew. Do not attempt to try a different fortran compiler, or even a different version of gfortran: it won't work! What should work (though I haven't tested this), is a gfortran 9 compiler installed with MacPorts or Fink.
Compile your source files (to be executed for each source file separately):
gfortran-9 -I/Applications/XMI-MSIM.app/Contents/Resources/include/xmimsim -fopenmp -ffree-line-length-none -c -fno-common -o object1.o source1.f90
Link the objects together:
gfortran-9 -fopenmp -Wl,-undefined -Wl,dynamic_lookup -o module.so -bundle object1.o object2.o ...
Feel free to use any C compiler you want for this: the default clang, or any C compiler offered by Homebrew. Keep in mind though that the macOS system clang currently doesn't support OpenMP. clang as provided by Homebrew and MacPorts does support OpenMP.
Compile your source files (to be executed for each source file separately):
clang -I/Applications/XMI-MSIM.app/Contents/Resources/include/xmimsim -c -fno-common -o object1.o source1.c
Link the objects together:
clang -Wl,-undefined -Wl,dynamic_lookup -o module.so -bundle object1.o object2.o ...
The following instructions assume that XMI-MSIM was installed using binary packages for selected Debian/Ubuntu and Redhat family distributions, include the development packages!. If compiled from source, you may have to set the PKG_CONFIG_PATH variable for the following instructions to work.
Compile your source files (to be executed for each source file separately):
gfortran `pkg-config --cflags libxmimsim` -fopenmp -ffree-line-length-none -c -fPIC -o object1.o source1.f90
Link the objects together:
gfortran -fopenmp -shared -fPIC -Wl,-soname -Wl,module.so -o module.so object1.o object2.o ...
Compile your source files (to be executed for each source file separately):
gcc `pkg-config --cflags libxmimsim` -c -fPIC -DPIC -o object1.o source1.c
Link the objects together:
gcc -fopenmp -shared -fPIC -Wl,-soname -Wl,module.so -o module.so object1.o object2.o
For any of the following to work, ensure you selected the SDK when asked which components to install when running the installer!!
Assuming you didn't change the default installation path during installation, XMI-MSIM should be installed in C:\Program Files\XMI-MSIM 64-bit
For the sake of convenience, let's call this installation folder xmi_msim. If for some reason you picked another installation directory, assume xmi_msim represents this one.
XMI-MSIM for Windows has been compiled with MinGW-w64 compilers offered through MSYS2. In order for this to work, you will have to install the exact same compilers on your system: download MSYS2 and install the gcc compiler suite
After installation, fire up a MinGW/MSYS2 shell from the Start Menu entries that were just created and cd to the directory that contains your source. Depending on what language was written, follow either the Fortran or C instructions, keeping in mind that xmi_msim refers to the full path to the XMI-MSIM installation folder!!!
Fortran does not have a standardized way of exporting a function from a dll. The following should work for both gfortran and Intel Fortran: include these lines just after the definition of the xmi_detector_convolute_all_custom function.
#ifdef __GFORTRAN__
!GCC$ ATTRIBUTES DLLEXPORT:: xmi_detector_convolute_all_custom
#elif defined(__INTEL_COMPILER)
!DEC$ ATTRIBUTES DLLEXPORT:: xmi_detector_convolute_all_custom
#endif?
Compile your source files (to be executed for each source file separately):
gfortran -I"xmi_msim\SDK\Include" -fopenmp -ffree-line-length-none -DDLL_EXPORT -c -o object1.o source1.f90
Link the objects together:
gfortran -shared -fopenmp -Wl,--enable-auto-image-base -o module.dll object1.o object2.o ... -L"xmi_msim\SDK\Lib" -lxmimsim
Exporting the xmi_detector_convolute_all_custom requires that the definition is proceded by __declspec(dllexport), as shown in the C example where this is accomplished using conditional compilation.
Compile your source files (to be executed for each source file separately):
gcc -mms-bitfields -I"xmi_msim\SDK\Include" -fopenmp -DDLL_EXPORT -c -o object1.o source1.c
Link the objects together:
gcc -mms-bitfields -shared -fopenmp -Wl,--enable-auto-image-base -o module.dll object1.o object2.o ... -L"xmi_msim\SDK\Lib" -lxmimsim
In theory you should also be able to compile a module from C source code using Visual Studio, but I have not tried this yet. For this, you will need the import library libxmimsim-0.lib, which is located in the SDK\Lib subdirectory of your XMI-MSIM installation.