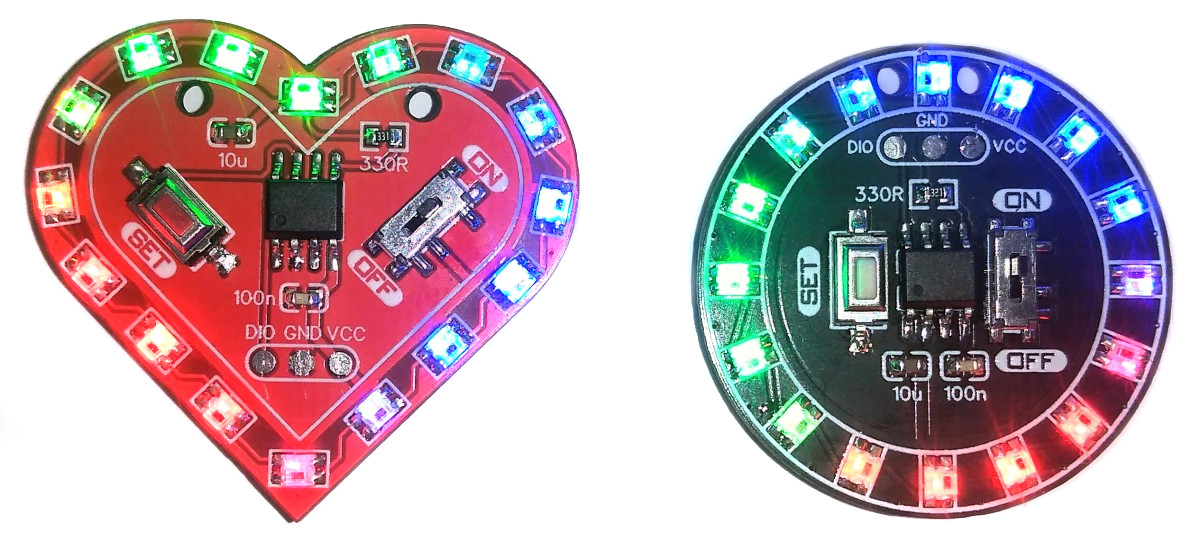
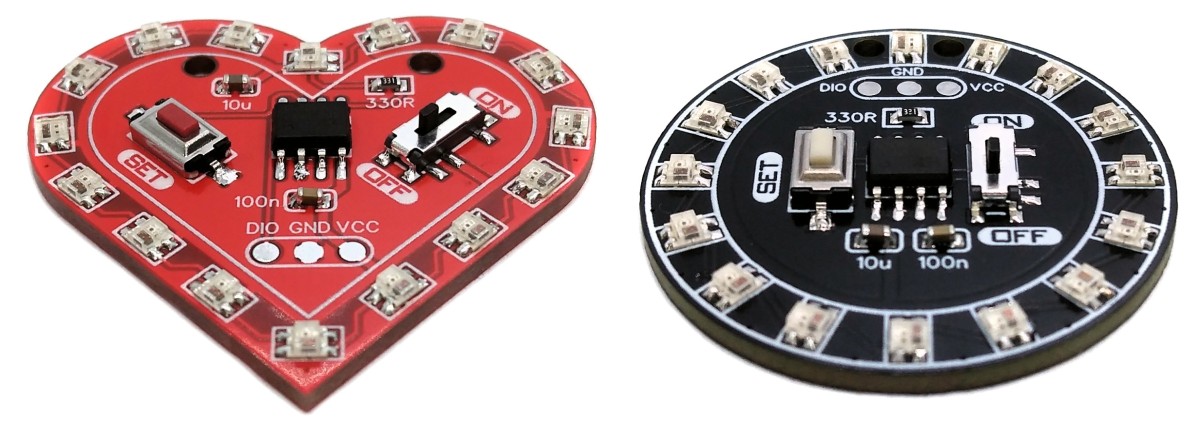
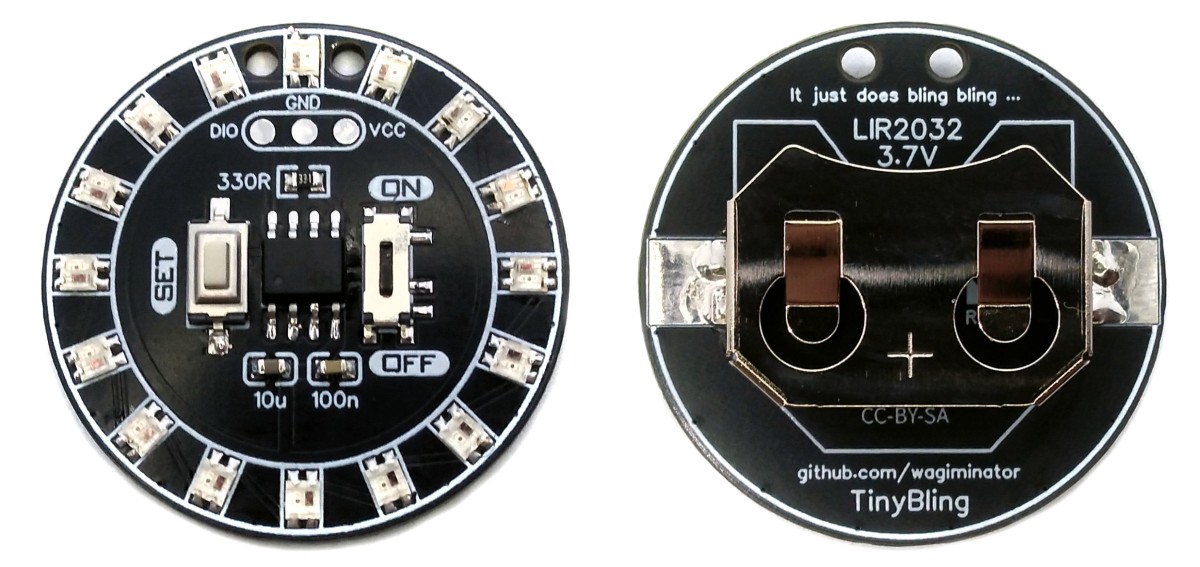
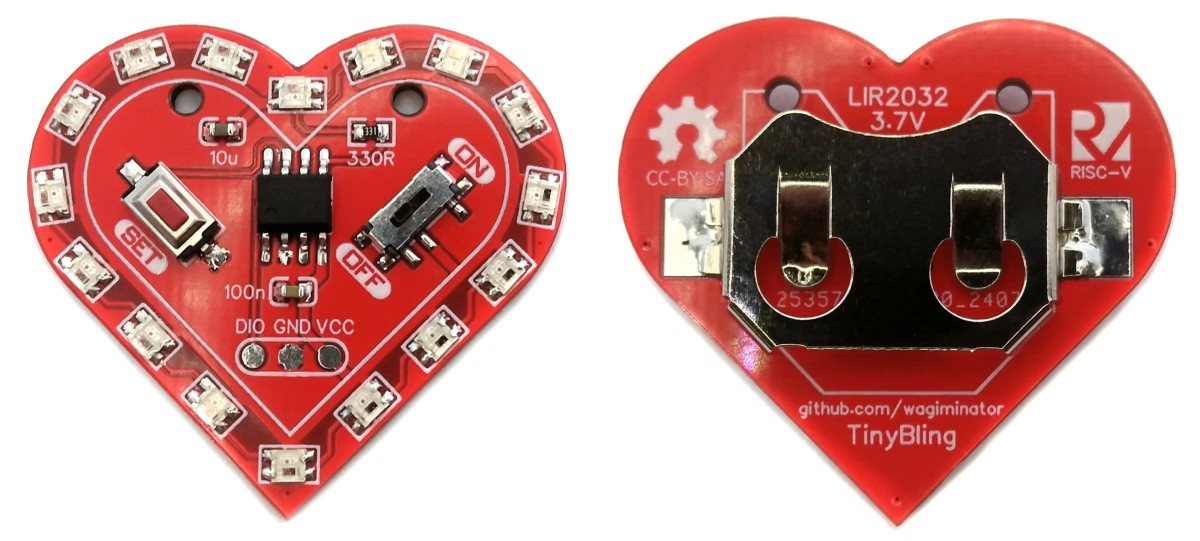
TinyBling is a completely pointless device that just does bling bling. It's wasted a CH32V003, 16 WS2812C-2020 5mA addressable LEDs, and a LIR2032 rechargeable coin cell battery.
- Project Video (YouTube, ATtiny13A version): https://youtu.be/-KiLh9RPjs4
For the ATtiny13A-based version visit ATtiny13A TinyBling.
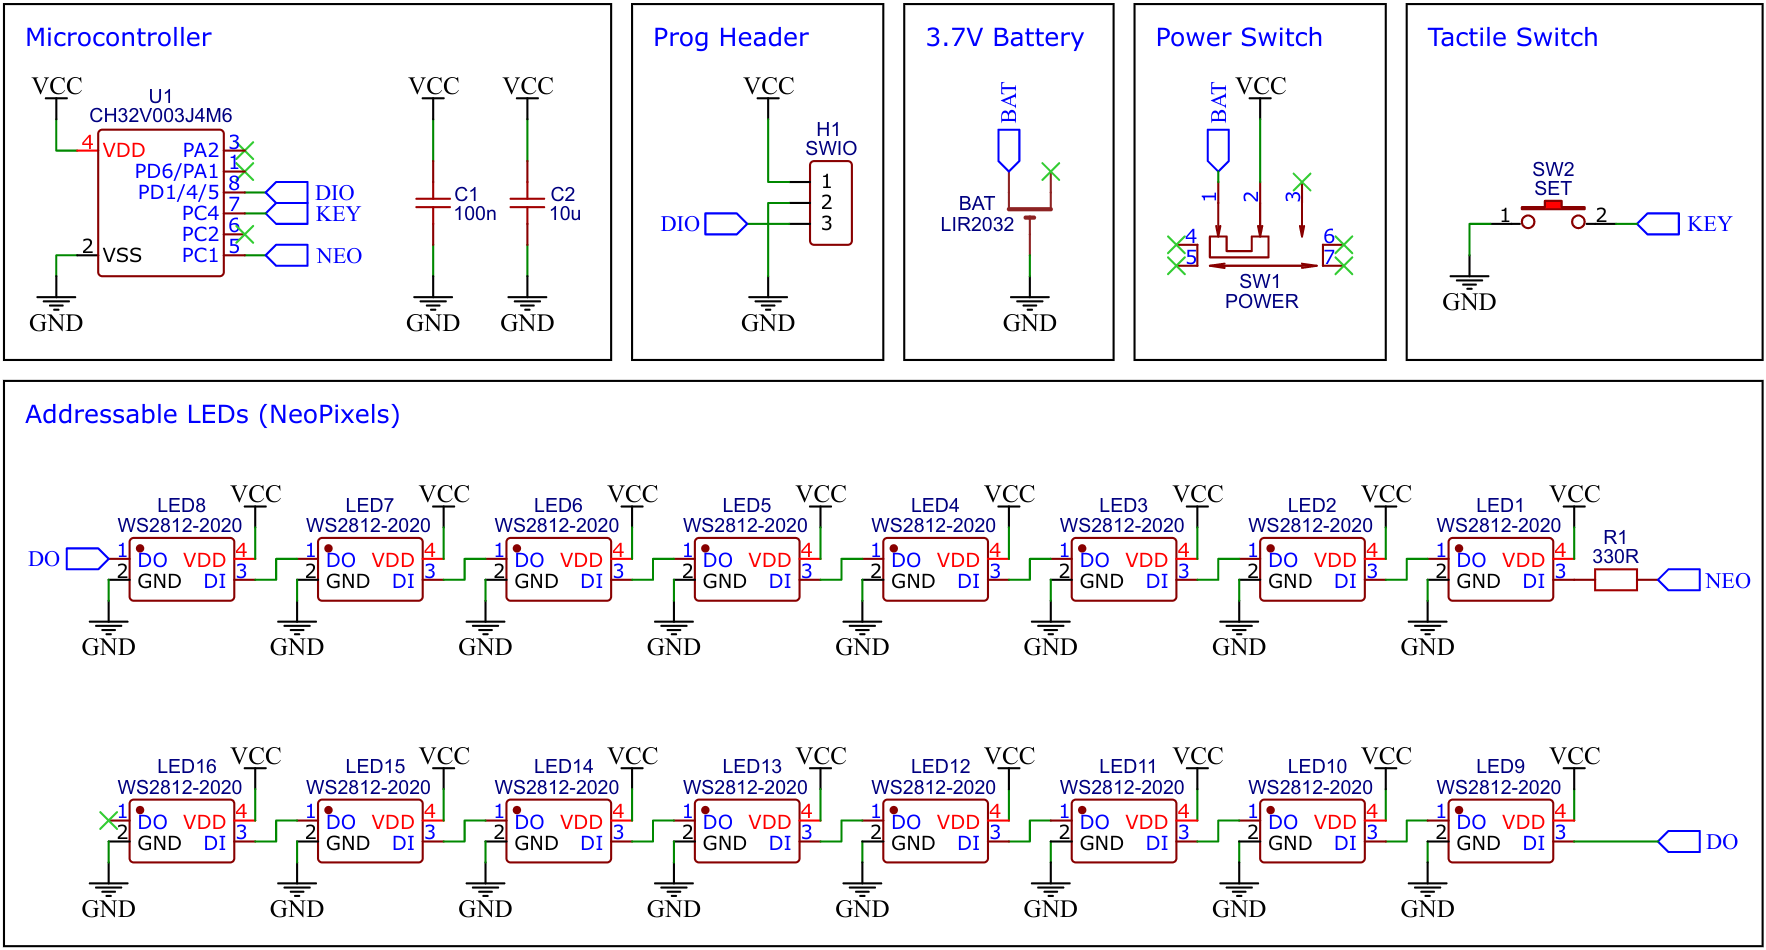
The CH32V003 series is a collection of industrial-grade general-purpose microcontrollers that utilize the QingKe RISC-V2A core design supporting the RV32EC instruction set. These microcontrollers are equipped with various features such as a 48MHz system main frequency, 16KB flash, 2KB SRAM, 2.7V - 5.5V supply voltage support, a single-wire serial debug interface, low power consumption, and an ultra-small package. Additionally, the CH32V003 series includes a built-in set of components including a DMA controller, a 10-bit ADC, op-amp comparators, multiple timers, and standard communication interfaces such as USART, I2C, and SPI.
The WS2812C-2020 is an advanced LED light source with built-in control and light-emitting circuits. It's packaged using the latest technology, fitting both the control IC and the LED chip into a small 2020 package. Each LED is a pixel containing a digital interface, a data latch, a signal shaping and amplification circuit, a precise internal oscillator, and a programmable constant current controller. This design ensures that each pixel's color is very consistent.
The LEDs use a single-line return-to-zero code for data communication. When powered on, the DIN terminal of the first pixel receives data from the controller. The first pixel takes the first 24-bit data and latches it, then processes and forwards the remaining data to the next pixel. Each pixel reduces the data by 24 bits as it passes it on. This automatic reshaping and forwarding allow for an unlimited number of pixels, depending only on the data transmission speed. The LEDs can handle a port scanning frequency of up to 2KHz, ensuring no flicker even under high-definition cameras, making them ideal for high-speed applications. The RESET time of over 280μs prevents false resets due to interruptions and supports lower frequency and cheaper MCUs.
These LEDs are energy-efficient, environmentally friendly, very bright, and have a wide viewing angle. They offer good consistency, low power consumption, and a long lifespan. Integrating the control circuit into the LED makes the setup simpler, more compact, and easier to install.
Do not use regular CR2032 3V batteries! They do not provide the necessary current to power all the LEDs.
- Take the Gerber files (the zip file inside the hardware folder) and upload them to a PCB (printed circuit board) manufacturer of your choice (e.g., JLCPCB). They will use these files to create the circuit board for your device and send it to you.
- Once you have the PCB, you can start soldering the components onto it. Use the BOM (bill of materials) and schematic as a guide to make sure everything is connected correctly. You can find the corresponding files in the hardware folder.
- Upload the firmware by following the instructions in the next section (see below).
For the implementation of the protocol to control addressable LEDs (NeoPixel), hardware SPI is typically used. Unfortunately, this is not possible with the 8-pin variant of the CH32V003, as the relevant pins are not available. Therefore, the protocol must be implemented using software bit-banging. However, this is particularly difficult at low clock rates due to the relatively high data rate of the protocol and the strict timing requirements. The essential protocol parameters for controlling the WS2812 NeoPixels (or similar 800kHz addressable LEDs) can be found in the datasheet.
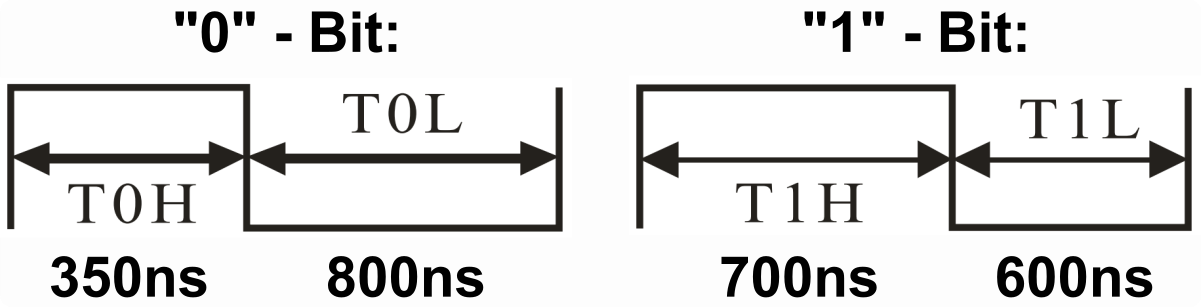
Fortunately, the timing is nowhere near as strict as the data sheet suggests. The following timing rules can be derived from the excellent articles by Josh Levine and Tim and should work with all 800kHz addressable LEDs:
| Pulse | Parameter | Min | Typical | Max |
|---|---|---|---|---|
| T0H | "0"-Bit, HIGH time | 65 ns | 350 ns | 500 ns |
| T1H | "1"-Bit, HIGH time | 625 ns | 700 ns | 8500 ns |
| T0L | "0"-Bit, LOW time | 450 ns | 800 ns | 8500 ns |
| T1L | "1"-Bit, LOW time | 450 ns | 600 ns | 8500 ns |
| TCT | Total Cycle Time | 1150 ns | 1250 ns | 9000 ns |
| RES | Latch, LOW time | 9 µs | 50 µs | 280 µs |
Apart from T0H, the maximum values can be even higher, depending on when the NeoPixels actually latch the sent data (with the type used here only after 280µs!). This also makes it possible to even work without a buffer and thus without the use of SRAM in certain cases. The software essentially only has to ensure that T0H is a maximum of 500ns and T1H is at least 625ns, so that the pixels can reliably differentiate "0" from "1" and that the time between sending two bits is less than the latch time (in this case less than 280,000ns). The following simple bit-banging function for the transmission of a data byte to the NeoPixels string was implemented:
// Send one data byte to the pixels string (works at 8MHz CPU frequency)
void NEO_sendByte(uint8_t data) {
  asm volatile(
    " c.li a5, 8                \n"   // 8 bits to shift out (bit counter)
    " li a4, %[pin]             \n"   // neopixel pin bitmap (compressed for pins 0-4)
    " li a3, %[base]            \n"   // GPIO base address   (single instr for port C)
    "1:                         \n"
    " andi a2, %[byte], 0x80    \n"   // mask bit to shift (MSB first)
    " c.sw a4, %[bshr](a3)      \n"   // set neopixel pin HIGH
    " c.bnez a2, 2f             \n"   // skip next instruction if bit = "1"
    " c.sw a4, %[bcr](a3)       \n"   // bit = "0" : set pin LOW after <= 500ns
    "2:                         \n"
    " c.nop                     \n"   // delay
    " c.sw a4, %[bcr](a3)       \n"   // bit = "1" : set pin LOW after >= 625ns
    " c.slli %[byte], 1         \n"   // shift left for next bit
    " c.addi a5, -1             \n"   // decrease bit counter
    " c.bnez a5, 1b             \n"   // repeat for 8 bits
    :
    [byte] "+r" (data)
    :
    [pin]  "i"  (NEO_PIN_BM),
    [base] "i"  (NEO_GPIO_BASE),
    [bshr] "i"  (NEO_GPIO_BSHR),
    [bcr]  "i"  (NEO_GPIO_BCR)
    :
    "a2", "a3", "a4", "a5", "memory"
  );
}
Remember that interrupts should be disabled during transmission, otherwise the timing requirements cannot be met.
There are three or four data bytes for each NeoPixel, depending on its type. These are transmitted with the most significant bit first in the order green, red and blue (GRB-type), red, green, blue (RGB-type) or red, green, blue, white (RGBW-type). The data for the NeoPixel, which is closest to the microcontroller, is output first, then for the next up to the outermost pixel. So this doesn't work like an ordinary shift register! After all color data have been sent, the data line must be kept LOW for at least 9 to 280µs (depending on the type of NeoPixel) so that the transferred data is latched and the new colors are displayed.
You can find an appropriate library (neo_sw.c) that works with all pins and at various CPU clock frequencies here.
The device shows various decorative light animations using the TinyBling's NeoPixels. It automatically switches between the various animations after a defined time interval. However, if the button is held down during power-up, the switching occurs with each button press.
A simple wheel of fortune on the TinyBling. Press the button and look forward to the result!
To program the CH32V003 microcontroller, you will need a special programming device which utilizes the proprietary single-wire serial debug interface (SDI). The WCH-LinkE (pay attention to the "E" in the name) is a suitable device for this purpose and can be purchased commercially for around $4. This debugging tool is not only compatible with the CH32V003 but also with other WCH RISC-V and ARM-based microcontrollers.

To use the WCH-LinkE on Linux, you need to grant access permissions beforehand by executing the following commands:
echo 'SUBSYSTEM=="usb", ATTR{idVendor}=="1a86", ATTR{idProduct}=="8010", MODE="666"' | sudo tee /etc/udev/rules.d/99-WCH-LinkE.rules
echo 'SUBSYSTEM=="usb", ATTR{idVendor}=="1a86", ATTR{idProduct}=="8012", MODE="666"' | sudo tee -a /etc/udev/rules.d/99-WCH-LinkE.rules
sudo udevadm control --reload-rules
On Windows, if you need to you can install the WinUSB driver over the WCH interface 1 using the Zadig tool.
To upload the firmware, you need to ensure that the battery is removed. Then, you should make the following connections to the WCH-LinkE:
WCH-LinkE      TinyBling
+-------+      +-------+
|  SWDIO| <--> |DIO    |
|    GND| ---> |GND    |
|    3V3| ---> |VCC    |
+-------+      +-------+
If the blue LED on the WCH-LinkE remains illuminated once it is connected to the USB port, it means that the device is currently in ARM mode and must be switched to RISC-V mode initially. There are a few ways to accomplish this:
- You can utilize the Python command-line tool rvprog (with -v option).
- Alternatively, you can select "WCH-LinkRV" in the software provided by WCH, such as MounRiver Studio or WCH-LinkUtility.
- Another option is to hold down the ModeS button on the device while plugging it into the USB port.
More information can be found in the WCH-Link User Manual.
Install the toolchain (GCC compiler, Python3, and rvprog):
sudo apt install build-essential libnewlib-dev gcc-riscv64-unknown-elf
sudo apt install python3 python3-pip
pip install rvprog
Remove the battery from the device. Connect the TinyBling via the 3-pin PROG header to the WCH-LinkE programming device. Open a terminal and navigate to the folder with the makefile. Run the following command to compile and upload:
make flash
Follow the instructions on CNLohr's ch32v003fun page to set up the toolchain on your respective operating system (for Windows, use WSL). Also, install Python3 and rvprog. Compile and upload with "make flash". Note that I only have Debian-based Linux and have not tested it on other operating systems.
- Install PlatformIO and platform-ch32v. Follow these instructions to do so. Linux/Mac users may also need to install pyenv.
- Click on "Open Project" and select the firmware folder with the platformio.ini file.
- Remove the battery from the TinyBling. Connect the WCH-LinkE to the board, then click "Upload".
WCH offers the free but closed-source software WCH-LinkUtility to upload the precompiled hex-file with Windows. Select the "WCH-LinkRV" mode in the software, open the .hex file in the bin folder and upload it to the microcontroller.
Alternatively, there is an open-source tool called minichlink developed by Charles Lohr (CNLohr). It can be used with Windows, Linux and Mac.
If you have installed Python3 on your system, you can also use the platform-independent open-source command-line tool rvprog for uploading:
rvprog -f bin/<firmware>.bin
The firmware uses the MCU's standby mode to save energy. However, this can make it impossible to reprogram the chip using the single-wire debug interface. If that happens, you will need to perform a power cycle erase ("unbrick") with your programming software. This is not necessary when using the Python tool rvprog, as it automatically detects the issue and performs a power cycle on its own.
- EasyEDA Design Files
- MCU Templates
- MCU Flash Tools
- WCH: CH32V003 Datasheet
- WS2812 Datasheet
- Josh Levine's Article about NeoPixels
- Tim's Article about NeoPixels
- AdaFruit NeoPixel Überguide
- ATtiny13A TinyBling

This work is licensed under Creative Commons Attribution-ShareAlike 3.0 Unported License. (http://creativecommons.org/licenses/by-sa/3.0/)