![]()
A Source of Truth for the Cisco Community Engagement, with creation and storage of Text and MP3 files.
The idea for this project came from our team’s desire to attach audio versions of the blogs and articles we post to the Cisco Community. This will enable those who are visually impaired and give everyone else the option to listen instead of reading. I also wanted to have a place to store all my blog and article documents, other than a folder on my desktop. This source of truth (SOT) of text templates and their associated audio MP3s will also serve as an archive for future use of this knowledge.
The continuous integration (CI) pipeline which I’m about to share is worth sharing because it does two things in particular, which you may have assumed GitHub Actions would do out of the box, but for which I had to do some research to find and implement a niche tool.
These two things are:
-
Detect exactly which file(s) have changed in a Push to GitHub and assign the properties of those files to variables.
-
After running a script using those variables, automatically Commit and Push back into the GitHub repository.
A) Provides a template for your blog or article and shows you how to check it for spelling and grammar errors
B) Shows how to create a directory and upload your blog or article in .docx format
C) An automated workflow will create a new project folder based on your .docx file name. So, uploading a .docx named "UCCE Script Generation" will create a folder with the name "UCCE_Script_Generation". Automation will convert the .docx to an MP3, saving it in an 'mp3s' sub-folder in your new project. All URLS and empty lines will have been removed, to give your audio a smooth, consistent flow. In the end, you'll have:
- A new folder, named for your .docx file, inside of which will be:
- A downloadable copy of you original .docx document
- A readable .txt version of your document
- A downloadable MP3, inside of an 'mp3s' sub-folder
D) Explains the need to compress your MP3 into a ZIP in order to attach it to your article or blog
E) Gives alternate means of generating your MP3, for more control over spoken accent.
The final result is a text source of truth (.docx, .txt and MP3) for your blog or article in the relative directory in this repo. This data structure of blog and article neta data serves as a record, backup and can eventually serve as an archive for published on the Cisco Community - Developer Hub.
Write your post in Word. If needed, download the post template and adjust as necessary. Use the Spelling and Grammar check, under the Review tab, in MS Word, or do the same in another text editor
A colleague moderator can review the document. A good tool to use, when the document is online as a draft, is the Grammar & Spell Checker — LanguageTool extension for the browser to check for spelling and grammar https://chrome.google.com/webstore/detail/grammar-spell-checker-%E2%80%94-l/oldceeleldhonbafppcapldpdifcinji?hl=en-US
If changes need to be made, the moderator will make the changes or the writer will make the changes themself.
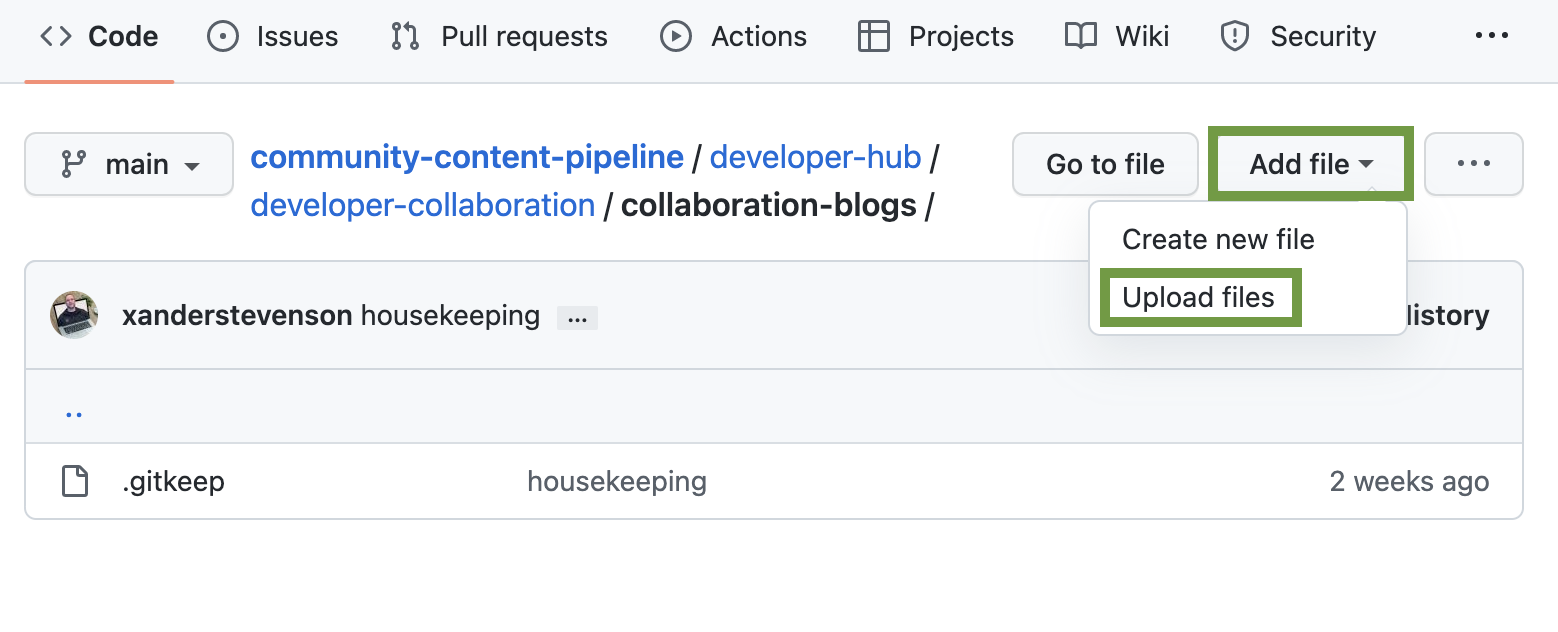
Once all the edits are finished, find the directory where your article/blog will be.
Upload your article or blog in .docx format
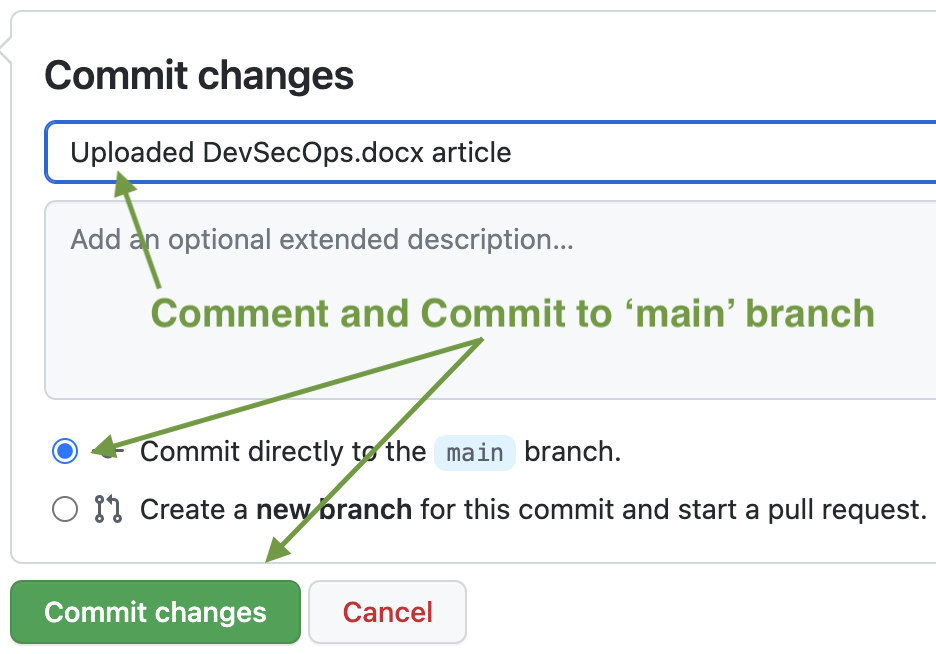
At the bottom of the page, comment and commit to the 'main' branch. This will start a workflow to create a project folder with all your files, including a sub-folder called 'mp3s', where it will place the MP3.
Details: It will create your project folder and 'mp3s' sub-folder, if they do not already exist. It will convert the .docx to .txt using the docxtotxt library, removing all images, empty lines and URLs. Then it will convert the .txt to an MP3 using gTTs. If you change your .docx and re-upload, it will overwrite the .txt and MP3. Whenever the process, is run, the .docx file you've uploaded is copied into the project folder and the original is deleted from the repo.
- It's not a bad idea to scan the .txt file and/or listen to the MP3 to make sure the final product is satisfactory.
Now, just download the MP3 from the 'mp3s' folder, compress it into a ZIP file, and attach it to your blog or article post on the Cisco Community!
In order to attach your MP3 to the blog post or article, you will need to compress it into a ZIP file.
- With either way below, don't forget to add and commit your .docx or .txt and MP3 files in the repo, to serve as backups.
-
Use txt_2_mp3 - this will give you more control over the accent you want. When it's finished, upload the MP3 to your project folder in the this repo, under developer-hub and don't forget to attach it to your blog/article on the community.
-
Use an online text to MP3 converter and attach the results to you post. Attach it to your blog/article on the Community.
Remember to In order to attach your MP3 to the blog post or article, you will need to compress it into a ZIP file.