**注意:**这实际上是一个Floodlight的fork项目。
- 如何安装和运行Floodlight,请参看:Floodlight - Installation Guide 你需要做的是把git repo url 改成
https://github.com/xiaochengzhong/floodlightUI - 关于如何用Mininet + Floodlight 搭建测试环境请参见:http://liwenjunmm.diandian.com/post/2013-01-16/40047359629
Floodlight也即Floodlight Open SDN Controller是一个企业级的,使用Apache协议的,基于Java的OpenFlow控制器。它由[Big Switch Networks]社区的众多开发者维护。
OpenFlow是一个由Open Networking Foundation (ONF)管理的开放标准。它定义了一种协议让远程控制器通过路由器可以修改网络设备的行为,使用定义良好的转发指令集。Floodlight被设计为同正在增长的交换机,路由器,虚拟交换机,通过支持OpenFlow标准的设备一起工作。
一般的体系机构:

Floodlight的一些重要特性:
- 提供一个模块加载系统,使得拓展和提升变得简单。
- 容易构建——最小依赖。
- 支持多种虚拟的或物理的OpenFlow交换机。
- 能够处理OpenFlow和非OpenFlow的混合使用情形。它能管理多个OpenFlow硬件「岛屿」。
- 为高性能而设计。
- 支持OpenStack cloud orchestration platform
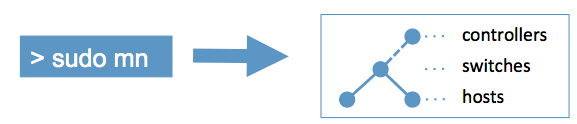
Mininet是由一些虚拟的终端节点(end-hosts)、交换机、路由器连接而成的一个网络仿真器,它采用轻量级的虚拟化技术使得系统可以和真实网络相媲美。
Mininet可以很方便地创建一个支持SDN的网络:host就像真实的电脑一样工作,可以使用ssh登录,启动应用程序,程序可以向以太网端口发送数据包,数据包会被交换机、路由器接收并处理。有了这个网络,就可以灵活地为网络添加新的功能并进行相关测试,然后轻松部署到真实的硬件环境中。
Mininet的特性
- 可以简单、迅速地创建一个支持用户自定义的网络拓扑,缩短开发测试周期
- 可以运行真实的程序,在Linux上运行的程序基本上可以都可以在Mininet上运行,如Wireshark
- Mininet支持Openflow,在Mininet上运行的代码可以轻松移植到支持OpenFlow的硬件设备上
- Mininet可以在自己的电脑,或服务器,或虚拟机,或者云(例如Amazon EC2)上运行
- Mininet提供python API,简单易用
- Mininet是开源项目,源代码在:https://github.com/mininet
简单的使用方法
我们在VirtualBox安装Mininet虚拟机,虚拟机的镜像下载:http://floodlight-download.projectfloodlight.org/files/floodlight-vm.zip
利用它可以非常方便的模拟出一个N叉树的网络,其中每一个中间节点都是一个Switch,每一个叶节点都是一个Host。例如,模拟出一棵四层的满二叉树网络的命令为:
sudo mn --topo tree,depth=3,fanout=2 --controller=remote --ip=xxx.xxx.xxx.xxx --port=6633
更多Mininet操作指导可以参见http://mininet.org/walkthrough/。
Mininet可以连接到Floodlight作为Controller,Controller可以是本地的或者远程的。默认情况下一个Mininet虚拟网络中的Swicth只能使用同一个Controller,但是可以通过编写自定义脚本的方式来构建Mininet拓扑,并且在其中显示的指定多个Controller。
我们希望基于Floodlight现有的API (REST API, Static Flow Pusher API) 实现一个简单的管理站点。它的主要功能有:
- 查看Switch列表及各个Switch的信息
- 查看Host列表及各个Host的信息
- 查看网络拓扑图
- 查看流表
- 针对某个Switch添加/删除Static Flow
- 查看日志
根据应用的需求和相关技术特性,我们对程序做如下体系结构设计:

我们对上图做简单的说明:
- Mininet虚拟网络。 底层虚拟机上的操作系统上安装有Mininet。通过Mininet我们可以创建多种类型的拓扑,并且可以把Floodlight Controller设置为远程,在我们的方案中Floodlight安装在虚拟机的宿主机上。
- Floodlight 负责监听和控制虚拟机中拓扑的动态。并开放REST API,执行相应的任务。
- Proxy 我们在宿主机上又搭建了一台服务器,后端即Command Proxy负责转发前端Web Interface的操作请求给Floodlight。
- Web Interface 为整个应用的前端,即主要的用户界面。负责内容展示和交互。根据用户操作生成相应的请求,发送到代理服务器。从服务器拿到结果后,对内容进行渲染展示给用户。这些页面上包括拓扑展示和操作,设备信息展示,流表展示和操作,日志显示等。
具体的模块间协作图:

由于ajax不能跨域请求,所以我们建立了一个服务器端代理。Command Proxy是我们用PHP编写的一个后端脚本,它用来转发Web Interface的请求或者执行Web Interface发送的命令。
TODO:

我们首先为用户提供了可视化界面来查看路由的列表,所有路由的IP Adress、Vender、Packets、Bytes、Flows以及Connected Since信息一览无遗。

同时我们继续利用Floodlight的自带API让各主机的信息也展现在了用户面前。


我们还提供了查看流表的功能。用户可以看到流的名称、Cookie、优先级、数据包数量等信息。

应用给用户提供了增加和删除流表的功能。在流表的下方我们为用户提供了命令输入窗口,在这里用户可以自主输入添加流表命令,比如示例命令如下:
curl -d '{"switch": "00:00:00:00:00:00:00:09", "name":"flow-mod-1", "cookie":"0", "priority":"32768", "ingress-port":"1","active":"true", "actions":"output=2"}' http://localhost:8080/wm/staticflowentrypusher/json
来添加一条流表(具体命令格式详见Floodlight REST API说明)。上图是在添加流表,下图则是添加流表成功的样子。我们可以明显看到流表中多了一条记录。

删除和添加基本上一样,区别仅在于命令不同。这是删除上面添加的流表的示例命令:
curl -X DELETE -d '{"name":"flow-mod-1"}' http://localhost:8080/wm/staticflowentrypusher/json


对命令中的一些参数的说明
Possible properties of a flow entry:
| Key |
Value |
Notes |
|---|---|---|
| switch | <switch ID> | ID of the switch (data path) that this rule should be added to xx:xx:xx:xx:xx:xx:xx:xx |
| name | <string> | Name of the flow entry, this is the primary key, it MUST be unique |
| actions | <key>=<value> | See table of actions below Specify multiple actions using a comma-separated list Specifying no actions will cause the packets to be dropped |
| priority | <number> | default is 32767 maximum value is 32767 |
| active | <boolean> | |
| wildcards | ||
| ingress-port | <number> | switch port on which the packet is received Can be hexadecimal (with leading 0x) or decimal |
| src-mac | <mac address> | xx:xx:xx:xx:xx:xx |
| dst-mac | <mac address> | xx:xx:xx:xx:xx:xx |
| vlan-id | <number> | Can be hexadecimal (with leading 0x) or decimal |
| vlan-priority | <number> | Can be hexadecimal (with leading 0x) or decimal |
| ether-type | <number> | Can be hexadecimal (with leading 0x) or decimal |
| tos-bits | <number> | Can be hexadecimal (with leading 0x) or decimal |
| protocol | <number> | Can be hexadecimal (with leading 0x) or decimal |
| src-ip | <ip address>[/mask] | xx.xx.xx.xx[/xx] |
| dst-ip | <ip address>[/mask] | xx.xx.xx.xx[/xx] |
| src-port | <number> | Can be hexadecimal (with leading 0x) or decimal |
| dst-port | <number> | Can be hexadecimal (with leading 0x) or decimal |
Possible actions within the "action" field:
| Key |
Value | Notes |
|---|---|---|
| output | <number> all controller local ingress-port normal flood |
no "drop" option (instead, specify no action to drop packets) |
| enqueue | <number>:<number> | First number is port number, second is queue ID Can be hexadecimal (with leading 0x) or decimal |
| strip-vlan | ||
| set-vlan-id | <number> | Can be hexadecimal (with leading 0x) or decimal |
| set-vlan-priority | <number> | Can be hexadecimal (with leading 0x) or decimal |
| set-src-mac | <mac address> | xx:xx:xx:xx:xx:xx |
| set-dst-mac | <mac address> | xx:xx:xx:xx:xx:xx |
| set-tos-bits | <number> | |
| set-src-ip | <ip address> | xx.xx.xx.xx |
| set-dst-ip | <ip address> | xx.xx.xx.xx |
| set-src-port | <number> | Can be hexadecimal (with leading 0x) or decimal |
| set-dst-port | <number> | Can be hexadecimal (with leading 0x) or decimal |
最后我们还完成了查看日志的功能。整个拓扑网络的日志监听完整地在这里反映出来了,并能够根据日志实时更新页面。页面的样子如下:

以下所有命令的具体信息请参看:Mininet Walkthrough
查看节点中连接信息,在mininet控制台输入以下命令:
mininet> net
结果如下:

查看所有节点的IP端口信息,在mininet控制台输入以下命令:
mininet> dump
结果如下:

查看特定switch或host的端口信息,在mininet控制台输入以下命令:
mininet> s9 ifconfig -a //s9 is a switch name
结果如下:

查看特定switch或host的arp或route信息,在mininet控制台输入以下命令:
mininet> s9 arp //s9 is a switch name
mininet> s9 route //s9 is a switch name
结果如下:

查看两个节点间的连接信息,在mininet控制台输入以下命令:
mininet> h1 ping -c 1 h2 //h1 , h2 is a host name
结果如下:

查看所有节点间的连接信息,在mininet控制台输入以下命令:
mininet> pingall
结果如下:
