Created by Kazuhiro Abe
abee at squeakland dot jp

Translated by Yohei Yasukawa
yohei@yasslab.jp from YassLab
This material is license under CC BY-SA 3.0.
The game workshop of "Escape from a cat!" is a workshop that creates a game program by hands using Scratch, a visual programming language for kids. This document is written for facilitators of the workshop. This workshop targets for kids who have never made a program. And it takes 30 minutes at least, and takes about 2 hours if you would like to cover advanced topics.
First, access to the Scratch website to make your code run in your web browser. Or, download offline Scratch editor.
- Scratch https://scratch.mit.edu/
- Scratch offline editor https://scratch.mit.edu/download
| Name | Meaning |
|---|---|
| Sprite | Main object (character) that behaves as you program on the stage. |
| Category | The category of blocks (scripts) that Sprite follows. |
| Stage | The area in which Sprite behaves by following scripts. |
| Block Palette | The list of selected blocks. |
| Script Area | The area for Building scripts that Sprite follows. |
| Costume | The image that affects the appearance of Sprite. |
- For putting workshop participants in the same status, click "File" -> "New" in the menu bar. (Note: Don't use pronouns, such as "this" and "that", if possible. And repeat the instruction if needed. This note should be applied for all the following instructions.) You don't need to click "File" -> "New" if you have just run Scratch. If a dialog appeared to confirm saving the existing scripts, click "No". (If there is a participant who really want to save the scripts, treat individually.) Then, facilitators confirm that each participant's Scratch status is 1). selected "Motion" category, 2). no scripts in script area, and 3). a cat (Sprite) at the center of stage.
- As a first script to make the sprite (cat) run, click the blue "move 10 steps" block from the block palette, a list of blocks in the left.
Let participants see the cat in the stage, and ask what happened to it. (Prospective answer: It moves to right a little.)
If needed, explain that "a step" is equivalent to a dot. (In case that you use a projector, you will be able to see a dot, so you may let them show a dot.) As you click the block, the cat moves 10 dots to right.
Click the block many times until the cat moves outside of the stage. (The point is for participants to see that clicking a block by hands is tedious.)
When the cat doesn't move, drag the tail of it, and drop it at the center of stage.
While dragging and dropping, facilitators need to carefully observe kids, and support them if they are difficult to manipulating a mouse, such as dragging and dragging. (But ideally, support by explaining, not by manipulating instead of them, and let them do by their hands.) - You can make it move in this way, but it's tired, so let's make it repeat moving so that it moves without clicking the block. Now, you need to make a program. Program is a list of blocks (scripts) in order. (In this document, a program has same meaning of a script).
To make a program, drag a "move 10 steps" block, and bring it to the script area, the gray window at the center. But just bringing the block doesn't change anything; still, it's the same situation that clicking a block makes the sprite move.
So then, click "Control" (the top-right orange block in the top-left window), bring "forever" block to the script area, and pinch the "move 10 steps" block (you will see that the C-shaped block changes when it's close to the other block).
If you click the "forever" block, then the cat moves forever until it touches the edge of right side. You can drag its tails and bring it back to the center of stage, but it repeats again.
To stop moving, click the red octagonal button (light) at the top right. When the cat stopped, bring it back to the center of stage. Now, you made a first program. (Note: It's good timing for participants to compare the differences between clicking a block many times and making a program.)
Facilitators need to carefully check if each kid successfully followed the instructions. If there is a kid who didn't, support him/her individually. - It seems that the cat moves when you click the green flag at the next of red light, but it doesn't move.
To make it move by clicking the green flag, you need to put the "when (green flag icon) clicked" block on the "forever" block. Drag the block and bring it close to the "forever" block, you will see a white line between the blocks. Then, drop the block. The two blocks stick together.
Now, clicking the green flag can start moving the cat, and clicking the red light can stop moving it. - Next, let's make the cat move back when it touches on the right edge. To make it, drag "if on edge, bounce" block in "Motion" category, and put it inside "forever" block (just after the "move 10 steps" block).
Now, clicking the green flag makes the cat move right and left forever.
It's good timing to ask if there is something strange; the cat turns upside down when moving back. Specifically, you would like to stop it when the sprite moves from right to left. To stop it, click the ↔ icon, next to the sprite icon in the top center window, in order to make the sprite turn only horizontally when moving back. - If you keep asking if there is something strange other than that, you would hear that the cat's legs don't move at all. So, you should make it move.
First, click the red light to stop moving.
In the center window, at the top next of script area, there is a "Costumes" tab. When you click the tab, the script area is switched and two cat images are displayed. These are the costumes for cats. When you click the other costume (not selected now), the cat's costume in the stage will be switched. (Note: If you double click the costume, a paint editor for the costume will be opened up. In that case, click the "Cancel" button at the right bottom to close it.) Now, you would get an idea that you can make the cat's legs move like a flip cartoon if you switch the costume in a timely manner.
To embody the idea, click purple-colored "Looks" category (at the next bottom to "Motion" category), click "next costume" block. Then, you will see that the cat's costume on the stage is changed to the next. So, putting this block inside the "forever" block makes the cat's legs move. Now, drag the "next costume" block, and drop it at the next bottom to "if on edge, bounce" block inside "forever" block.
Finally, clicking the green flag makes the cat (sprite) walk. - One more step: Now you created a program that make Sprite walk. However, just making it move right and left might not be so interesting, so let's make it move around in the whole stage. All you need to do is just to change the direction of sprite. At the top center, there is a blue line over the sprite icon, which shows its direction. So, drag the line and change the direction as you want. Then, you can make the sprite move around in the stage.
- In the previous section, you did make your first program, making Sprite walk. From this section, we'll create a game called "Escape from a cat". Ask participants which animal escapes from a cat, and the answer would be a mouse (at least in Japan). So, let's create a new character (new sprite).
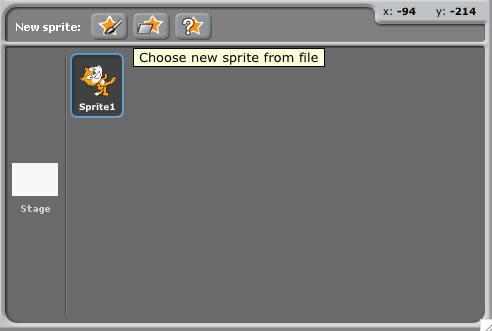
To create it, click the folder-over-star icon, "Choose new sprite from file", at the 2nd of 3 buttons right next to "New sprite:" label in the bottom right.
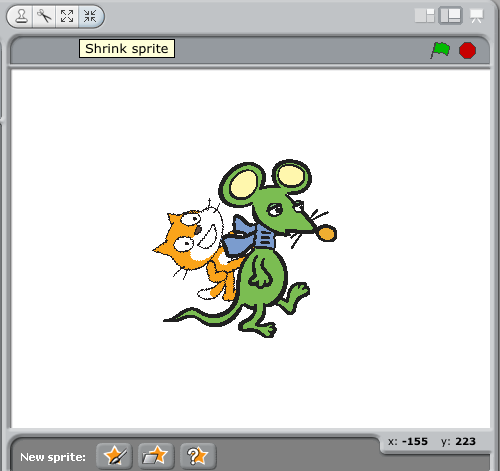
When a dialog opened up, press "OK" button (you will go into "Animals" folder). Then, scroll down and look for "mouse1" image. When you found, click it, and press "OK" (or double click the mouse). Now, you see that the selected mouse appears on the stage. (And you may hear the voice, "big!", from kids.) - But, by comparing with the size of cat, the size of mouse is too big. So, make it small. There are 4 buttons on the next top-left of the stage. Click "Shrink sprite" button that has 4 arrows go inward. Then, your mouse cursor will change into the same icon with the button. Now, click the mouse several times to make it small enough (probably for one third of the existing cat).
- Next, make a program for the mouse. First, in the same way as programming a cat, pick "when (green flag) clicked" and "forever" blocks from "Control" category, put them on the script area, and stick them together. As you might notice, this is a basic template of Scratch programming; in other words, almost all Scratch programs (scripts) should have this part.
In this game, the mouse is a main character that you controls, you need to be able to control it. So, in this time, let's make a program to make it move around in the stage by mouse cursor. Because you will make it "move", the related block that we look for should be in "Motion" category. When you click "Motion" category and switched block palette, you will see that there is a "go to ▾" block in the 7th from the top. Clicking "▾" opens menu, and you can find "mouse-pointer" in the menu. The "mouse-pointer" means a mouse cursor (arrow) that you use. So, click the "mouse-pointer", then you will see that the block becomes "go to mouse-pointer". Now you got a block you need, so drag and drop it inside "forever" block. You could understand how your program works by reading through your blocks: "when (green flag) clicked, forever, go to mouse-pointer." And it seems fine, so click the green flag to check if it works correctly. As we though, the mouse starts following your mouse cursor. Also, the cat starts moving around as you programmed in the previous section. - However, nothing happened when your mouse is caught by the cat. It's because you have never programmed anything about it yet. So, let's program it. Before stepping forward, it's good timing to through a question at participants: What does "a mouse is caught by a cat" mean? Stop programs by clicking the red light, drag the mouse, and put it away from the cat. This is not "a mouse is caught by a cat". Next, drag the cat, and put it over the mouse; in other words, a cat is touching a mouse. This is "a mouse is caught by a cat". From these points, by checking if a cat is touching/not touching a mouse, you can find out if a mouse is caught by a cat or not. To check it, you could use a block in "Sensing" category.
- Of course, there are many blocks in the category. But for now, giving attention to colors (especially, the cat's color "Orange" from the point of mouse), we will use the "touching color ■ ?" in the 2nd from the top. As in "mouse-pointer", clicking ■ changes your mouse cursor from arrow into syringe. When changed, click the orange color on the cat. Then, the color of ■ was changed into the color you selected with the syringe cursor.
Now, you would like to use the block, but there is no blocks fit to the block we created, because it is hexagonal. So, for now, drag and drop the block somewhere in the script area, and leave it there. - Next, ask what should happen when a mouse is caught by a cat. Then, this game should exit; in other words, it should be "Game Over". Game over is a state that the game stops so that you can't control any characters. It's the same state as you click the red light. So, if there is a block that clicks the light instead of you, you can program "Game over". And yes, there is a "stop all" block at the bottom of "Control" category. However, there is no block in our script area that fits to this block, so just put the block somewhere in the area; we'll use that block later.
- Now, we have two blocks: "touching color (orange)?" and "stop all". But the blocks can't stick together. So, let's look for a block that connects between the blocks. When you look for such blocks from block palette (it should be "Control" category), you will find a few blocks that have space to put a hexagonal block. Especially, a "if" block seems to be easy to use between such blocks. So, drag the block and put it to somewhere in script area.
- Next, put "touching color (orange)?" block on the hexagonal space in "if" block. Then, the blocks stick together and you will get a "if touching color (orange)?" block. Also, put "stop all" block on the C-shaped space in the "if" block you created. Then, you will get a block, "if touching color (orange), then stop all".
- If you successfully create the block, you can add it to the existing script. Drag the characters of "if" in the block, and bring it to the next bottom of "go to mouse-pointer" in "forever" block. It's good timing to read through the scripts you get: "When (green flag) clicked, forever, go to mouse-pointer. If touching color (orange), stop all." Finally, you get the script (game) that you want.
- So, let's play the game by clicking the green flag. Control your mouse to escape from a cat. When your mouse is caught by the cat, all characters stop (game over). To restart the game, click the green flag again. (Note: Playing the game for a few minutes is a good enough, but it sometimes depends on your circumstance.)
- If your participants feel that this game is too easy, then it's good timing to teach them how to make it more difficult. The simple solution is to increase the number of cats. Any sprite (such as cats and mice on the stage) can be copied (like Ninja!). To copy sprites, there is a stamp-icon button at the top left of stage (in the same line of button that you used for shrinking the size of mouse. So, click the stamp button first, and click the cat next. Then, you see that the cat is copied into two. (Note: The number of cats should be 2 or 3, because the game is too difficult when the cats on the stage are more than 3; however, it sometimes depends on your circumstance as in the previous section.)
- Or, to make the game difficult, changing the speed of cat is also a good idea. Choose a cat (or one of cats) from the area of sprite icons at the bottom right of window, click the number in the "move 10 steps" block, and type any numbers in it (and press Enter key). Then, the speed of cat is changed. To make it more difficult, you can change the direction of cat by dragging the cat icon at the top left of the script area. If there are a few cats and each cat moves to different directions, then your game becomes very hard. (Note: As usual, keep controlling playtime based on your circumstance).
- The game works fine, but its background image is pure white, which is not a good design. So, create a background image. Click "Stage" icon at the left of sprite area, and click "Backgrounds" tab at the top of script area. Then, press "Import" button at the right of "New background:" label. Then, after a dialog is opened, click "OK" button. (You will go into "Indoors" folder selected at default. For the first time, let kids choose a background from this folder to smoothly conduct this workshop.) Choose a backgound image you lick, and click "OK" button. Then, the background image of stage is switched to it.
- To pleasantly play this game, switch the size of stage to fullscreen. You can switch to fullscreen by clicking a screen button (presentation mode) at the top right of window. Playing a game in the fullscreen mode (presentation mode) is same as usual; just click the green flag to start a game. Exit from the presentation mode, click the left-curved arrow at the top left. (Note: This is also a pitfall for facilitators to let kids play the game for too long time. So, keep controlling playtime.)
- Even if you create a game like this time, it will be deleted when you switched off your personal computer. To avoid such a situation, you need to save your program. Click "Save As..." from "File" menu, then a dialog will be opened up. Click "Desktop" icon at the left of dialog, click the input form at the right of "New Filename:" label, and type your game name. (Note: The reasons why we save a game at Desktop are that usually Desktop is writable and finding out the game is easy for kids.) The name of game is usually come from its concept, but for this workshop, it should be named by some rules, such as dates and nicknames, which makes the workshop smooth. However, facilitators need to pay attention to personal information, which should be carefully handled.
When typing a game name, there may be some kids who are stuck at keyboard input. It should be typed by themselves if possible, but if it seems too difficult, support them. Also, let kids write their game name to a memo or something, and let them have it in order to be able to continuously create a game at schools or home.
The other input forms, such as "Project author" and "About this project", can be blank, so leave them blank. When finished typing a filename, click "OK" button. When your game file is successfully saved, its name appears at the top left of stage area.
To re-open your game, click "Open..." from "File" menu, click "Desktop" icon in the dialog, and select your game file (and press "OK" button as usual). - You can skip the rest of instructions, but if you have time to teach more, you can additionally teach the following subjects: 1). draw your own character by "Paint" in "Costumes" tab (the point is teach how to pick a color), 2). play a sound when something happened by "Record" or "Import" in "Sounds" tab, and 3). add a score and timer to stage (in this case, you need to teach how to use blocks in "Variables" category). Observe your workshop participants, find out what they are interested in, and decide which instruction(s) above is fit to your workshop.
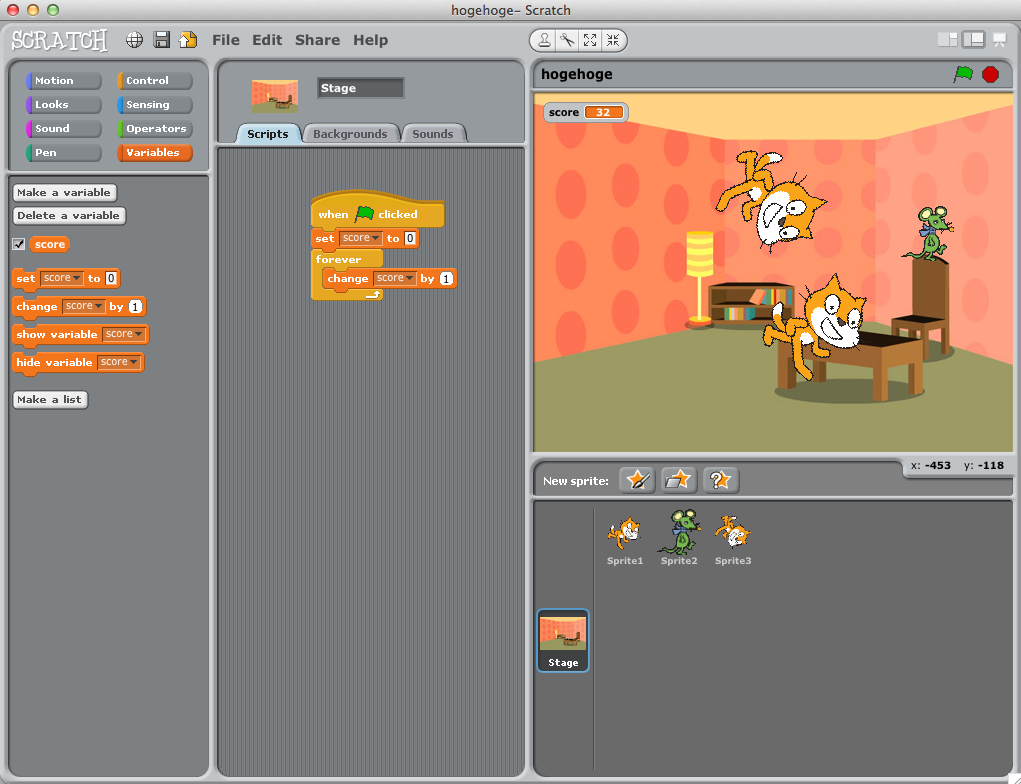
- Between the three instructions, adding a score/timer is most difficult to teach. So, in case of that, the rest of instructions help you teach how to implement a score (just quick hints, not detailed). First, to add a score, click the stage icon at the left of sprite area, click "Variables" category, and click "Make a variable". And type "score" in the focused input form and click "OK" (or press Enter key). Then, some blocks related to the "score" variable are added to block palette, and the "score" variable appears at the top left of your stage.
- Next, switch to "Control" category, and create a script with "when (green flag) clicked" and "forever" blocks. Then, get back to "Variables" category, and put "set score to 0" block between the blocks (not inside "forever" block). Finally, put "change score by 1" inside "forever". Then, click the green flag to play a game with score.
- When you share your game online, anyone can play it with a web browser. If you are planning to teach how to share, create an account for the workshop and share it with participants, preferably before the workshop starts. And write the login name (username) and password of that account on a whiteboard, or show them with a projector . (Note: If you would like kids to make a program after the workshop, distribute them with a paper or something portable).
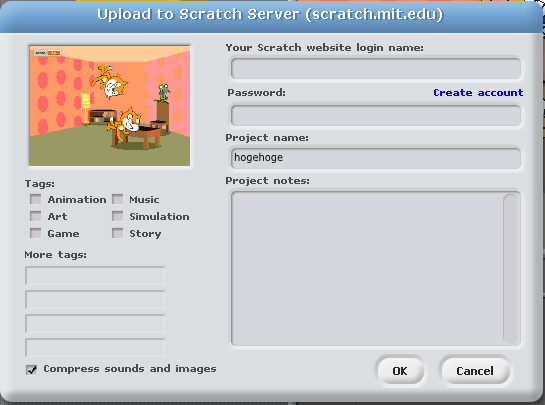
Click "Share This Project Online..." from "Share" menu, then a dialog is popped up and require login name (username) and password. So, let them type the shared account's ID and password. In the same way as you saved the project, you don't need to fill in other input forms, such as Tags and Project notes.
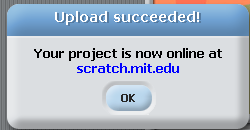
- If you successfully uploaded your game, a dialog that says "Upload succeeded!" is popped up. Then, do NOT click "OK" button; instead, click the blue text, "scratch.mit.edu".
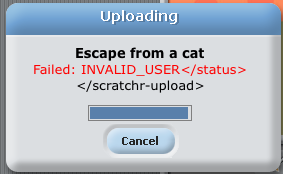
If you failed uploading (generally because of mistype), then a dialog that says "Failed" is popped up. In such cases, double check given login name (username) and password, and re-try uploading.
Also, in case that you clicked "OK" and close the dialog by mistake, click "Go To Scratch Website…" from "Share" menu.
Then, your default web browser is opened up (when not running), and automatically go to Scratch website. Now, regardless of succeeded/failed uploading, let kids go to Scratch website, click "Sign in" at the top right, and type the username and password.
If successfully logged in, "Sign in" is replaced with your thumbnail picture, so click the picture, and click "My Stuff". Then, let kids find out their game by the game name that they typed, and if found, click it. (Note: the game name cannot be on the top page, if so, click "Load More" to look further.) Also, make sure to encourage kids to play other games that the other students in the workshop created.
In this way, they can play any game from schools, home and any places that can access to Scratch website. - The final instruction is to teach how to remix games online. To remix, from the any game page in the Scratch website, click "See inside" button at the top right, then you can see, remix, and re-share its scripts with Scratch 2.0. (Note: In Scratch 2.0, the layout of each area is slightly changed, but basically it has same functions in Scratch 1.4. So, you can instantly understand which area in Scratch 2.0 is corresponding to which area in Scratch 1.4.) All games uploaded to Scratch website are licensed under CC BY-SA, so you should encourage kids to remix and re-share others' games. (Final note: you should explain why remixing and re-sharing others' games uploaded to Scratch website is not pirates. For details, see License to play.)
This material is licensed under Attribution-ShareAlike 3.0 Unported (CC BY-SA 3.0).
