Reverse Engineering
For most controllers, watching the incoming MIDI messages sent to Mixxx and referring to the manufacturer's documentation is enough to find all you need to map a controller to Mixxx. Unfortunately, it is common for manufacturers' documentation to be incomplete (for example, not documenting the MIDI message to request the position of all the knobs and faders when the DJ application starts) or completely missing. In these cases, you'll need to reverse engineer how the hardware communicates with other DJ software to get it working with Mixxx.
The MIDI Crash Course page has more background information about interpreting MIDI messages.
- Start Mixxx from a command prompt using the
--controllerDebugoption like so:
- Linux:
user@machine:~$ mixxx --controllerDebug - Windows:
C:\Program Files\Mixxx>mixxx --controllerDebug - macOS:
$ open -a mixxx --args --controllerDebug
- Look at the output
- Watch the console output or look at the Mixxx.log file which will contain all of the MIDI messages Mixxx receives. As you manipulate the controller, the MIDI commands it sends will be printed to the screen/logged to the file. Compare the status (first) byte in each line with the table above and note which button/slider/control sends what message.
- For example, when you move a slider, you might see
Debug: [...]: "MIDI ch 1: opcode: B0, ctrl: 2, val: 3D" Debug: [...]: "MIDI ch 1: opcode: B0, ctrl: 2, val: 3A" Debug: [...]: "MIDI ch 1: opcode: B0, ctrl: 2, val: 3D" Debug: [...]: "MIDI ch 1: opcode: B0, ctrl: 2, val: 3B" Debug: [...]: "MIDI ch 1: opcode: B0, ctrl: 2, val: 3C"
In this instance, it's sending 0xB0 (which when we look at the table, we see that it's a Control Change message on channel 1). We also see that the second byte, 0x02 in this case, is the control number that was moved, and the third is the value or position of that control, which you can ignore for the purposes of mapping.
- Add the byte values to a
<control>block in the XML file
- Just plug the first two bytes into a
<control>XML block for<status>and<midino>respectively. This is detailed on the MIDI Controller Mapping File Format page.
Wireshark is an excellent, free, cross platform program to record and analyze computer communication data. It is most known for analyzing network traffic, but it can also be used for USB traffic. Wireshark has a USB Audio filter that can be used to analyze traffic for USB Audio and MIDI devices (MIDI is part of the USB Audio Class standard). Wireshark also has a USB HID filter.
Use usbaudio.midi.event as the filter in Wireshark to separate audio
signals from MIDI. The usbaudio.sysex.reassembled.data filter shows
only system exclusive (sysex) messages.
If you are using Linux, you can run other DJ software in a Windows virtual machine and record the USB traffic with Wireshark (macOS is a hassle to run in a VM but Windows is easy). You can run Wireshark on the Linux host or inside the virtual machine, but if you run Wireshark in Linux you don't need to bother transferring the captured traffic files out of the VM. You need to redirect the USB device to the VM for the VM to use it.
If you use VirtualBox, you need to install the VirtualBox guest extensions with experimental 3D acceleration to run VirtualDJ or Serato.
TODO: Is there anything in particular to configure for QEMU?
Wireshark has both GUI and CLI applications.
First, you need to load the kernel module that allows monitoring the USB connection:
$ sudo modprobe usbmon
Now run lsusb to find out with USB bus your controller is connected
to, e.g.:
$ lsusb
[...]
Bus 001 Device 016: ID 0582:0208 Roland Corp. DJ-505
The controller in the example is connected to Bus 001, which means that
you need to use the usbmon1 interface for capturing data.
Next, you can start monitoring the outgoing USB packets by using
tshark or Wireshark. If you're using the former, just run:
$ tshark -i usbmon1 -Y 'usb.capdata && usb.src == host' -e usb.capdata -Tfields
Capturing on 'usbmon1'
This will print all outgoing USB packets on interface usbmon1 that
have a usb.capdata field (that contains the MIDI messages).
The captured data will start with an extra byte which you'll have to ignore, e.g.:
| Captured USB data | MIDI message |
|---|---|
0990007f |
90 00 7f |
0bbf6400 |
bf 64 00 |
09900100 |
90 01 00 |
Here you can find a Wireshark example running wireshark-gtk (for KDE you may want use wireshark-qt) GUI on Ubuntu using the left screen and Win10 with MIDI-OX and Serato in VirtualBox on the right screen. We wanna check for the Serato communication with Denon MC4000 and MC7000 to find out what information the Software and controllers exchange during startup of Serato.
To set up Wireshark I recommend you to check the Wireshark WIKI and your distribution specific documentation. Another source you need to look at is the MIDI Manufacturer ID.
To keep analyzing as simple as possible it is recommended to capture USB data only for a few seconds while you do one specific action. Capturing 30 seconds while starting Serato can easily record 70-100MB of data.
Starting with the Denon MC4000 to learn something about the USB traffic signals and how to find the SysEx messages that Serato exchange with the MC4000 during start ...
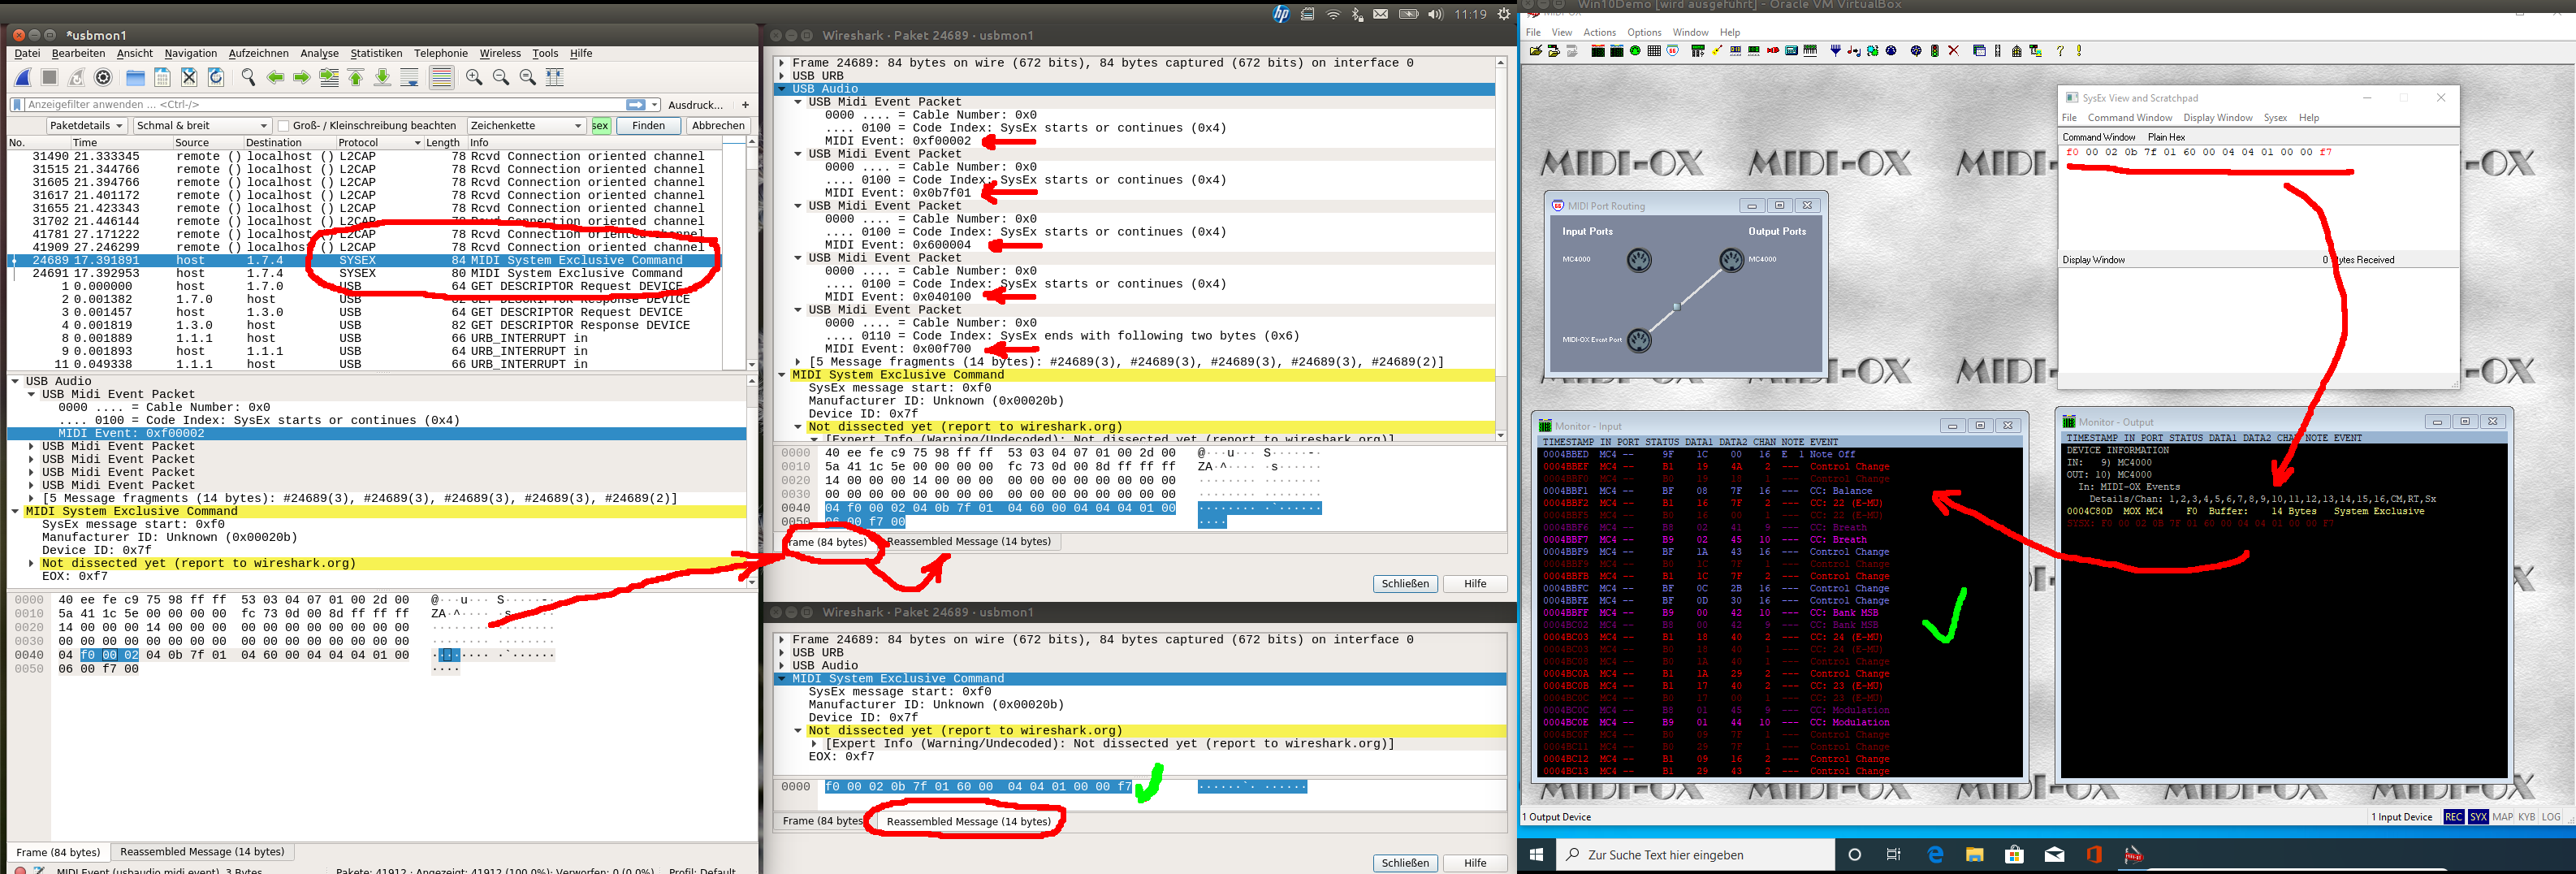
Analyzing the Wireshark record from left to right side of the picture above.
1) left side window called "*usbmon1": inside either you use the filter or sort column "Protocol" and look for "SYSEX". The example shows 2 lines where we check the first one in more detail by double click the line so the details window will open with all information about that package and brings us to ....
2) the 2nd window called "Wireshark - Paket 24689 - usbmon1". In there you gonna find the sections "Frame", "USB URB" and "USB Audio". The later one we are interested in so open that section by clicking on the triangle. Several MIDI signals are present indicated by the red arrows. Here a more detailed view:

The raw signal shows blocks of 3 MIDI signals (red arrows) always starting with a 04 to indicate that another MIDI packet is coming (green underline and arrows). The last packet is indicated by either 05 or 06 (here 06). Changing the TAB in that window to "Reassembled Message" will show the MIDI signal only. Wireshark just deletes the control bytes 04 and 06 and assembles the SysEx message from the 5 Event Packets.
3) So when checking and sending that SysEx message (see right side of the first picture)
f0 00 02 0b 7f 01 60 00 04 04 01 00 00 f7
from MIDI-OX to the controller then the MC4000 replies back with the current status of all knobs. This message can now be used on the MC4000 MIDI script file inside the init section as following:
var byteArray = [ 0xF0, 0x00, 0x02, 0x0B, 0x7F, 0x01, 0x60, 0x00, 0x04, 0x04, 0x01, 0x00, 0x00, 0xF7 ]; midi.sendSysexMsg(byteArray,byteArray.length);
and MIXXX also will recognise the knobs positions during start.
yet to come ...
- explain software used
- explain minimizing bus traffic
- mention wsl as workflow accelerator
- usb RE-workflows
- timed captures
- Explain the difference between real USB vs USB-capture
MIDI OX can intercept MIDI messages from programs other than Mixxx.
MIDI Monitor and MIDISimulator are two different applications that can be used to observe MIDI signals on macOS.
alsa-utils on Linux has a few tools helpful for working with MIDI devices.
Open a console and issue amidi -l. This will list the attached MIDI
device(s) like so:
Dir Device    Name
IO  hw:1,0,0  SCS.3d MIDI 1
Then, to dump the data, you just issue amidi -p hw:1,0,0 -d (Replace
hw:1,0,0 with whatever device ID your controller shows in the list.)
You'll get output like this:
B0 02 3D
B0 02 3A
B0 02 3D
B0 02 3B
B0 02 3C
See above for how to interpret this data.
amidi can also be used to send MIDI messages to your controller with the -S option. Specify each byte as a hexadecimal number and separate the bytes by spaces. For example:
amidi -p hw:1,0,0 -S "b0 02 7f"
The program aseqdump works similarly, but is a bit more verbose than a
series of hexadecimal numbers:
$ aseqdump -l
 Port    Client name                      Port name
  0:0    System                           Timer
  0:1    System                           Announce
 14:0    Midi Through                     Midi Through Port-0
 20:0    Tweaker                          Tweaker MIDI 1
 20:1    Tweaker                          Tweaker MIDI 2
$ aseqdump -p 20:0
Waiting for data. Press Ctrl+C to end.
Source  Event                  Ch  Data
 20:0   Note on                 0, note 1, velocity 127
 20:0   Note off                0, note 1
 20:0   Note on                 0, note 2, velocity 127
 20:0   Note off                0, note 2
 20:0   Note on                 0, note 3, velocity 127
 20:0   Note off                0, note 3
 This is the Mixxx Wiki -
 Mixxx is a free and open-source DJ software.
Manual
Hardware Compatibility
Reporting Bugs
Getting Involved
Contribution Guidelines
Coding Guidelines
Using Git
Developer Guide
Contributing Mappings
Mixxx Controls
MIDI Scripting
Components JS