Develop your own custom plugin for XrmToolBox
Work In Progress
In this page:
- Develop your plugin for XrmToolBox v1.2015.7.6 and above
- Develop your plugin for XrmToolBox before v1.2015.7.6
- Common logic
Related:
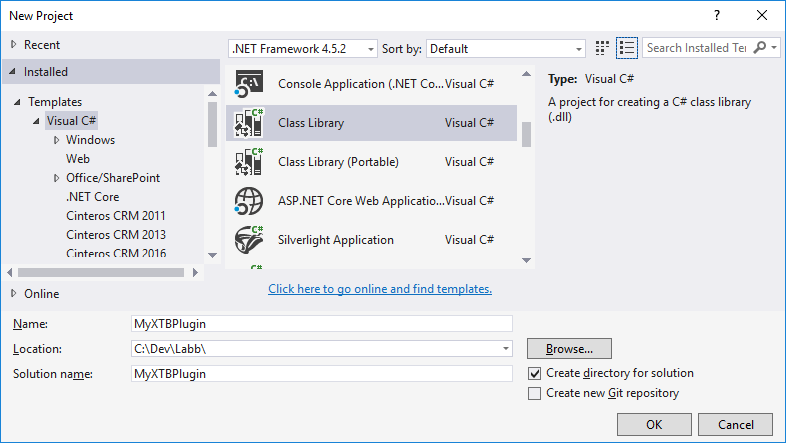
First, create a new Visual Studio project of type Class Library.
Open the NuGet Manager for the solution, search for XrmToolBoxPackage, and install the latest version.
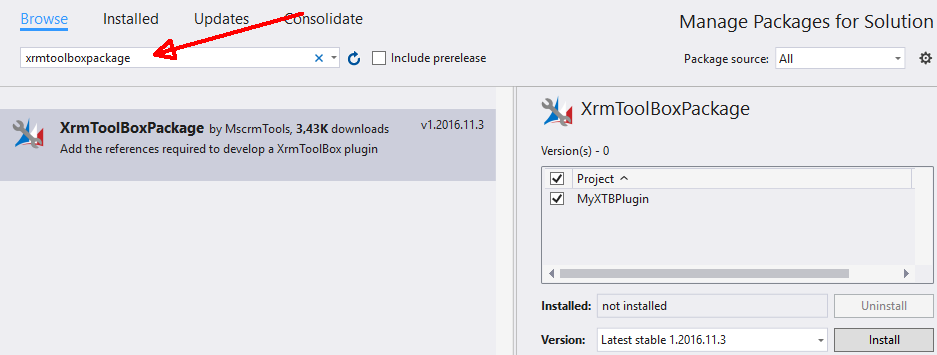
XrmToolBox Package and dependencies such as MS CRM SDK should now have been added.
Update the packages to latest version, except Microsoft.IdentityModel.Clients.ActiveDirectory, which has to be version 2.28 or earlier.

Some of the project properties are used to display your tool in the tools list. Company is used as the author of the tool in the Plugins list. Assembly Version is used to display this version number in the Plugins list.
You can add one or multiple XrmToolBox plugins in one assembly. One plugin is made of two classes:
- A "plugin" class that describes the plugin.
- A "plugin control" class that represents the user interface of the plugin.
The plugin class is a public class that implements the interface IXrmToolBoxPlugin. The XrmToolBox.Extensibility namespace provides a base class, PluginBase, that implements this interface for you. Inheriting from this base class is the recommended approach since it allows you to focus on your plugin specific implementation, and not all the methods in the interface.
The class has to be decorated with the attribute Export with the type IXrmToolBoxPlugin. All ExportMetadata arguments have to be filled with values described below:
- BackgroundColor : The color used as background for the plugin in the XrmToolBox plugins list.
- PrimaryFonctColor : The color used for the text displayed in the XrmToolBox plugins list.
- SecondaryFontColor : The color used for the author of the plugins in the XrmToolBox plugins list (only used when displaying small plugins list).
- SmallImageBase64 : A base64 encoded 32px/32px image used as the plugin logo in the XrmToolBox small plugins list.
- BigImageBase64 : A base64 encoded 80px/80px image used as the plugin logo in the XrmToolBox big plugins list.
- Name : The name of the plugin as displayed in XrmToolBox plugins list.
- Description : The description of the plugin as displayed in XrmToolBox plugins list.
The only method to implement here is the method GetControl that returns a IXrmToolBoxPluginControl which is the UserControl to display the plugin user interface in the main application.
using System.ComponentModel.Composition;
using XrmToolBox.Extensibility;
using XrmToolBox.Extensibility.Interfaces;

namespace MyFirstPlugin
{
    [Export(typeof(IXrmToolBoxPlugin)),
    ExportMetadata("BackgroundColor", "MediumBlue"),
    ExportMetadata("PrimaryFontColor", "White"),
    ExportMetadata("SecondaryFontColor", "LightGray"),
    ExportMetadata("SmallImageBase64", "a base64 encoded image"),
    ExportMetadata("BigImageBase64", "a base64 encoded image"),
    ExportMetadata("Name", "My First Plugin name"),
    ExportMetadata("Description", "My First Plugin description")]
    public class Plugin : PluginBase
    {
        public override IXrmToolBoxPluginControl GetControl()
        {
            return new PluginControl();
        }
    }
}
The plugin control is a class that inherits from UserControl class and implements interface IXrmToolBoxPluginControl. The XrmToolBox.Extensibility namespace provides a base class, PluginControlBase, that implements this interface for you. Inheriting from this base class is the recommended approach since it allows you to focus on your plugin specific implementation, and not all the methods in the interface.
The PluginControlBase provides a Service property that returns the IOrganizationService for the plugin that has been selected by the user in the XrmToolBox. If the user hasn't selected anything, it will be null. Also, All calls to CRM should be asynchronous so the XrmToolBox interface doesn't lock. Therefore, it is very important to note that any time you need to make a call to CRM (accessing the PluginControlBase Service property), your call hierarchy should always go through the ExecuteMethod, which will prompt the user for a connection to CRM if they haven't already selected one, and WorkAsync method, which uses the BackgroundWorkerProcess in order to allow notifications to the user of progress and preventing the UI thread from getting locked!
using System;
using System.Windows.Forms;
using XrmToolBox.Extensibility;
using XrmToolBox.Extensibility.Interfaces;

namespace MyFirstPlugin
{
    public partial class PluginControl : PluginControlBase
    {
        // Your code here
    }
}namespace MsCrmTools.SampleTool
{
public partial class SampleTool : PluginControlBase
{
#region Base tool implementation
public SampleTool()
{
InitializeComponent();
}
public void ProcessWhoAmI()
{
WorkAsync(new WorkAsyncInfo
{
Message = "Retrieving your user id...",
Work = (w, e) =>
{
var request = new WhoAmIRequest();
var response = (WhoAmIResponse)Service.Execute(request);
e.Result = response.UserId;
},
ProgressChanged = e =>
{
// If progress has to be notified to user, use the following method:
SetWorkingMessage("Message to display");
},
PostWorkCallBack = e =>
{
MessageBox.Show(string.Format("You are {0}", (Guid)e.Result));
},
AsyncArgument = null,
IsCancelable = true,
MessageWidth = 340,
MessageHeight = 150
});
}
private void BtnCloseClick(object sender, EventArgs e)
{
CloseTool(); // PluginBaseControl method that notifies the XrmToolBox that the user wants to close the plugin
// Override the ClosingPlugin method to allow for any plugin specific closing logic to be performed (saving configs, canceling close, etc...)
}
private void BtnWhoAmIClick(object sender, EventArgs e)
{
ExecuteMethod(ProcessWhoAmI); // ExecuteMethod ensures that the user has connected to CRM, before calling the call back method
}
#endregion Base tool implementation
private void btnCancel_Click(object sender, EventArgs e)
{
CancelWorker(); // PluginBaseControl method that calls the Background Workers CancelAsync method.
MessageBox.Show("Cancelled");
}
}
}IGitHubPlugin interface
Implements this interface to add a menu in XrmToolBox when your plugin is opened and visible. This menu allows to redirect the user to the Issues page of the specified GitHub repository.

ICodePlexPlugin interface
Implements this interface to add a menu in XrmToolBox when your plugin is opened and visible. This menu allows to redirect the user to the Issues, Discussions and Rating page of the specified CodePlex project.

IPayPalPlugin interface
Implements this interface to add a menu in XrmToolBox when your plugin is opened and visible. This menu allows to redirect the user to PayPal donation page (USD, GBP, EUR).

IHelpPlugin interface
Implements this interface to add a menu in XrmToolBox when your plugin is opened and visible. This menu allows to redirect the user to a web help page.

IStatusBarMessager interface
Implements this interface to allow your plugin to send process progress information to XrmToolBox main application. This information can be displayed as text, progress bar or both in the XrmToolBox status bar.

Finally, compile the project and move the resulting assembly into the folder Plugins in the XrmToolBox folder
The Plugins folder is no longer in the same folder as the XrmToolBox.exe. It is created at %AppData%\MscrmTools\XrmToolBox\Plugins when you first run the XrmToolBox application.
First, create a new Visual Studio project of type library:
Project properties are used to display your tool in the tools list. Title, Description and Company are used.
Add the following references to the project:
- Microsoft.Crm.Sdk.Proxy
- Microsoft.Xrm.Sdk
- System.Drawing
- System.Runtime.Serialization
- System.ServiceModel
- System.Windows.Forms
- XrmToolBox (this tool executable)
References should look like the screenshot below:
Add a new user control
This user control must implement the IMsCrmToolsPluginUserControl interface defined in the XrmToolBox executable. The easiest way to do this is to inherit from the XrmToolBox.PluginBase. The interface contains the following elements:
using System;
using System.Drawing;
using Microsoft.Xrm.Sdk;

namespace XrmToolBox
{
    public interface IMsCrmToolsPluginUserControl
    {
        /// <summary>
        /// Gets the organization service used by the tool
        /// </summary>
        IOrganizationService Service { get; }

        /// <summary>
        /// Gets the logo to display in the tools list
        /// </summary>
        Image PluginLogo { get; }

        /// <summary>
        /// EventHandler to request a connection to an organization
        /// </summary>
        event EventHandler OnRequestConnection;

        /// <summary>
        /// EventHandler to close the current tool
        /// </summary>
        event EventHandler OnCloseTool;

        /// <summary>
        /// Method to allow plugin to Cancel a closing event, or perform any save events required before closing.
        /// </summary>
        void ClosingPlugin(PluginCloseInfo info);

        /// <summary>
        /// Updates the organization service used by the tool
        /// </summary>
        /// <param name="newService">Organization service</param>
        /// <param name="actionName">Action that requested a service update</param>
        /// <param name="parameter">Parameter passed when requesting a service update</param>
        void UpdateConnection(IOrganizationService newService, string actionName = "", object parameter = null);
    }
}You may choose to "roll your own", but the simplest way to get started is to use the XrmToolBox.PluginBase. It fully implements the interface, and allows you to focus completely on your plug-in logic.
By default the PluginBase will return null for the plug-in logo, which results in no logo being displayed. To add your own logo, first add an image to your project resources:
Project Properties –> Resources –> Add Resource –> Add Existing File, and select the image you’d like to use. The image must be square, with 80 pixels on each side.
Then override the PluginLogo Property to return your image:
/// <summary>
/// Gets the logo to display in the tools list
/// </summary>
public override Image PluginLogo
{
     get { return Resources.MyLogo; }
}The final code for our sample tool is the following:
public partial class SampleTool : XrmToolBox.PluginBase
{
    private void ProcessWhoAmI()
    {
        WorkAsync("Retrieving your user id...",
            (e) => // Work To Do Asynchronously
            {
                var request = new WhoAmIRequest();
                var response = (WhoAmIResponse)Service.Execute(request);

                e.Result = response.UserId;
            },
            e =>  // Cleanup when work has completed
            {
                MessageBox.Show(string.Format("You are {0}", (Guid)e.Result));
            }
        );
    }

    #region Events

    private void BtnWhoAmI_Click(object sender, EventArgs e)
    {
        ExecuteMethod(ProcessWhoAmI);
    }

    private void BtnClose_Click(object sender, EventArgs e)
    {
        base.CloseTool();
    }

    #endregion Events
}Finally, compile the project and move the resulting assembly into the same folder as the XrmToolBox executable
You can choose to trigger any specific plug-in logic however you like. In this tutorial, we’ll use a button, BtnWhoAmI to start the logic of the plug-in, and BtnClose to close the plug-in. Add these two buttons to your plug-in using the design window. After they are added double click them to generate the Click event handlers. Implement them as follows:
private void BtnWhoAmI_Click(object sender, EventArgs e)
{
    ExecuteMethod(ProcessWhoAmI);
}

private void BtnClose_Click(object sender, EventArgs e)
{
    base.CloseTool();
}
The CloseTool will call an event in the XrmToolBox that will then call the ClosingPlugin method (ClosingPlugin will get called anytime a plug-in has to close).
public virtual void ClosingPlugin(PluginCloseInfo info)
{
    if (info.FormReason != CloseReason.None ||
        info.ToolBoxReason == ToolBoxCloseReason.CloseAll ||
        info.ToolBoxReason == ToolBoxCloseReason.CloseAllExceptActive)
    {
        return;
    }

    info.Cancel = MessageBox.Show(@"Are you sure you want to close this tab?", @"Question", MessageBoxButtons.YesNo, MessageBoxIcon.Question) != DialogResult.Yes;
}
Its uses the standard Windows Form Cancel Event to cancel the close by setting Cancel to true. The PluginBase by default will pop up a MessageBox with a standard, "Are you sure" message, whenever the user attempts to close a single plug-in. If the user selects to close multiple tabs, or closes the form itself, it won't prompt the user. If there are config settings that need to be saved in the plug-in, this method should be overriden, most likely calling any custom plug-in closing logic required, then calling base.ClosingPlugin.
The ExecuteMethod handles ensuring that the XrmToolBox has a valid open connection, before attempting to make an SDK call. If it doesn't have a valid connection, it will prompt the user to connect, and then call the method passed in, in this case ProcessWhoAmI.
In order to simplify multithreading logic, the base provides a WorkAsync method with two different signatures. One provides the ability to perform multiple actions, and notify the user of the work that is being performed:
WorkAsync("Message To Display...",
    (w, e) => // Work To Do Asynchronously
    {
        w.ReportProgress(0, "Doing Something");
        //Do something
        w.ReportProgress(50, "Doing Something Else");
        //Do something else

        // Populate whatever the results that need to be returned to the Results Property
        e.Result = new object();
        w.ReportProgress(99, "Finishing");
    },
    e => // Finished Async Call.  Cleanup
    {
        // Handle e.Result
    },
    e => // Logic wants to display an update.  This gets called when ReportProgress Gets Called
    {
        SetWorkingMessage(e.UserState.ToString());
    }
);
The other, which we will use for this tutorial, assumes that one SDK call is being performed and and provides actions to perform the call, and process the result:
WorkAsync("Retrieving your user id...",
    (e) => // Work To Do Asynchronously
    {
        var request = new WhoAmIRequest();
        var response = (WhoAmIResponse)Service.Execute(request);

        e.Result = response.UserId;
    },
    e =>  // Cleanup when work has completed
    {
        MessageBox.Show(string.Format("You are {0}", (Guid)e.Result));
    }
);
It is very important to note that any time you access the Service property, your call hierarchy should always go through the ExecuteMethod, and WorkAsync method!