-
Notifications
You must be signed in to change notification settings - Fork 10
Arduino
to get started, you will need to install the Arduino IDE accordingly to your operating system.
Officials arduino guides if needed
- Linux
- Windows
- OS X
- portable version (Linux & Windows)
After opening our code in the IDE you need to upload it to the Arduino microController.
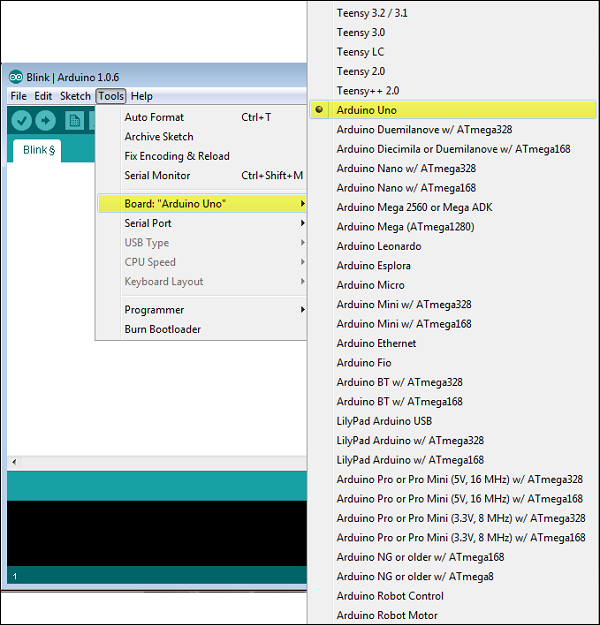
first, Connect the Arduino board to your computer using the USB cable. Your Arduino should be recognized through some COM port. You must first select the type of card used, in this case an arduino uno.

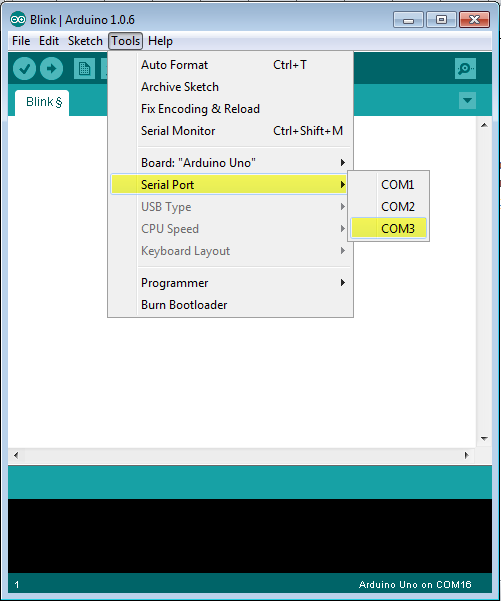
Then you have to select the correct com port so that the IDE knows which device to upload the code to later on.

Clicking the Upload button (right arrow icon), will compile the code and upload it if it passed compilation.
The arduino is used here as an interface between the python/user script and the engine and lights controls.
In order to be able to trigger the commands we have implemented a parser which reads the serial port and interprets the commands.
commands should be written in the following format :
commandName:arg01,arg02
note: An "\n" is automatically added by the arduino IDE to signify the end of line. We have taken this into account in the parser, so it should not be added. Furthermore it is also supported and added through our python methods ( (Manual control through serial port)
The commands available are listed and explained below.
| command | description | arguments | return | exemple |
|---|---|---|---|---|
| led | allows you to switch on or off the leds, specifying which one and its on or off state. | led number (in [1, 6])state (0 for off; 1 for on) | "Success" | led:4,1 |
| left / right | allows you to move the motor in the direction specified in the command name by specifying the speed and the angle you wish to make at the mechanical arm (the reduction ratio of the system is taken into account). | angle (in deg)speed(in sec/tr) | "AngleDone:00" where 00 is the angle already covered | right:40,60 |
| leftSmooth / rightSmooth | Same movement as the previous command using a progressive increasing speed in the desired direction using the argument easing direction | easing direction (0 for left; 1 for right), angle (in deg)speed (in sec/tr) | "AngleDone:00" | leftSmooth:0,40,60 |
| leftCaptureFull / rightCaptureFull | Sets the motor in motion by accelerating over a specified angular distance. This is followed by a constant speed rotation over a certain angular distance while sending callbacks every x degrees specified by the capture angle in the parameters to prevent the python script from taking the images at the right time. Finally, a deceleration is used to stop the engine. | constant speed angle(in deg) capture callbacks angle(in deg) acceleration/deceleration angle(in deg)speed(sec/tr) | "Success" | leftCaptureFull:360,30,40,60 |
| leftManual / rightManual | Allows you to control the motor in a more direct way by specifying the number of pulses to be sent and the number of microseconds between each pulse | pulseNumberpulseDelay( in µSec) | "AngleDone:00" | leftManual:200,20 |
| stop / s | self explanatory, Allows you to stop the movement during rotation if needed | no arguments | Success | stop: |
To be able to control
To send data to the arduino card via the serial port, you must use the "pySerial" python library. This library must be installed first: pyserial
We have created methods and objects to simplify the use of the library in the serial_managment.py file.
The available methods are listed below:
availablePorts() : Lists all the available ports on the computer
selectPort(baudrate = 9600) : Allows to create the object representing the serial port by selecting it via availablePorts() and defining the data transfer speed in baudrate. This method returns the object thus created.
serialWrite(ser, cmdString) : Allows to write a command via the serial port by specifying the object represent this serial port and the command as a character string
class SerialReader:
init_(self, serial) : constructor of the class which takes as parameter the object
readline() : allows to read a line if available in the serial port. return space in bytes (b' ') if there is no line to handle
clearBuffer() : allows to clean the buffer used within the class used to read the serial port
Here is an example of practical use through a small python script to allow reading the serial port and capture's callback.
  # Initialize arduino
  arduinoSer = selectPort()
  # Init custom Serial reader to handle readLine correctly
  serialReader = SerialReader(arduinoSer)

  #send command
  serialWrite(arduinoSer, "leftCaptureFull:60,15,45,45")

  while(loop):
    line = serialReader.readline()
    # While the motor is rotating and send nothing
    while(line == b''):
      line = serialReader.readline()
      time.sleep(0.01)

    # When the motor reaches the step capture angle
    if line == b'Capture\r':
      # do the capture

    # When the motor reaches the end
    elif line == b'Success\r' :
      # mouvment success

    elif line != b'':
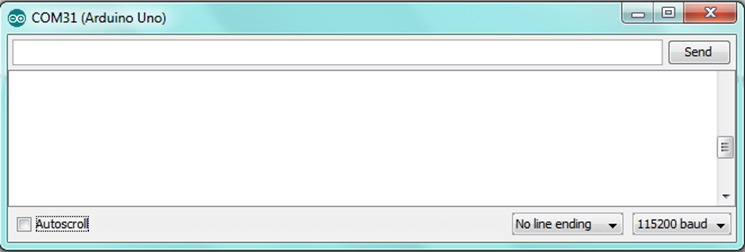
# errorArduino serial monitor allow you to send commands manually and it can be opened by clicking on the magnifying glass icon on the upper right side of the IDE.

The serial monitor can be used for interacting with the Arduino board using the computer through commands.
In order to control manually the Arduino board, you can just write you command in the text area and press Send.
the baudrate must be set to the same value as in the python and arduino script, which is 9600 in this case.