Adding the DirectX Tool Kit
After creating a new project in the The basic game loop (or using the DeviceResources variant), the next step is to add the DirectX Tool Kit to the project so we can make use of it in our code.
The easiest way to achieve this is to use the NuGet package manager built into Visual Studio.
- From the drop-down menu, select Project / Manage NuGet Packages...
- Select "Browse" on the top tab, and make sure the Package source is set to "nuget.org"
- In the text search field type "DirectXTK" and hit enter to search for the packages
- Select the package with the id directxtk_desktop_2015 for Win32 or directxtk_uwp for UWP
- Select "Install"
- When finished, close the NuGet Manager

You can check for updates to the NuGet package by selecting "Updates/All" in the left-hand tree view. If there are updates, select the "DirectX Tool Kit" package, and click on "Update".
Both directxtk_desktop_2015 and directxtk_uwp support VS 2017 as well.
Another option rather than using NuGet is to use Visual Studio's project-to-project references. This approach is a little more setup, but it does ensure that you are building the full DirectX Tool Kit library as part of your solution, and allows you to make changes directly to the tool kit if desired as well.
- Extract the release .zip file into a directory relative to the new project you created. For this tutorial, we will assume the
DirectXTKfolder is in the same folder as your new project's Visual Studio Solution (.sln) file. - Right-click on your solution in the Solution Explorer, and select Add / Existing Project...
- Browse into the "DirectXTK" folder and select
DirectXTK_Desktop_2015.vcxproj/DirectXTK_Desktop_2017.vcxprojfor Win32 -or-DirectXTK_Windows10.vcxprojfor UWP, click "Open" - If Visual Studio presents a "Security Warning", select "OK". Optional: Uncheck "Ask me for every project in this solution" first.
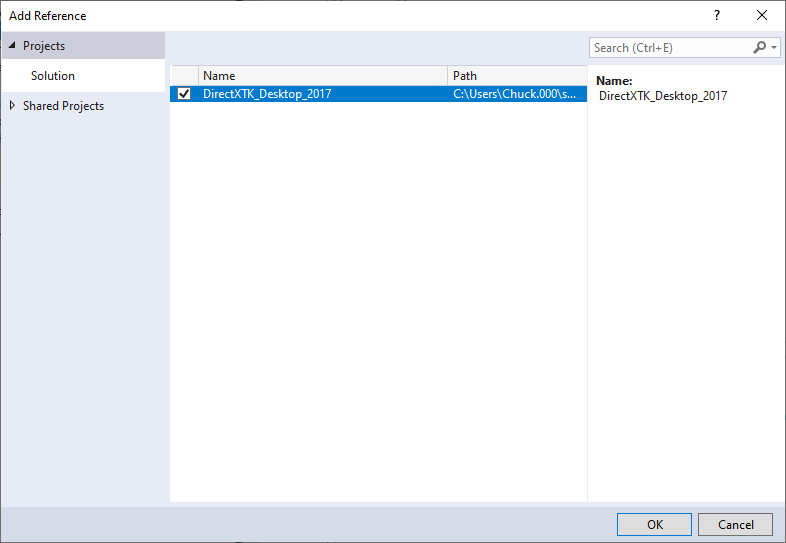
- Right-click on your project in the Solution Explorer, and select Add / References...
- Select "Add New Reference..."
- Check
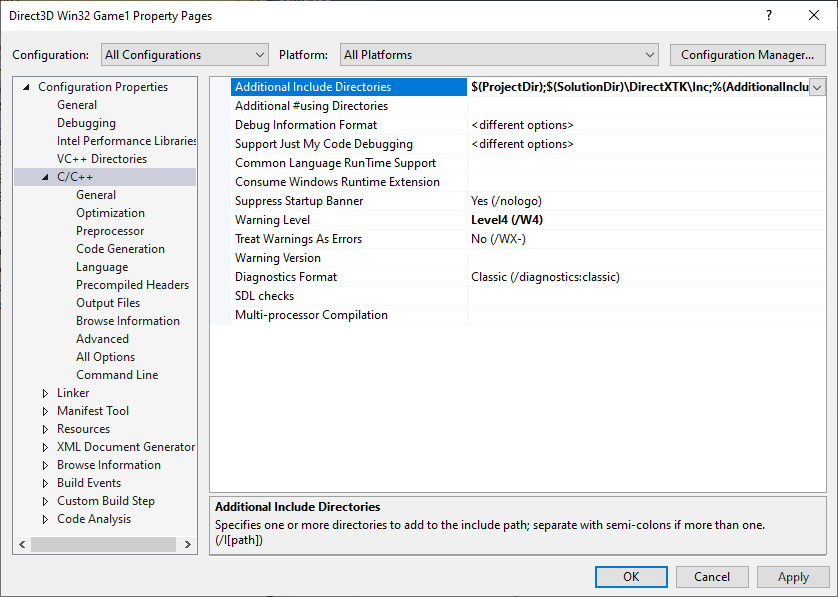
DirectXTKand select "OK" - Click on "Configuration Properties" in the left-hand tree view, then C/C++ / General
- Select "All Configurations" and "All Platforms"
- Edit Additional Include Directories to the relative path to the
DirectXTK\Incfolder. With our original assumption, you can use$(SolutionDir)\DirectXTK\Inc. - Select "OK"
For more information see DirectXTK under Adding to a VS solution.
For Xbox One XDK apps, you have to use project-to-project references instead of NuGet to ensure the built library matches the XDK edition specific headers and shader generation.
Now that we have the DirectX Tool Kit usable in your project, the next step is to include the library headers into your project.
General advice for C++ projects is that you should only add the headers you actually use to your project, but to simplify the tutorial we will go ahead and add them all to your new project's pch.h header:
//
// pch.h
// Header for standard system include files.
//

#pragma once

...

#include "CommonStates.h"
#include "DDSTextureLoader.h"
#include "DirectXHelpers.h"
#include "Effects.h"
#include "GamePad.h"
#include "GeometricPrimitive.h"
#include "GraphicsMemory.h"
#include "Keyboard.h"
#include "Model.h"
#include "Mouse.h"
#include "PostProcess.h"
#include "PrimitiveBatch.h"
#include "ScreenGrab.h"
#include "SimpleMath.h"
#include "SpriteBatch.h"
#include "SpriteFont.h"
#include "VertexTypes.h"
#include "WICTextureLoader.h"
This does not include the DirectX Tool Kit for Audio header
Audio.hwhich is covered by another tutorial.
Then finish off the setup by adding a C++ namespace using statement to your Game.cpp file to make it a bit easier to use the SimpleMath types:
//
// Game.cpp -
//

#include "pch.h"
#include "Game.h"

using namespace DirectX;
using namespace DirectX::SimpleMath;

using Microsoft::WRL::ComPtr;

...If you are using the DirectX Tool Kit with the Xbox One XDK, then you have two additional steps:
-
You need to build the Xbox One shaders that match your XDK release via
CompileShaders.cmd xbox -
You need to add creation of the GraphicsMemory singleton to your application and call
m_graphicsMemory->Commit();after callingPresent();/m_deviceResources->Present();
Next lessons: Sprites and textures, Game controller input, Using the SimpleMath library, Adding the DirectX Tool Kit for Audio