Hardware accelerated algorithm for edge detection using laplacian of gaussian. Where the system was designed in C++ using SystemC libary. IP core was designed using HVDL, and it was tested in SystemVerilog. Drivers were written in C.
The projects algorithm is based on the matrix convolution. Where the Laplacian of Gaussian kernel
is convolved with grayscaled image. After which zero crossing check must be performed to get
the final image of detected edges.
The example of convolution can be seen on the following gif.
For more information reffer to this article.

The Laplacian of Gaussian matrix is convolved with grayscaled source image.
In digital photography, computer-generated imagery, and colorimetry, a grayscale image is one in which the value of each pixel is a single sample representing only an amount of light; that is, it carries only intensity information. Grayscale images, a kind of black-and-white or gray monochrome, are composed exclusively of shades of gray. The contrast ranges from black at the weakest intensity to white at the strongest.
In this project the images are represented in their RGB format (red, green, blue). To gray scale images we've used the following formula:

Where Y' represents the final value of grayscaled pixel.
Example of grayscale:

The Laplacian is a 2-D isotropic measure of the 2nd spatial derivative of an image. The Laplacian of an image highlights regions of rapid intensity change and is therefore often used for edge detection (see zero crossing edge detectors). The Laplacian is often applied to an image that has first been smoothed with something approximating a Gaussian smoothing filter in order to reduce its sensitivity to noise, and hence the two variants will be described together here. The operator normally takes a single graylevel image as input and produces another graylevel image as output.
The following formula was used to calculate kernel matrix:

By using the σ = 1.4 the following matrix is calculated:
When graphing previosly stated matrix the following graph is obtained.
The zero crossing detector looks for places in the Laplacian of an image where the value of the Laplacian passes through zero --- i.e. points where the Laplacian changes sign. Such points often occur at `edges' in images --- i.e. points where the intensity of the image changes rapidly, but they also occur at places that are not as easy to associate with edges. It is best to think of the zero crossing detector as some sort of feature detector rather than as a specific edge detector. Zero crossings always lie on closed contours, and so the output from the zero crossing detector is usually a binary image with single pixel thickness lines showing the positions of the zero crossing points.
The starting point for the zero crossing detector is an image which has been filtered using the Laplacian of Gaussian filter. The zero crossings that result are strongly influenced by the size of the Gaussian used for the smoothing stage of this operator. As the smoothing is increased then fewer and fewer zero crossing contours will be found, and those that do remain will correspond to features of larger and larger scale in the image.
Once the image has been LoG filtered, it only remains to detect the zero crossings. This can be done in several ways. The simplest is to simply threshold the LoG output at zero, to produce a binary image where the boundaries between foreground and background regions represent the locations of zero crossing points. These boundaries can then be easily detected and marked in single pass, e.g. using some morphological operator. For instance, to locate all boundary points, we simply have to mark each foreground point that has at least one background neighbor.
Response of 1-D LoG filter to a step edge. The left hand graph shows a 1-D image, 200 pixels long, containing a step edge. The right hand graph shows the response
of a 1-D LoG filter with Gaussian standard deviation 3 pixels:
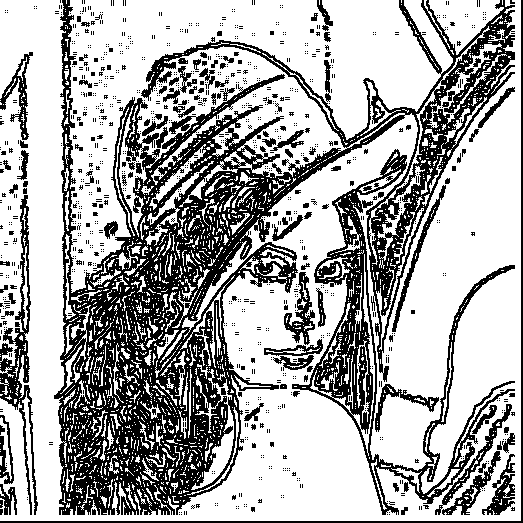
After zero crossing check is done the following image of Lena is aquired.
To install required libaries for C++ and python follow the instructions.
sudo apt-get install g++
sudo apt-get install python3.6
First install PiP
sudo apt install python3-pip
Then to install OpenCV
pip install opencv-python
pip install opencv-contrib-python
apt-get update
apt-get upgrade
sudo apt-get install libsystemc libsystemc-dev
Step 1. Update the Ubuntu System Package
sudo apt-get update && sudo apt-get upgrade
Step 2. Install Required tools and packages
sudo apt install software-properties-common
sudo apt install apt-file
sudo apt-get install build-essential cmake git libgtk2.0-dev pkg-config libavcodec-dev libavformat-dev libswscale-dev
sudo apt-get install python3.5-dev python3-numpy libtbb2 libtbb-dev
sudo apt-get install libjpeg-dev libpng-dev libtiff5-dev libjasper-dev libdc1394-22-dev libeigen3-dev libtheora-dev libvorbis-dev libxvidcore-dev libx264-dev sphinx-common libtbb-dev yasm libfaac-dev libopencore-amrnb-dev libopencore-amrwb-dev libopenexr-dev libgstreamer-plugins-base1.0-dev libavutil-dev libavfilter-dev libavresample-dev
Step 3. Download OpenCV Sources using git
sudo -s
cd /opt
git clone https://github.com/Itseez/opencv.git
git clone https://github.com/Itseez/opencv_contrib.git
Step 4. Build & Install OpenCV
cd opencv
mkdir release
cd release
cmake -D BUILD_TIFF=ON -D WITH_CUDA=OFF -D ENABLE_AVX=OFF -D WITH_OPENGL=OFF -D WITH_OPENCL=OFF -D WITH_IPP=OFF -D WITH_TBB=ON -D BUILD_TBB=ON -D WITH_EIGEN=OFF -D WITH_V4L=OFF -D WITH_VTK=OFF -D BUILD_TESTS=OFF -D BUILD_PERF_TESTS=OFF -D OPENCV_GENERATE_PKGCONFIG=ON -D CMAKE_BUILD_TYPE=RELEASE -D CMAKE_INSTALL_PREFIX=/usr/local -D OPENCV_EXTRA_MODULES_PATH=/opt/opencv_contrib/modules /opt/opencv/
make -j4
make install
ldconfig
exit
cd ~
Step 5. Check OpenCV version installed
pkg-config --modversion opencv
If the Installation fails, reffer to the following link: OpenCV Installation guide
Refer to the official Xilinx site.
Clone the project
git clone https://github.com/nikolajkarpic/edge_detectionGo to the project directory
cd edge_detectionThen go to scripts folder and run img_to_txt.py to the source image:
cd ../../script
py img_to_txt.py "Path to image"
To compile the system model go to spec folder:
cd ../../spec/VP
Then run Make script:
make
To run the model:
cd ../../VP
./output /example/inputFile.txt /example/outputFile.txt
Then run txt_to_img.py script:
cd ../../script
py txt_to_img.py "Path to model output" "Path where to save image"