-
-
Notifications
You must be signed in to change notification settings - Fork 80
NplVisualStudioIDE
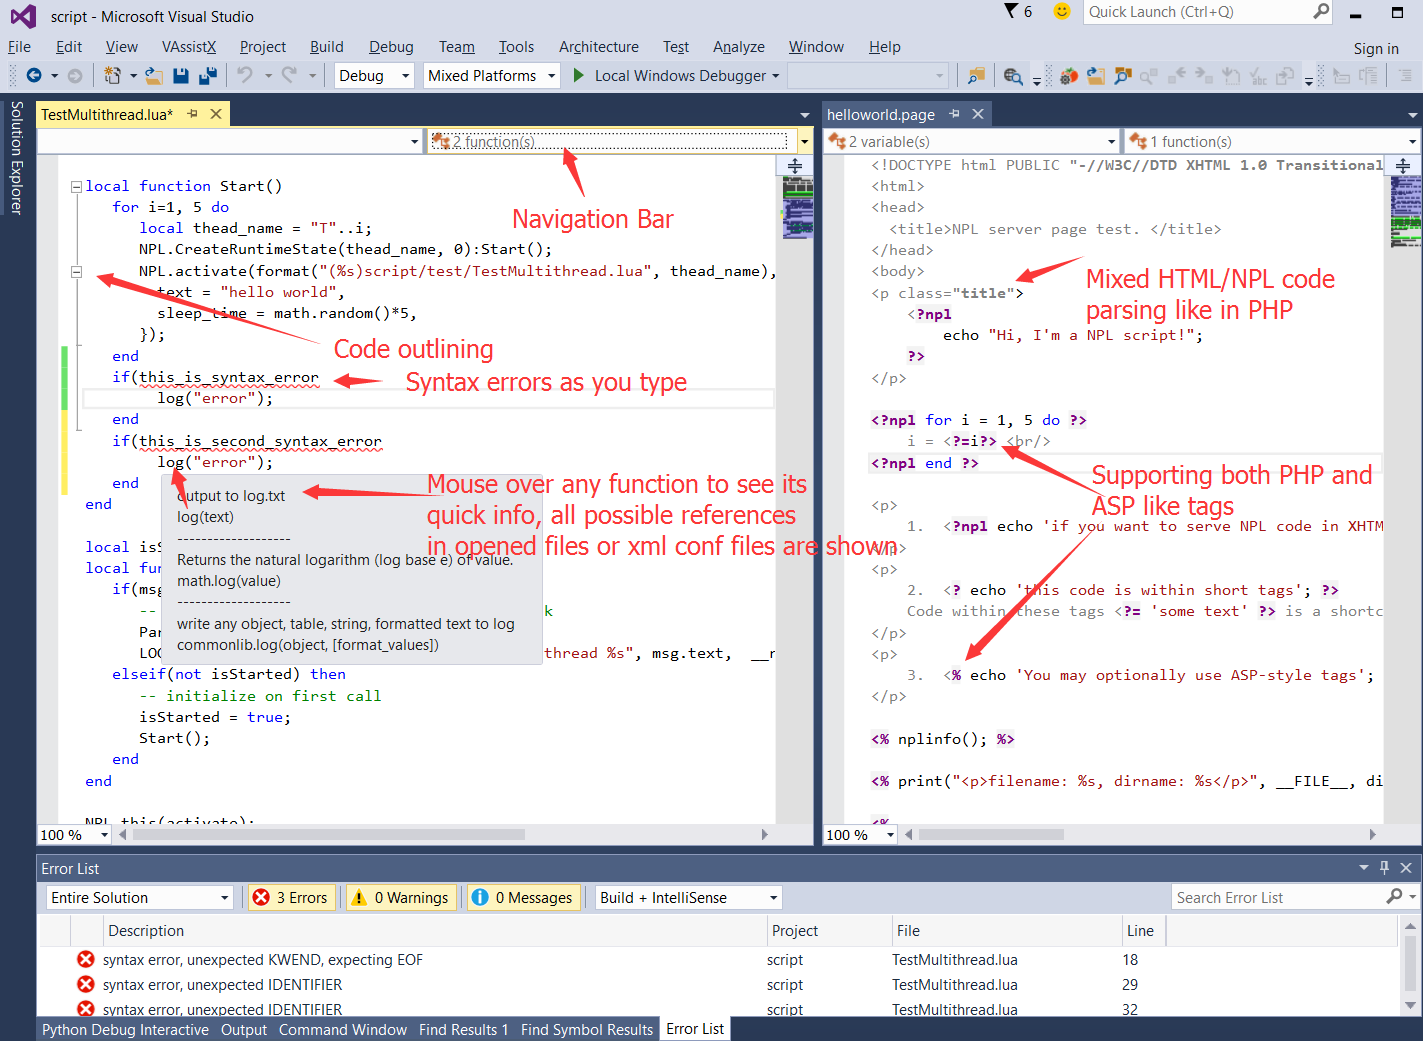
Although one can use any text editor that support lua syntax highlighting to develop/debug NPL program fairly easily, we recommend using the free visual studio community edition. We have developed several useful plugins to help you write code faster in visual studio.
- Install visual studio 2015 community edition here
- In vs, click menu
Tools::Extensions And Update, clickOnlinetab, search forNPLin visual studio gallery, you will need to installNPL_LuaLanguageServiceandNPL_LuaDebuggerPackage. Alternatively, you can install from following links- NPL/Lua language service for visual studio: this provide features like syntax highlighting, code-complition, goto definition, etc.
- NPL Debugger for visual studio: this one provides graphical debugging in visual studio. One can escape this one if NPL Http Debugger is preferred.
Once installed, you will have a number features as described in the links above.
You need to run as administrator in order to complete installation of NPL_LuaDebuggerPackage, please read very carefully here. If you still can not get it to work, then use NPL Http Debugger which is the build-in graphical debugger in NPL runtime.
Because NPL is a dynamically compiled scripting language, you do not need to compile anything to run it. All we need is to create an empty visual C++ or C# project/solution, and add our NPL scripts to it.
You can then configure the command line program, parameters, working directory in the project's property page, so that they point to the proper NPL executable. Then you can use the standard Ctrl+F5 to launch your specified program. Some people prefer to write shell script or batch files to launch NPL applications externally. You can use whichever way you find comfortable. Batch file is a more automated way for experienced programmers, since different batch files can bring programmer to a give place of interest faster.
Most NPL application needs one or more NPL packages to run. In most cases, you need at least the main package.
In your development directory, you can install the main package by following command.
mkdir npl_packages
cd npl_packages
git clone https://github.com/NPLPackages/main.git
Your development directory, usually looks like below
./bin      (optional: 32bits NPL Runtime exe/dll files)
./bin64    (optional: 64bits NPL runtime)
../redist  (optional: Another place to keep your NPL runtime, such as by installing [ParacraftSDK](https://github.com/LiXizhi/ParaCraftSDK/wiki) )

./npl_packages/main   (main NPL packages)
./npl_packages/XXX    (other NPL packages that your project depends on)

Documentation/  (NPL intellisense files for visual studio)
script/         (all your NPL script files that belong to your project)
...             (other asset files)


MyApp.sln   (visual studio solution file)
MyApp.proj  (visual studio project file)
run.bat     (optional: your application's launch scripts)
NPL is a weakly-typed dynamic language, it is hard to have intellisense, such as "go to definition ...". However, we do provide these advanced code editing features by parsing all your currently opened script files in your solution, as well as all ./Documentation folders relative to each project in your visual studio solution.
./Documentation folder contains both user-written and machine-generated function definitions in XML files. NPL language service plugin use these information to provide features like code-completion, go to definition....
Most NPL packages contains a visual studio project file and a ./Documentation folder. You can add the NPL package's project file to your own solution in order to get intellisense features for all important functions in that NPL package.
For example, add .\npl_packages\main\NPLPackageMain.csproj to your MyApp.sln. You will notice there is a .\npl_packages\main\Documentation folder, which contains several XML files.
Code Snippet is another language neutral feature provided by visual studio. Right click any NPL code and click Insert snippet... in visual studio.
NPL language service contains several useful code snippet template in its installation directory. The directory usually looks like c:\users\[your user name]\AppData\Local\Microsoft\VisualStudio\14.0\Extensions\[Some random string]\Snippets\1033\Lua, you need to add it manually to visual studio's snippet manager. You can also write your own code snippet. BTW, the log snippet is really useful.
You can add all scripts to solution file, and use Ctrl + , to open a given file.
One can also click goto definition ... on NPL files that contains NPL.load(...) to open a file even if the file is not in your solution.
In the top toolbar of solution explorer of visual studio, one can click Show All Files icon to reveal all files relative to your project's directory, even these files are not added to your solution. This is kind of useful when browsing source code in third-party NPL packages that your project depends on.
There are two exclusive ways to debug NPL process.
- One is to install NPL_LuaDebuggerPackage
- The other is to use the NPL Http Debugger: this is always the recommended way to debug both lua and page script files.
Make sure you have installed the NPL/Lua language service for visual studio.
In visual studio, open your NPL script or page file, right click the line where you want to set breakpoint, and from the context menu, select NPL Set Breakpoint Here. See NPL Http Debugger for details.

Download Paracraft | ParacraftSDK | copyright by tatfook 2016 | upload image
