Copyright (c) 2018 NVIDIA Corp. All Rights Reserved. This work is licensed under the Creative Commons Attribution NonCommercial ShareAlike 4.0 License.
- Zhaoyang Lv, Georgia Institute of Technology
- Kihwan Kim, NVIDIA
- Alejandro Troccoli, NVIDIA
- Deqing Sun, NVIDIA
- James M. Rehg, Georgia Institute of Technology
- Jan Kautz, NVIDIA
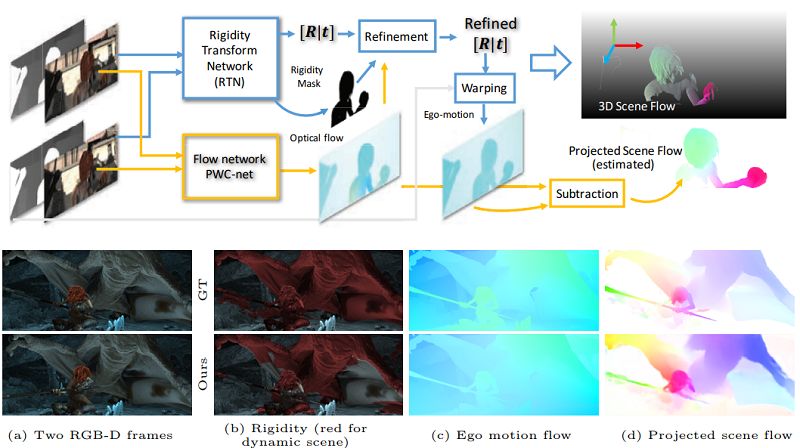
This repository includes the implementation of our full inference algorithm, including rigidity network, flow and the refinement optimization.
The data creation toolkit is located at an independent REFRESH repository
git clone https://github.com/lvzhaoyang/RefRESH
If you use this code, our generated data, or the dataset creation tool, please cite the following paper:
Learning Rigidity in Dynamic Scenes with a Moving Camera for 3D Motion Field Estimation,
Zhaoyang Lv, Kihwan Kim, Alejandro Troccoli, Deqing Sun, James M. Rehg, Jan Kautz,
European Conference on Computer Vision (ECCV) 2018
@inproceedings{Lv18eccv,
  title     = {Learning Rigidity in Dynamic Scenes with a Moving Camera for 3D Motion Field Estimation},
  author    = {Lv, Zhaoyang and Kim, Kihwan and Troccoli, Alejandro and Sun, Deqing and Rehg, James and Kautz, Jan},
  booktitle = {ECCV},
  year      = {2018}
}We provide both Docker-based setup for the containerizaiton and generic setup with conda.
An inference example is currently available. We are working on a release version of the training code, which will be available soon.
- Install nvidia-docker.
- Clone gtsam at 'external_packages/' folder (do not build it there yet. Docker will build inside the container later).
Download the following models and put them in the 'weights/' directory.
- Rigidity Transform Network Weights: trained on our REFRESH dataset,
- PWC-net Weights: sequentially trained on FlyingChairs and FlyingThings3D, which is the same weights from PWC-Net Pytorch repository
docker build . --tag rigidity:1.0
Now go to the root folder of this project, and run the run_container.sh script. This is important as we will mount the project folder inside the docker container.
sudo ./run_container.sh
Run the example inference code with default weights with the refinement step and visualization flags:
/rigidity#python run_inference.py --post_refine --visualize
Then the output of the testing example (using an example pair from sintel's market_5) will pop up as shown below:

You can also check out the 'results/' folder to see all saved images.
Optionally you can specify the output folder with --output_path. See more options with --h.
The estimated pose from the refinment will be shown as:
Estimated two-view transform
[[[ 0.99974869  0.01963792 -0.01081263 -0.04639582]
  [-0.01937608  0.9995287   0.02381045 -0.05028503]
  [ 0.01127512 -0.02359496  0.99965802  0.44513745]
  [ 0.          0.          0.          1.        ]]]
You can manually choose the network weights if you have another models.
/rigidity$python run_inference.py --pwc_weights weights/pwc_net_chairs.pth.tar --rigidity_weights weights/rigidity_net.pth.tar --post_refine --visualize

# to check the help functions
/rigidity$python run_inference.py --help
The code was developed using Python 2.7 & PyTorch 0.3.1 & Cuda 8.0. We provide an anaconda environment with all dependencies needed. To run it, please ensure you have the Anaconda Python 2.7 version installed and set the environment path for conda. Then run the following script to automatially set up the environment:
# create the anaconda environment
conda env create -f setup/rigidity.yml

# activate the environment
conda activate rigidity

sh setup/install_for_network.sh
# If you don't need the refinement stage, you can choose not to run this.
# And set the post_refine flag to be false
sh setup/install_for_refinement.sh
Download the following pre-trained models and put them in the 'weights/' directory:
- Rigidity Transform Network Weights: trained on our REFRESH dataset
- PWC-net Weights: sequentially trained on FlyingChairs and FlyingThings3D, which is the same weights from PWC-Net Pytorch repository
Please refer to the issue list of PWC-net/pytorch if there is any issue w.r.t. the flow models.
Run the example inference code with default weights the refinement step and visualization:
python run_inference.py --post_refine --visualize
Or you can manually choose the network weights
python run_inference.py --pwc_weights weights/pwc_net_chairs.pth.tar --rigidity_weights weights/rigidity_net.pth.tar --post_refine --visualize

# to check the help functions
python run_inference.py --help
To run results for your own inputs, you can use the default simple loader provided in the run_inference.py example. You need to set the color images directory, depth images directory (only support '.dpt' and '.png' format), and a simple pin-hole camera intrinsic parameters ('fx,fy,cx,cy'). For example:
python run_inference.py --color_dir data/market_5/clean --depth_dir data/market_5/depth --intrinsic 1120,1120,511.5,217.5 --post_refine --visualize
- The rigidity mask is generated the same as Optical Flow for Mostly Rigid Scenes, J. Wulff et al, CVPR 2017. As fair comparison, we also use the rigidity mask generated by them. You can download it at Ground Truth rigidity segmentation for SINTEL.
- To download the data we generate for pre-training, check REFRESH Data Readme.
