Documentation Advanced Search
The Advanced Search is a powerful and flexible tool to search structured resources (such as CRE, ITM or SPL) by any number of user-defined filter definitions. Each filter definition can target a specific field or group of common fields of the resource and match any kind of textual or numeric content. There is virtually no limit on how many filters can be defined, which makes it possible to build rather complex filter chains.
In addition, it is possible to export or import filter configurations, which allows you to reuse existing search patterns whenever you want.
The results list consists of a detailed description of all matches, which can be used to jump directly to the requested resource field or can be exported as a text file.


The dialog is split into the filter section and the search results list.
The filter section consists of a resource type selection in the top left corner where you can choose the resource type to filter. Each filter is matched against resources of that type.
The filter mode defines how filters are evaluated before it is considered a valid match.
-
Match all (AND)requires all filter entries to match before the resource is added to the results list. -
Match any (OR)requires that at least one filter entry matches before the resource is added to the results list. -
Match one (XOR)requires exactly one matching filter for the resource to be added to the results list.
Filter mode does nothing if only one filter is defined.
The filter list consists of all the filter entries you have defined to narrow down (or expand, depending on filter mode) available resources for the results list.
Filters can be added, edited or removed from the list. This can be done with the buttons below the filter list or by a context menu by right-clicking into the list box.
-
Add filter...Opens the filter dialog to define a new filter that is added to the list. The filter dialog is described in more detail down below. -
Clone filter...Opens the filter dialog to define a new filter with cloned settings from the currently selected filter. This is useful if you want to add multiple filters with similar definitions. -
Edit filter...Opens an existing filter in the filter dialog where you can make changes. -
Remove filterRemoves the selected filter from the list. -
Remove all filtersClears the whole filter list at once.
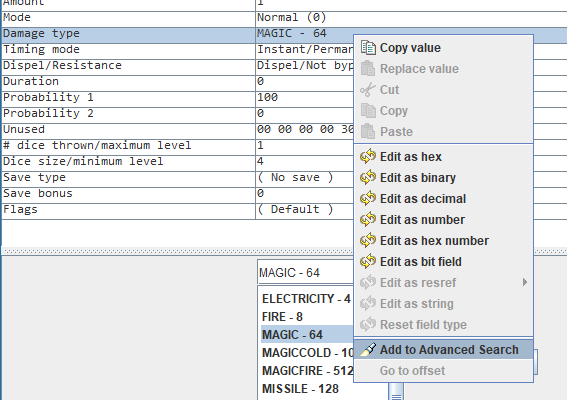
Hint: For convenience it is possible to auto-generate filters from an opened structured resource. Select the field you want to filter in the Edit tab and right-click to open the context menu. Select Add to Advanced Search to have a new filter added to the search dialog with the data from the resource field. Resource type will be set automatically in the Advanced Search dialog to match the selected resource.
The Save filters... button can be used to export the current search configuration. A save dialog prompts you for the location and name of the configuration file. With the Load filters... button you can import an existing configuration file. This operation will overwrite current settings.
Configuration is saved as xml data and should be mostly self-explanatory, so it is possible to make changes with external text editors or even create your own configuration files from scratch.

The Search button initiates the actual search operation. Depending on resource type and number of filters it may take a while to finish. The operation makes use of all available CPU cores to speed up the search.
If results are found they are added to the results list. To open a results entry either double-click on an entry or select an entry and use the Open... button. The resource will open in the NI main window and should jump to the specified resource field. With Open in new window you can open the resource in a separate window instead.
The Save... button allows you to save the results list into a text file.

This dialog allows you to set up a single search filter. It is divided into the three sections structure level, field and value as well as the global settings Invert match.
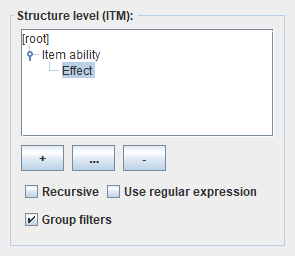
Here you can define the substructure you want to search in. The structure layout is based on the resource representation in Near Infinity. For example, ITM resources may include Item ability and Effect substructures with Item ability containing Effect structures as well. To address fields in Effect structures within Item ability structures you have to add a Item ability node to [root] and then a Effect node to the Item ability node.
The + button is used to add new structure nodes. Nodes are only added to the bottom-most node in the structure tree. With the ... button you can edit the text of an existing node. Alternatively either press F2 or click the select node once and wait a second. The - button removes the currently selected node and all child nodes.
Option Recursive can be selected to search not only the specified structure level but also any child structure as well.
Enable Use regular expression to evaluate the node name as a regular expression. Disable this option to perform an exact match of the string. In this case only additional indices will be implicitly allowed.
Enable Group filters to ensure that all filters targetting the same substructure type (e.g. "Effect") are considered a match only if they are also found in the same substructure instance (e.g. "Effect 3"). This option is enabled by default.
This section deals with field names. It is possible to target fields by Name, Relative Offset or Absolute offset.
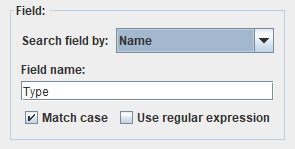
Name allows you to specify a search pattern textually for the field name. If option Match case is set then text is matched case-sensitive. Set option Use regular expression to evaluate the text input as regular expression. Otherwise the text is matched directly against field names.
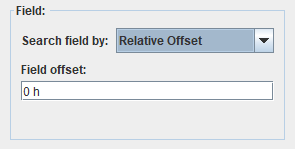
Relative Offset can be used to define a numeric offset relative to the start of the target structure defined in the "Structure level" section. This is useful if the field name in question changes depending on the context. This mode does not support the Recursive option of the "Structure level" section.
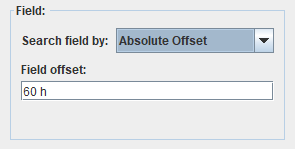
Absolute Offset can be used to define an absolute numeric offset from the start of the resource. This option is useful if the field can be found at a fixed position within the resource. "Structure level" settings are ignored in this mode since field position is fixed.
Hint: Offset input can be done in decimal notation (just by entering the number) or hexadecimal notation (by using "0x" prefix or "h" suffix). The input control will automatically change mode to the last notation entered. Alternatively you can right-click to change notation manually.
This section allows you to define the actual search pattern for the field content. The following types are available:
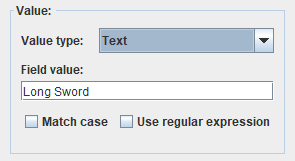
Text: This is the most generic value type. It is matched against all field types that produce some kind of text output, which includes regular text fields, resource references and even numeric fields or string references (as well as their referenced content). By default a partial textual comparison is performed that doesn't take case into account. Option Match case can be enabled to match case-sensitive. Set option Use regular expression to evaluate text input as a regular expression.
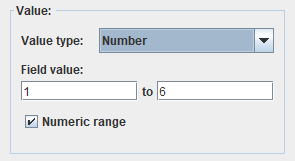
Number can be used to search for numeric field data. It is possible to search for a single numeric value, or a numeric range by enabling the Numeric range checkbox. Just like the numeric input for field names you can either enter decimal or hexadecimal values. A right-click on the input field allows you to change display mode. Additionally you can use the UP and DOWN direction keys to increase or decrease the current value by 1 (or by 10 if you press CTRL or Command).
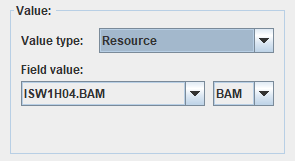
Resource type can be used to select a specific resource to search for. With this type selected only resource references will be searched.

Bitfield: This type allows you to search for specific flags or flag combination in various ways.
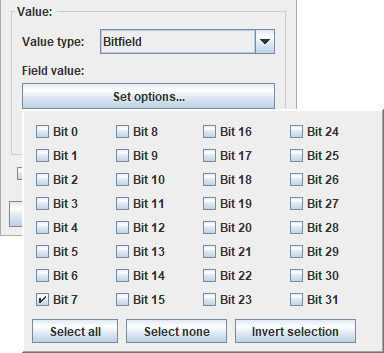
Click on Set options... to open a list of bits to select or unselect. You can enable or disable bits individually or use the buttons at the bottom to operate on all bits at once.
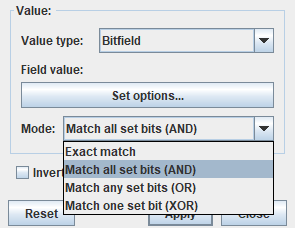
The bitfield Mode controls how flags are considered a match:
-
Exact matchresults only in a match if all (selected and unselected) flags in the flags panel are identical to the flags in the resource field. -
Match all set bits (AND)results in a match if at least all selected flags in the flags panel are also set in the resource field. -
Match any set bits (OR)results in a match if at least one selected flag in the flags panel is also set in the resource field. -
Match one set bit (XOR)results only in a match if exactly one selected flag in the flags panel is also set in the resource field.

The bottom-most option of the filter dialog, Invert match, inverts the search result for this filter, so that only resource fields NOT matching the filter definition will be added to the results list.
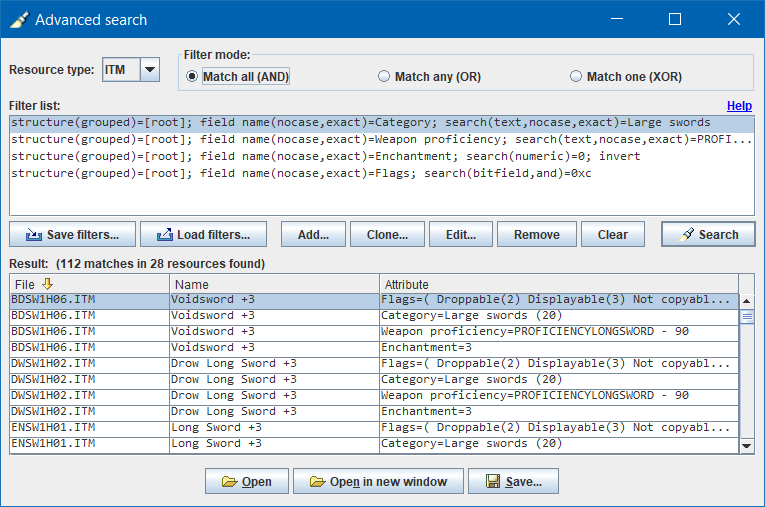
Configuration file: itm_enchanted_longswords.xml
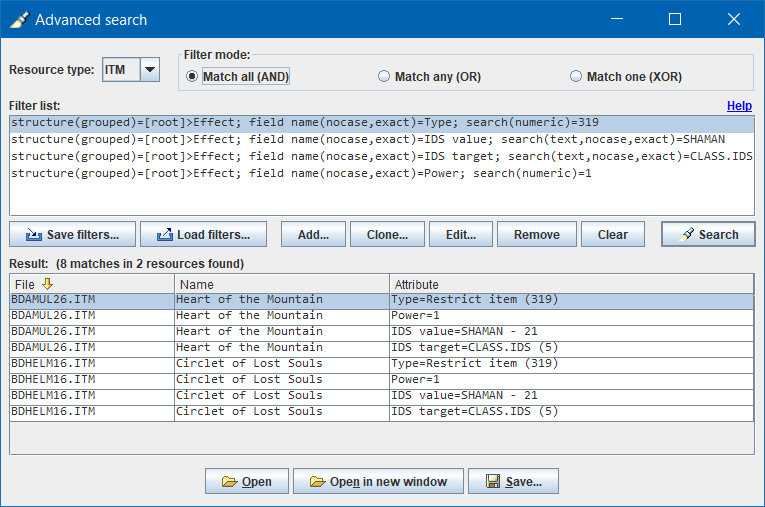
Configuration file: itm_restrict_shaman_only.xml
Example 3: Filter hostile creatures carrying superior healing potions which can be looted by the player
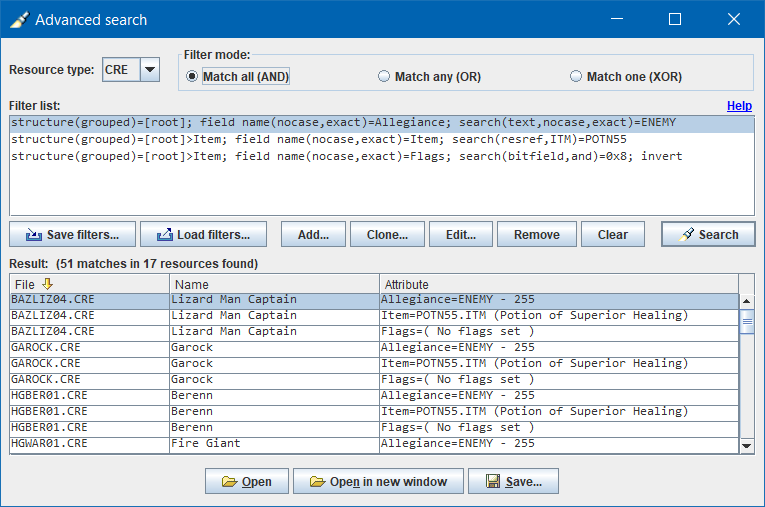
Configuration file: cre_with_droppable_potn55.xml

Configuration file: itm_dealing_fire_damage.xml