-
Notifications
You must be signed in to change notification settings - Fork 37
Documentation Tools BAM Converter
The BAM Converter is a sophisticated tool to create new BAM animations or modify existing BAM resources. It can import and output all BAM variants supported by Infinity Engine games, which includes uncompressed BAM V1, compressed BAMC and the new BAM V2 format. You can open it from Tools menu > Convert > BAM Converter... or, in the case of editing existing BAMs, use the Edit BAM button for selected BAM resources.
The converter is divided into a number of selectable tabs. Each tab provides controls to create or modify specific aspects of BAM animations which are described in more detail in the following chapters.
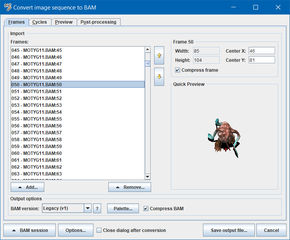
The Frames tab deals with anything frames-related and also provides controls for selecting the BAM output format, including options for the chosen BAM format.
The frames list and related buttons on the left side controls the frames which are used to define animation sequences.
The Add... button provides a number of options how you want to populate the frames list. Add file(s)... allows you to select one or more graphics files that can be added to the frames list. The converter attempts to keep the properties of the selected source files. For example, transparency from PNG files or the original palette from selected BAM files. Add resource(s)... allows you to select one or more internal game resources that can be added to the frames list.
Note 1: Both Add... options can only import frames to the frames list. Cycle definitions from selected BAM files or resources are ignored.
Note 2: The BAM Converter supports drag and drop functionality for files and folders. Simply drag files or folders from the system's file explorer to the frames list. A visual marker will show where the files will be inserted if there are already frames available in the list.
Import BAM file... can be used to import full frames and cycle definitions from a selected BAM file. If frames or cycles have already been defined then a dialog lets you choose whether to append frames and cycles from the selected file or replace the whole content. Import BAM resource... lets you choose from a list of internal game resources instead.
The Add folder... option lets you add all supported files found in the selected folder. That can be useful if you have a folder full of animation frames you want to import without having to select everything manually. The frames will be added in alphabetical sort order.
The Remove... button provides a number of options how to remove frames from the list. Remove will remove all selected frame entries from the list. Drop unused frames will remove all frames not referenced in any cycle definitions. As the name applies Remove all will remove all frames from the list.
The buttons on the right side can be used to manipulate the frames order. The "Up" button moves all selected frames up by one position. The "Down" button moves all selected frames down by one position.
On the right side you can see two regions labeled Frame x and Quick Preview.
The Quick Preview can give you a visual representation of the selected frame, including its center position.
The Frame x section provides information about the selected frame's dimension and allows you to inspect or modify its center position. If you selected Legacy (v1) in the BAM Version field of the Output options you can also choose whether to compress the frame. (Hint: You can define the center position of multiple frames at once by selecting more than one frame from the list and enter the desired values. You can also prepend the values by ++ or -- to move the center coordinates for each frame in positive or negative directions by the specified amount.)
This section allows you specify the BAM output format. Supported formats are Legacy (v1) and PVRZ-based (v2).
Legacy (v1) lets you create a BAM file in the format supported by the non-enhanced Infinity Engine games. The checkbox Compress BAM controls whether to create uncompressed BAM V1 files (when unchecked) or compressed BAMC files (when checked).
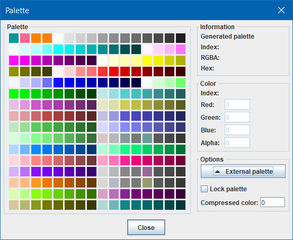
You have also the opportunity to inspect or modify the palette of the resulting BAM file. Click on the Palette... button to open a new dialog:
Hover with your mouse cursor of a palette entry to see information about it in the Information section at the top right. You can also select a palette entry to modify its color. You can do it in the Color section on the center right.
If you are not satisfied with the palette at all you can also import an external palette by clicking on External palette and selecting Load palette.... You can restore the original palette if needed by selecting Clear palette instead.
The Lock palette option can be used if you don't want the converter to make changes to the current state of the palette when you modify the global frames list.
The Compressed color field lets you choose which palette index should be RLE compressed when you choose to compress BAM frames. Default is palette index 0.
The second BAM format is PVRZ-based (v2). It allows you to export the current BAM configuration to the BAM V2 format which is supported by the new Enhanced Edition games. In addition to the BAM file itself it also creates one or more PVRZ files which contain the graphics data of the BAM. The filename format is hardcoded as MOSxxxx.PVRZ where xxxx is a positive numeric value. Since the games already contain a number of MOSxxxx.PVRZ files in their unmodded state it is recommended to use a PVRZ index of 1000 or higher. You can also use special WeiDU functions to take care of this issue.
With the Compression type you can select a specific PVRZ compression type used for the graphics data of the BAM. The button ? next to the combobox provides a short summary of the pros and cons for each format. It is recommended to leave it at Auto.
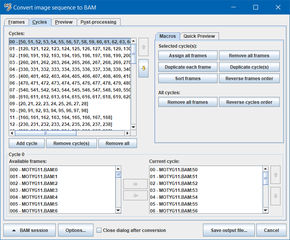
The Cycles tab is divided into three main sections:
The top-left Cycles sections provides a list of cycle definitions and related buttons. Add cycle adds a new empty cycle right after the selected entry. Remove cycle(s) removes all selected cycles from the list. With Remove all you can clear the whole cycles list. The button on the right of the list can be used to move one or more selected cycles up or down.
The Cycle x section at the bottom of the converter can be used to add, remove or move frames within a cycle. When you add a new cycle to the list it is empty by default. This section allows you to fill it with frame indices. On the left side you can see the list of Available frames. The right side represents the Current cycle. To add frames to the cycle definition select one or more frames in the Available frames list and use the 🠖 button to add them to the Current cycle list. To remove frames from the cycle you can select one or more frames in the Current cycle list and use the 🠔 button. You can also change the order of frames in the cycle by using the "Up" and "Down" buttons on the right.
The top-right section can be used to automate simple cycle-related tasks. The section offers action for selected cycles only or all cycles at once. You can also select the Quick Preview tab to make it easier adding the right frames to the selected cycle in the Cycle x section at the bottom of the window.
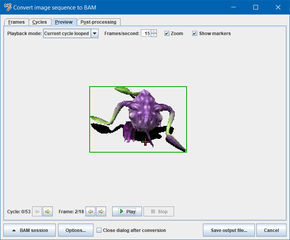
As the name suggests this tab allows you to preview the final result of the current BAM configuration, which includes the current state of frames made in the Frames tab, current cycle definitions and applied post-processing filters described in the next chapter.
The controls at the top of the window let you control how to preview animations. The Playback mode should be self-explanatory. You can choose whether to play back the current cycle only or all cycles at once, either looped continuously or only once per playback. The Frames/second option lets you choose the animation speed. The (in-game) default is usually 15 fps. Selecting the Zoom checkbox causes the animation to be displayed at twice the size. Make sure to resize the converter window appropriately. The Show markers option displays useful information, such as the frame border and center position.
At the bottom you can choose which animation cycle to play back. You can also browse through every frame with the Frame forward/back buttons. The Play and Stop buttons can be used to start or stop the playback of the animation respectively.
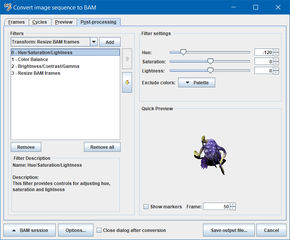
In addition to defining frames and cycles which are directly stored in the resulting BAM file you can also influence several aspects of the graphics data itself. This tab allows you to select one or more filters which fall into either of the broad categories Color filter, Transformation filter or Output filter.
Each filter added to the list can be moved up or down to achieve the desired effect. A short filter description is displayed in the Filter Description section below the filter list. Many filters also provide their own controls which can be accessed in the Filter Settings section on the right side. The Quick Preview section shows you the cumulative result of this and all previous filters.
Filters of this category can only alter the visual appearance of graphics data without making any changes to frame or cycle configurations.
Available filters:
-
Brightness/Contrast/Gamma- Provides controls for adjusting brightness, contrast and gamma. -
Hue/Saturation/Lightness- Provides controls for adjusting hue, saturation and lightness. -
Color Balance- Provides controls for adjusting the balance of each individual color channel. -
Replace colors (BAM v1 only)- Allows you to manipulate individual palette entries or replace the palette as a whole. It is only available if the BAM output formatLegacy (v1)has been selected. -
Swap color channels- Provides controls for swapping color channels in any desired order. -
Invert colors- Inverts colors of all frames.
Note: For the majority of these filter you can select palette entries to exclude from being modified if you selected Legacy (v1) as BAM output format.
Filters of this category allow you to change properties of the frames themselves, which includes size or layout.
Available filters:
-
Resize BAM frames- Allows you to adjust the size of each BAM frame. Not all resize algorithms are available for all BAM output formats. -
Rotate BAM frames- Allows you to rotate each frame in 90 degree steps. -
Mirror BAM frames- Allows you to mirror each BAM frame horizontally, vertically or along both axes. -
Trim BAM frames- Attempts to remove unused space around each BAM frame.
Note: All of these filters allow you to adjust center positions accordingly.
This category contains only two filters:
Default BAM output: This filter outputs the current BAM structure into a single file. It is used implicitly by default if no other output filters have been specified.
Splitted BAM output: This filter allows you to split the BAM into multiple parts and outputs each one into a separate BAM file. This is useful for giant creature animations which have to be split into several segments or for animations exceeding certain width or height limits.
Note: Output filters will always be processed last regardless of current filter position.
Last but not least, let's talk about the row of buttons at the bottom of the converter.
The Cancel button should be self-explanatory. It cancels the whole BAM creation and closes the window. A confirmation dialog prevents you from accidentally closing the converter and losing all data.
With the Save output file... button you can finally generate the resulting BAM file based on the current BAM configuration.
The checkbox Close dialog after conversion should be self-explanatory as well. Selecting it causes the converter to close automatically after saving the resulting BAM file.
Caution: You will lose the whole BAM configuration if you enable this option.
With the Options... button you can open the BAM Converter Options. It is explained in more detail in the next chapter.
Pressing the BAM session button opens a list of two options:
-
Export session...allows you to export the current BAM configuration into a human-readable INI file. The stored data includes the list of frames and their center coordinates, cycle definitions and post-processing filters. A selection dialog allows you to skip one or more of these options. -
Import session...allows you to import BAM data from a specified INI file. You can import frames, their center coordinates, cycle definition and post-processing filters. Old data in the converter will be overwritten. Hint: Skipping certain elements from importing allows you, for example, to clone frame coordinates, cycle definitions and/or post-processing filters for another set of previously added frames.
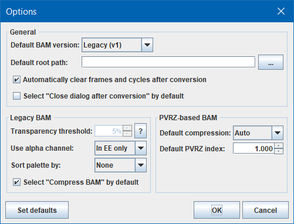
Options... opens an Options dialog where you can define a number of global settings affecting the BAM generation process in one way or another.
With the Default BAM version you can choose which BAM output version is selected by default when you open the BAM Converter.
The Default root path allows you to specify the directory which is initially selected when you open the file dialog for importing files or saving the resulting BAM file. Clear this field to use the root directory of the current game.
The option Automatically clear frames and cycles after conversion should be self-explanatory. It clears all data after generating the output BAM without closing the converter.
With the option Select "Close dialog after conversion" by default you can specify whether the option Close dialog after conversion mentioned in the previous chapter is preselected every time you open the BAM Converter.
In the Legacy BAM section you can specify options specifically for the BAM V1 or BAMC output formats. The Transparency threshold defines how much alpha/transparency in pixels of a source graphics file is required to treat it as fully transparent. The ? button next to it provides a more in-depth explaination. Select "Compress BAM" by default lets you choose whether you want to output compressed BAMC files by default.
In the PVRZ-based BAM section you can specify a number of defaults for creating BAM V2 files. The Default compression option defines which compression type is preselected. The Default PVRZ index is equally self-explanatory and defines the initially set PVRZ index for BAM V2 files.
Near Infinity - An Infinity Engine Browser and Editor
Project | Download | Discussions on GitHub | Topic on Spellhold Studios | Topic on Beamdog Forums
