Tutorial_ASPNET_CSharp
November 27th, 2014
The objective is to learn the development of ASP.NET Web Forms application using Open Touryo framework, by developing sample programs according to the exercises in this tutorial. This tutorial explains the generation of scripts and class files by using the tool, flow and functionality of ASP.NET Web Forms application with an example.
Scope of this tutorial is learning how to use Open Touryo framework in ASP.NET Web Forms application.
This tutorial describes the development flow for ASP.NET Web Forms application by using Open Touryo framework. The sample program attached to Open Touryo Visual Studio 2015 template base (/root_VS2015/) is used as the material of this tutorial.
As we are pressed for time, some images are only displayed in Japanese.
The company names and product names used in this document are the trademarks or registered trademarks of the respective companies.
This document can use Creative commons CC BY 2.1 JP license.
1. Overview of Open Touryo framework
Open Touryo framework is an application framework for .NET. Open Touryo framework targets .NET Framework 4.6 or above and can be used in various applications like C/S (Windows Forms, WPF), Web (ASP.NET) and RIA (Silverlight).
Figure 1-1 shows the class configuration of Open Touryo framework.
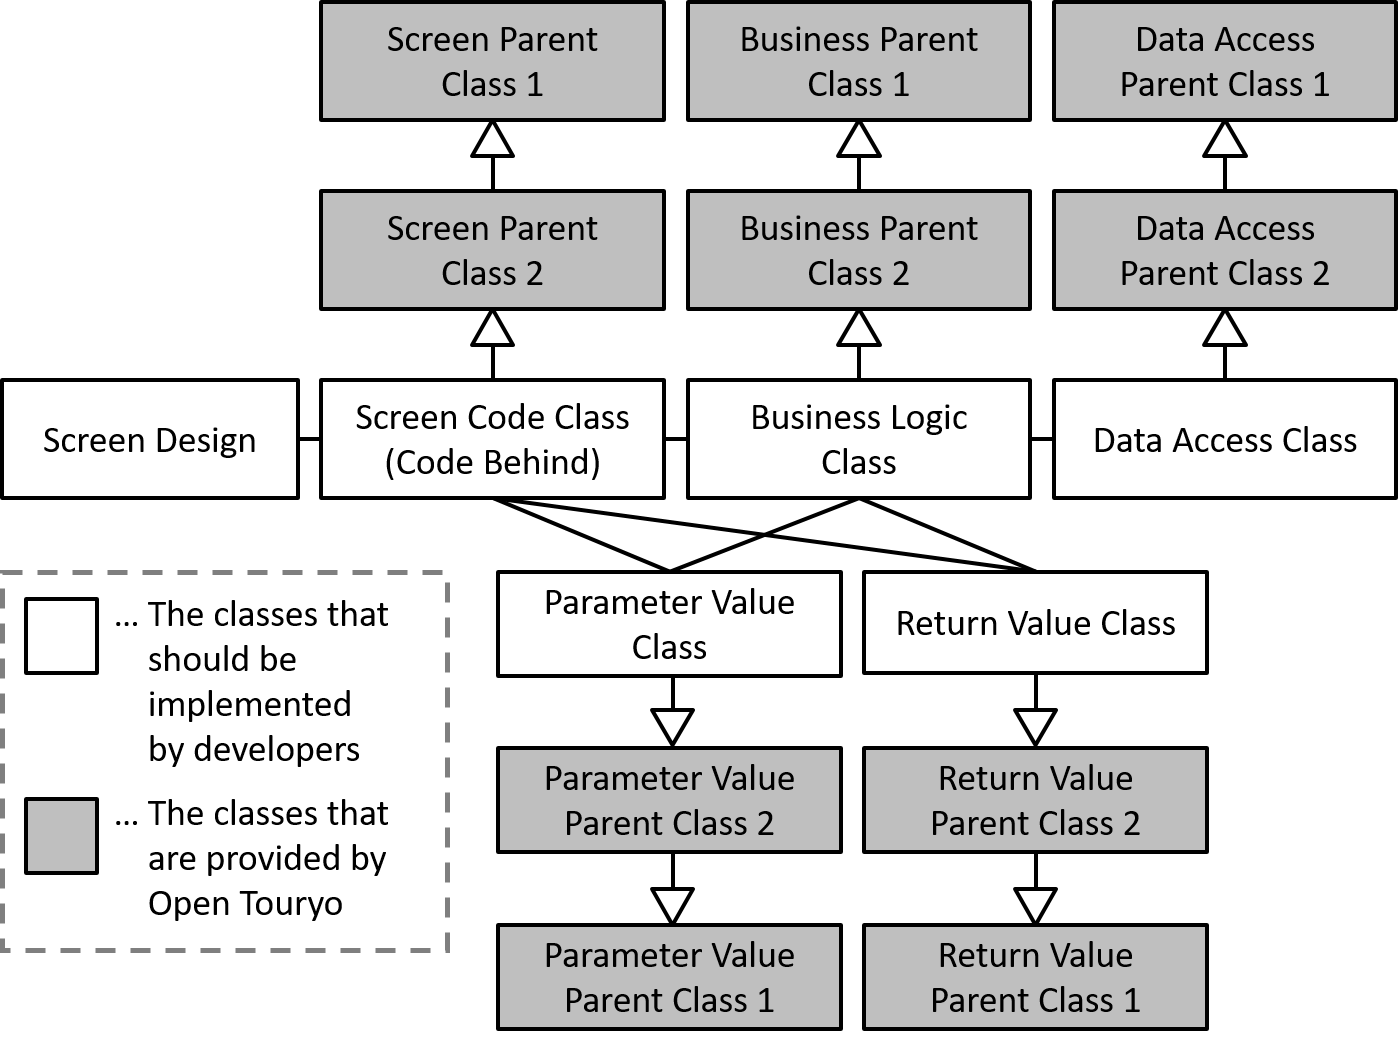
Figure 1-1 Class diagram of Open Touryo framework
This tutorial explains how to create Screen / Business logic class / Data access class to be implemented by developer according to Class configuration diagram - Figure 1-1.
The followings are the prerequisites for this tutorial.
- Development environment
- IDE
- Visual Studio 2015 (Express Edition is also available)
- Application framework
- Open Touryo Template Base for Visual Studio 2015
- IDE
- Runtime environment
- Runtime
- .NET Framework 4.6
- Web Server
- IIS Express
- DB
- SQL Server Express 2008 R2
- Runtime
- Others
- OS
- Windows 7
- Programming language
- C#
- Browser
- Internet Explorer 11
- OS
Install Visual Studio referring to Microsoft homepage beforehand.
Next, set up Open Touryo Template Base and database.
-
Click [Download ZIP] button on GitHub and obtain OpenTouryoTemplates.zip. Unzip this zip file and obtain Open Touryo Template Base for Visual Studio 2015.
-
Set up Open Touryo Template Base and database according to Readme.md in root_VS2015 folder.
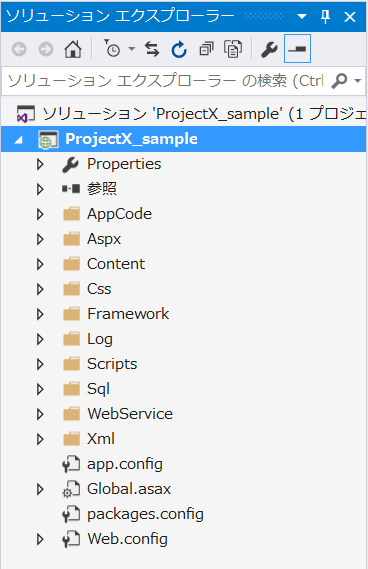
Users of this tutorial can practice by adding screen or logic to the sample program that bundled with Open Touryo template base. Figure 3-1 shows the configuration of sample program and Figure 3-2 shows the Screen transition diagram of the tutorial.

Figure 3-1 Configuration of sample program
When the exercise of this tutorial is completed, three types of class, indicated in the following table, are created for data access class. For details on these classes, refer User guide of Open Touryo (Better use and FAQ Edition).
| Data Access class | Explanation |
|---|---|
| Auto generation DAO | DAO class that is generated by D layer auto generation tool bundled with Open Touryo template base. This class is used while performing simple CRUD process in table/view. |
| Common DAO | DAO class that is provided by Open Touryo framework. This class is used when D layer auto generation tool can not be used, such as the case of obtaining the result based on joined tables. |
| DAO summary class | Facade class in D layer. This class is used for summarizing requests from business logic class when using multiple DAO classes in one transaction. |
Figure 3-2 Screen transition diagram of tutorial
The following section describes development flow using Open Touryo framework.
-
Open
C:\root\programs\C#\Samples\WebApp_sample\WebForms_Sample\WebForms_Sample.sln. -
Confirm that Visual Studio is launched and the sample program that bundled with Open Touryo template base is opened.
-
In Solution Explorer, select
Aspx\Commonfolder. Click Project -> Add New Item in toolbar.
-
Select Web Forms Master Page and add new master page named
TouryoMaster.master. -
To add JavaScript and hidden tags used by Open Touryo in the master page, implement master page as follows referring to existing master page. (e.g.
Aspx\Common\TestBlankScreen.master)<%@ Master Language="C#" AutoEventWireup="true" CodeBehind="TouryoMaster.master.cs" Inherits="WebForms_Sample.Aspx.Common.TouryoMaster" %> <!-- All Rights Reserved, Copyright (C) 2007,2012 Hitachi Solutions,Ltd. --> <!DOCTYPE html> <html> <head id="Head1" runat="server"> <title>無題のページ</title> <!--Uncomment below line when using jQuery--> <!--<script src="http://code.jquery.com/jquery-3.1.0.min.js"></script>--> <!--FxCode:add-start--> <script type="text/javascript" src="<%= this.ResolveClientUrl("~/Framework/js/common.js") %>"></script> <script type="text/javascript" src="<%= this.ResolveClientUrl("~/Framework/js/ie_key_event.js") %>"></script> <!-- Resolve URL in the javascript--> <script type="text/javascript"> var baseUrl = "<%= ResolveUrl("~/") %>"; </script> <!-- IE8をIE7互換モードで動作させる --> <!--meta http-equiv="X-UA-Compatible" content="IE=EmulateIE7" /--> <link rel="stylesheet" href="<%= this.ResolveClientUrl("~/Css/style.css") %>" type="text/css"/> <!--FxCode:add-end--> </head> <!--FxCode:add-js-event--> <body onload="Fx_Document_OnLoad();" onunload="Fx_Document_OnClose();"> <!-- オートコンプリートを指定 --> <form id="form1" runat="server" autocomplete="on"> <!-- Common header --> <h1>Open Touryo sample</h1> <!--SampleCode:add-start--> <a href="<%= this.ResolveUrl("~/Aspx/start/menu.aspx") %>">メニュー画面</a><br /> <!--SampleCode:Contents--> <asp:contentplaceholder id="ContentPlaceHolder_A" runat="Server"> This is Default Content -- Override on Page </asp:contentplaceholder> <!--SampleCode:add-end--> <!--FxCode:add-start--> <asp:HiddenField ID="ChildScreenType" runat="server" Value="0" /> <asp:HiddenField ID="ChildScreenUrl" runat="server" Value="0" /> <asp:HiddenField ID="CloseFlag" runat="server" Value="0" /> <asp:HiddenField ID="SubmitFlag" runat="server" Value="0" /> <asp:HiddenField ID="ScreenGuid" runat="server" Value="0" /> <asp:HiddenField ID="FxDialogStyle" runat="server" Value="0" /> <asp:HiddenField ID="BusinessDialogStyle" runat="server" Value="0" /> <asp:HiddenField ID="NormalScreenStyle" runat="server" Value="0" /> <asp:HiddenField ID="NormalScreenTarget" runat="server" Value="0" /> <asp:HiddenField ID="DialogFrameUrl" runat="server" Value="0" /> <asp:HiddenField ID="WindowGuid" runat="server" Value="0" /> <asp:HiddenField ID="RequestTicketGuid" runat="server" Value="0" /> <!--FxCode:add-end--> </form> </body> </html>
-
Save
TouryoMaster.master.Note:
If master page is not saved at this step, an error occurs in Visual Studio designer when creating web forms in the subsequent steps.
-
In Solution Explorer, select
Aspx\samplefolder. Click Project -> Add New Item in toolbar.
-
Select Web Form with Master Page and add new web form named
OrdersList.aspx. -
In Select a Master Page dialog, select
Aspx\Common\TouryoMaster.masterand click OK. -
Add GridView control to
OrdersList.aspx, and set theIDproperty togvwOrdersList.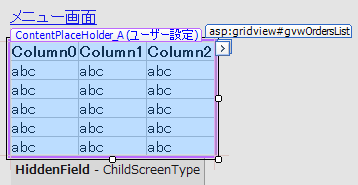
Note:
If the prefix of control name, e.g. "gvw", is set incorrectly, the control is not recognized correctly by Open Touryo. For details, refer Open Touryo user guide (Leader edition). -
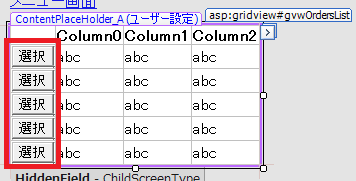
Click Edit Columns in GridView Tasks menu.

-
Select ButtonField in Available fields list and click Add.

-
Set the properties of ButtonField as follows:
- ButtonType: Button
- Text: Select
- Leave the other fields as default.

-
Confirm that Select buttons have been added to GridView.
-
In the same way to section 4.2.2, create a web form that displays the order details. Here, name the form
OrderDetails.aspx. -
Add two Label controls, two GridView controls and Button control to
OrderDetails.aspxas following image.
Set it as below respectively.
- Label (Upper part)
- Text: Order information (Summary)
- Label (Lower part)
- Text: Order information (Details)
- GridView (Upper part)
- ID: gvwOrderSummary
- AutoGenerateEditButton: true
- GridView (Lower part)
- ID: gvwOrderDetails
- AutoGenerateEditButton: true
- Button
- Name: btnUpdateOrder
- Text: Update order Information
- Label (Upper part)
-
In Solution Explorer, select
Aspx\samplefolder. Click Project -> Add Existing Item in toolbar.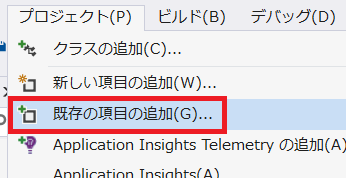
-
In Add Existing Item dialog, select
C:\root\files\resource\Test\test.pdfand click Add. -
Confirm that
test.pdffile has been add toAspx\samplefolder.
-
In Solution Explorer, open
Aspx\start\menu.aspx. -
Insert the following code to add the LinkButton(ID:
lbnGetOrdersList) for transferring to orders list form and the LinkButton(ID:lbnShowDialog) for displaying the dialog window.・ Tutorial<br /> - <asp:LinkButton ID="lbnGetOrdersList" runat="server">Get order information list</asp:LinkButton> <br /> - <asp:LinkButton ID="lbnShowDialog" runat="server">Display modal dialog</asp:LinkButton>
-
Confirm that added LinkButtons are shown in the design view of
menu.aspx.
-
In Solution Explorer, open
app.config. -
Set
FxScreenTransitionModetoR.<!-- 画面遷移方法を指定(T:Transfer、R:Redirect、off) --> <add key="FxScreenTransitionMode" value="R"/>
Define screen transition in SCDefinition.xml file when controlling screen transition with Open Touryo.
-
Open
C:\root\files\resource\Xml\SCDefinition.xmlwith Notepad. -
Modify the definition of
menu.aspxas follows:<Screen value="/WebForms_Sample/Aspx/start/menu.aspx" directLink="allow"> <!-- Define transition to orders list form --> <Transition value="/WebForms_Sample/Aspx/sample/OrdersList.aspx" label="List"/> </Screen>
-
Define orders list form and order details form in
SCDefinition.xml.<!-- Orders list form --> <Screen value="/WebForms_Sample/Aspx/sample/OrdersList.aspx" directLink="deny"> <!-- Define transition to order details form --> <Transition value="/WebForms_Sample/Aspx/sample/OrderDetails.aspx" label="Detail"/> </Screen> <!-- Order details form --> <Screen value="/WebForms_Sample/Aspx/sample/OrderDetail.aspx" directLink="deny"> </Screen>
Note:
Refer to Open Touryo user guide (Each Function Edition) for information about the notation ofSCDefinition.xmland the details of screen definition with Open Touryo.
-
In Solution Explorer, select
AppCode\sample\Commonfolder. Click Project -> Add Class in toolbar.
-
Add new class named
OrderParameterValue.cs. -
Add the following namespaces in
OrderParameterValue.csto import the classes provided by Open Touryo.using Touryo.Infrastructure.Business.Util; using Touryo.Infrastructure.Business.Common;
-
Inherit Parameter Value Parent Class of Open Touryo to
OrderParameterValueclass as shown below.public class OrderParameterValue : MyParameterValue
-
Create
OrderParameterValueconstructor with the following code.public OrderParameterValue(string screenId, string controlId, string methodName, string actionType, MyUserInfo user) : base(screenId, controlId, methodName, actionType, user) { }
-
Create the following properties in
OrderParameterValueclass to transfer data from form to data access class./// <summary>Order ID</summary> public string OrderId; /// <summary>Order information (Summary)</summary> public System.Data.DataTable Orders; /// <summary>Order information (Details)</summary> public System.Data.DataTable OrderDetails;
-
In the same way to section 4.4.1, create new class named
OrderReturnValue.cs. -
Add the following namespace in
OrderReturnValue.csto import the classes provided by Open Touryo.using Touryo.Infrastructure.Business.Common;
-
Inherit the Return Value Parent Class of Open Touryo to
OrderReturnValueclass as shown below.public class OrderReturnValue : MyReturnValue
-
Create the following properties in
OrderReturnValueclass to transfer the resultant data from data access class to form./// <summary>Order information (Summary)</summary> public System.Data.DataTable Orders; /// <summary>Order information (Details)</summary> public System.Data.DataTable OrderDetails;
Perform the following steps to generate data access class and SQL files that implement simple CRUD operation for table or view, using the D layer auto generation tool (DaoGen_Tool) bundled with Open Touryo template base.
-
Open
C:\root\programs\C#\Frameworks\DaoGen_Tool\bin\Debug\DaoGen_Tool.exe. -
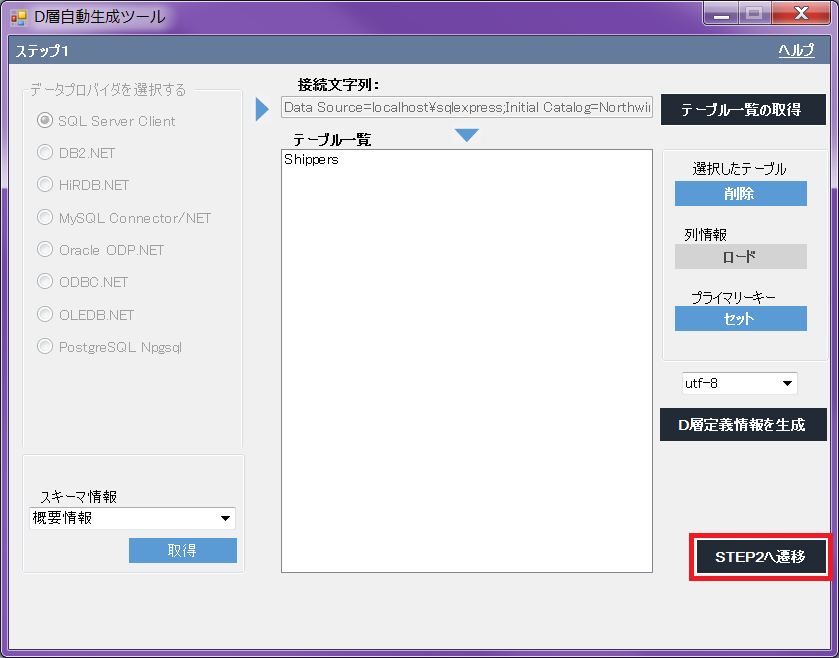
In the STEP1 screen, set database information as follows and click acquisition.
- Data provider: SQL Server Client
- Connection string: Data Source=localhost\SQLExpress;Initial Catalog=Northwind;Integrated Security=true;
- Schema Info: Summary Information

-
If database information, such as connection string, are correct, Display (Summary Information) dialog of schema information of DBMS screen is shown.
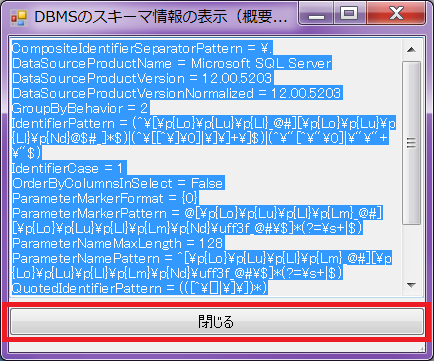
Click Close to close the dialog box.
-
Click Get Table List.

In the Note? (prerequisites) dialog box, click OK.
-
Tables and views in Northwind database are shown in list box. Since Orders table and Order Details table will be used in this tutorial, select all tables and views except Order table and Order Details table, and click Delete.

-
Confirm whether Table List contains only Order table and Order Details table, and click Load.

-
The Generate D layer definition file button is activated. Select utf-8 as file encoding and click Generate D layer definition file.

Save as
C:\root\Info.csv. -
Click OK in the dialog box displaying the message Completion of generation of the D-layer definition information!.

-
Click Go to STEP 2.
-
In the STEP2 screen, enter input / output settings as follows:
- D layer definition file: C:\root\Info.csv
- Source Template Folder: C:\root\files\tools\DGenTemplates
- Output File: C:\root
- Leave the other fields as default.

Click Generate Program.
-
Click OK in the dialog box displaying the message Automatic Generation Completed!.

-
Confirm that data access classes and SQL files are generated in
C:\rootfolder.
Note:
In the Open Touryo framework, the files with extensions.sqland.xmlare SQL files. (For more details, refer to the Open Touryo framework user guide) -
To add generated data access class to sample program, select Dao folder in Solution Explorer, and click Project -> Add Existing File in toolbar.

-
In the Add Existing Item screen, select
DaoOrders.csandDaoOrder_Details.csinC:\rootfolder. Click Add. -
Copy the generated SQL and XML files in
C:\roottoC:\root\files\resource\Sqlfolder. -
Close D layer auto generation tool.
D layer auto generation tool can generate data access class and SQL file for simple CRUD processing. However, the developer should create sql file individually for complicated processing, such as join multiple tables.
-
Create
SelectOrders.sqlfile inC:\root\files\resource\Sqlfolder. -
Add the following SQL scripts in
SelectOrders.sqlto get the list of orders.SELECT Orders.OrderID, Customers.CompanyName, Customers.ContactName, Employees.LastName As EmployeeLastName, Employees.FirstName As EmployeeFirstName, Orders.OrderDate FROM Orders INNER JOIN Customers ON Orders.CustomerID = Customers.CustomerID INNER JOIN Employees ON Orders.EmployeeID = Employees.EmployeeID
In this tutorial, the following data access classes are used.
- DaoOrders
- For access to Orders table
- DaoOrder_Details
- For access to Order Details table
- CmnDao (Common data access class with Open Touryo)
- For access with SQL file created in section 4.5.2.
In this section describes how to create Dao Summary Class. Dao summary Class is Facade for business logic class, and controls the call the above data access classes.
-
Select Dao folder in the Solution Explorer. And click Project -> Add Class in toolbar.

-
Add class named
ConsolidatedLayerD.cs. -
Add the following namespaces to
ConsolidatedLayerD.csto import the classes provided by Open Touryo, and parameter and return value class created in section 4.4.// Open Touryo using Touryo.Infrastructure.Business.Dao; using Touryo.Infrastructure.Public.Db; // Parameter and return value class using WebForms_Sample.AppCode.sample.Common;
-
Inherit Data Access Parent Class of Open Touryo framework to
ConsolidatedLayerDclass as shown below.public class ConsolidatedLayerD : BaseConsolidateDao
-
Create
ConsolidatedLayerDconstructor with the following code.public ConsolidatedLayerD(BaseDam dam) : base(dam) { }
-
Create
GetOrdersmethod to get the list of orders with the following code.public OrderReturnValue GetOrders(OrderParameterValue orderParameter) { // Create an object of Return Value class OrderReturnValue returnValue = new OrderReturnValue(); // Create an object of common DAO and assign SQL file CmnDao dao = new CmnDao(this.Dam); dao.SQLFileName = "SelectOrders.sql"; // Create an object of DataTable System.Data.DataTable table = new System.Data.DataTable(); // Get the list of orders information from the database and stored in a DataTable dao.ExecSelectFill_DT(table); // Store the orders information to the Return Value class and return to the B layer returnValue.Orders = table; return returnValue; }
-
Create
GetOrderByIdmethod to get the details of specific order summary and order details information based on the Order ID with the following code.public OrderReturnValue GetOrderById(OrderParameterValue orderParameter) { // Create an object of Return Value class OrderReturnValue returnValue = new OrderReturnValue(); // Create an object of auto generated DAO classes DaoOrders orderDao = new DaoOrders(this.Dam); DaoOrder_Details orderDetailsDao = new DaoOrder_Details(this.Dam); // Create objects of DataTable to store the details of specified order information System.Data.DataTable orderTable = new System.Data.DataTable(); System.Data.DataTable orderDetailsTable = new System.Data.DataTable(); // Set the required parameters orderDao.PK_OrderID = orderParameter.OrderId; orderDetailsDao.PK_OrderID = orderParameter.OrderId; // Get the details of specific order information from the database and stored in the DataTable orderDao.D2_Select(orderTable); orderDetailsDao.D2_Select(orderDetailsTable); // Store the details of specific order information to the Return Value class and return to the B layer returnValue.Orders = orderTable; returnValue.OrderDetails = orderDetailsTable; return returnValue; }
-
Create
UpdateOrdermethod to update the details of specified order summary and order details information with the following code.public OrderReturnValue UpdateOrder(OrderParameterValue orderParameter) { // Create an object of Return Value class OrderReturnValue returnValue = new OrderReturnValue(); // Create an object of auto generated DAO classes DaoOrders orderDao = new DaoOrders(this.Dam); DaoOrder_Details orderDetailsDao = new DaoOrder_Details(this.Dam); // Create an object of DataTable to store order information and order details information System.Data.DataTable orderTable = orderParameter.Orders; System.Data.DataTable orderDetailsTable = orderParameter.OrderDetails; // Judge the state of DataRow, and update database if DataRow is modified if (orderTable.Rows[0].RowState == System.Data.DataRowState.Modified) { // Set the parameters of the order information orderDao.PK_OrderID = orderTable.Rows[0]["OrderId"]; orderDao.Set_OrderDate_forUPD = orderTable.Rows[0]["OrderDate"]; orderDao.Set_RequiredDate_forUPD = orderTable.Rows[0]["RequiredDate"]; orderDao.Set_ShippedDate_forUPD = orderTable.Rows[0]["ShippedDate"]; orderDao.Set_ShipVia_forUPD = orderTable.Rows[0]["ShipVia"]; orderDao.Set_Freight_forUPD = orderTable.Rows[0]["Freight"]; orderDao.Set_ShipName_forUPD = orderTable.Rows[0]["ShipName"]; orderDao.Set_ShipAddress_forUPD = orderTable.Rows[0]["ShipAddress"]; orderDao.Set_ShipCity_forUPD = orderTable.Rows[0]["ShipCity"]; orderDao.Set_ShipRegion_forUPD = orderTable.Rows[0]["ShipRegion"]; orderDao.Set_ShipPostalCode_forUPD = orderTable.Rows[0]["ShipPostalCode"]; orderDao.Set_ShipCountry_forUPD = orderTable.Rows[0]["ShipCountry"]; // Update the order information to the database orderDao.D3_Update(); } foreach (System.Data.DataRow row in orderDetailsTable.Rows) { // Judge the state of DataRow, and update database if DataRow is modified if (row.RowState == System.Data.DataRowState.Modified) { // Set the parameters of the order details information orderDetailsDao.PK_OrderID = row["OrderId"]; orderDetailsDao.PK_ProductID = row["ProductId"]; orderDetailsDao.Set_UnitPrice_forUPD = row["UnitPrice"]; orderDetailsDao.Set_Quantity_forUPD = row["Quantity"]; orderDetailsDao.Set_Discount_forUPD = row["Discount"]; // Update the order details information to the database orderDetailsDao.D3_Update(); } } // Return result value return returnValue; }
-
In Solution Explorer, select
AppCode\sample\Businessfolder. Click Project -> Add Class in toolbar.
-
Add class named
OrdersLogic.cs. -
Add the following namespaces to
OrdersLogic.csto import the classes provided by Open Touryo, and parameter and return value class, and data access class.// Open Touryo // Business using Touryo.Infrastructure.Business.Business; using Touryo.Infrastructure.Business.Common; using Touryo.Infrastructure.Business.Dao; using Touryo.Infrastructure.Business.Exceptions; using Touryo.Infrastructure.Business.Presentation; using Touryo.Infrastructure.Business.Util; using Touryo.Infrastructure.Business.RichClient.Asynchronous; using Touryo.Infrastructure.Business.RichClient.Business; using Touryo.Infrastructure.Business.RichClient.Presentation; // Framework using Touryo.Infrastructure.Framework.Business; using Touryo.Infrastructure.Framework.Common; using Touryo.Infrastructure.Framework.Dao; using Touryo.Infrastructure.Framework.Exceptions; using Touryo.Infrastructure.Framework.Presentation; using Touryo.Infrastructure.Framework.Util; using Touryo.Infrastructure.Framework.Transmission; using Touryo.Infrastructure.Framework.RichClient.Presentation; // Public using Touryo.Infrastructure.Public.Db; using Touryo.Infrastructure.Public.IO; using Touryo.Infrastructure.Public.Log; using Touryo.Infrastructure.Public.Str; using Touryo.Infrastructure.Public.Util; // Parameter and Return value class using WebForms_Sample.AppCode.sample.Common; // Data access class using WebForms_Sample.AppCode.sample.Dao;
-
Inherit Business Parent Class of Open Touryo framework to OrdersLogic class as shown below.
public class OrdersLogic : MyFcBaseLogic
-
Create
UOC_GetOrdersmethod to get the list of orders with the following code.private void UOC_GetOrders(OrderParameterValue orderParameter) { // Create an object DAO Summary class ConsolidatedLayerD facade = new ConsolidatedLayerD(this.GetDam()); // Get the list of orders information OrderReturnValue returnValue = facade.GetOrders(orderParameter); // Return the object of Return Value class this.ReturnValue = returnValue; }
Note:
The method to be called from the Controller class is required to be created asUOC_xx(xx is arbitrary string). When controller sends xx as parameter, Open Touryo framework allocates the processing toUOC_xxmethod in business logic class. -
Create
UOC_GetOrderByIdmethod to get the details of specific order summary and order details information based on the Order ID with the following code.private void UOC_GetOrderById(OrderParameterValue orderParameter) { // Create an object DAO Summary class ConsolidatedLayerD facade = new ConsolidatedLayerD(this.GetDam()); // Get the details of specific order information and order details information based on Order ID OrderReturnValue returnValue = facade.GetOrderById(orderParameter); // Return the object of Return Value class this.ReturnValue = returnValue; }
-
Create
UOC_UpdateOrdermethod to update the details of specified order summary and order details information with the following code.private void UOC_UpdateOrder(OrderParameterValue orderParameter) { // Create an object DAO Summary class ConsolidatedLayerD facade = new ConsolidatedLayerD(this.GetDam()); // Update the specified order information and order details information OrderReturnValue returnValue = facade.UpdateOrder(orderParameter); // Return the object of Return Value class this.ReturnValue = returnValue; }
-
In Solution Explorer, open
Aspx\Common\TouryoMaster.master.cs. -
Add the following namespaces to
OrdersForm.csto import the namespaces of Open Touryo.using Touryo.Infrastructure.Framework.Presentation;
-
Inherit Master Page Parent Class of Open Touryo to
TouryoMasterclass as shown below.public partial class TouryoMaster : BaseMasterController
Note:
Open Touryo provides the utility method for acquiring the controls in master page or contents page. If master page does not inherit Master Page Parent Class, this utility method can not acquire controls normally. Therefore, when using this utility method, master page should inherit Master Page Parent Class. For more details, refer to Open Touryo user guide (Leader Edition).
-
In Solution Explorer, open
Aspx\start\menu.aspx.cs. -
Add handler method to
menu.aspx.csfor Click event of LinkButton that was added at section 4.2.5.protected string UOC_lbnGetOrdersList_Click(FxEventArgs eventArgs) { // Transfer screen according to the value defined in SCDefinitions.xml return "List"; } protected string UOC_lbnShowDialog_Click(FxEventArgs eventArgs) { // Show modal dialog this.ShowNormalScreen("/WebForms_Sample/Aspx/sample/test.pdf"); // Return empty string return string.Empty; }
Note:
When using Open Touryo, event handers of the controls, e.g. Button, should be namedUOC_[Control Name]_[Event Name]. For more details, refer to Open Touryo user guide (Common Edition).
-
In Solution Explorer, open
Aspx\sample\OrdersList.aspx.cs. -
Add the following namespaces to
OrdersList.aspx.csto import the classes provided by Open Touryo, and parameter and return value class and business logic class.// Open Touryo // Business using Touryo.Infrastructure.Business.Business; using Touryo.Infrastructure.Business.Common; using Touryo.Infrastructure.Business.Dao; using Touryo.Infrastructure.Business.Exceptions; using Touryo.Infrastructure.Business.Presentation; using Touryo.Infrastructure.Business.Util; using Touryo.Infrastructure.Business.RichClient.Asynchronous; using Touryo.Infrastructure.Business.RichClient.Presentation; // Framework using Touryo.Infrastructure.Framework.Business; using Touryo.Infrastructure.Framework.Common; using Touryo.Infrastructure.Framework.Dao; using Touryo.Infrastructure.Framework.Exceptions; using Touryo.Infrastructure.Framework.Presentation; using Touryo.Infrastructure.Framework.Util; using Touryo.Infrastructure.Framework.Transmission; using Touryo.Infrastructure.Framework.RichClient.Business; using Touryo.Infrastructure.Framework.RichClient.Presentation; // Public using Touryo.Infrastructure.Public.Db; using Touryo.Infrastructure.Public.IO; using Touryo.Infrastructure.Public.Log; using Touryo.Infrastructure.Public.Str; using Touryo.Infrastructure.Public.Util; // Parameter and return value class using WebForms_Sample.AppCode.sample.Common; // Business logic class using WebForms_Sample.AppCode.sample.Business;
-
Inherit Screen Parent Class of Open Touryo to
OrdersListclass as shown below.public partial class OrdersList : MyBaseController
-
Click light bulbs and select Implement Abstract Class.

-
Remove auto-generated
Page_Loadmethod. -
Override
UOC_FormInitmethod to display the order information list during the form load with the following code. Because no processing should be executed in post back, emptyUOC_FormInit_PostBackmethod.protected override void UOC_FormInit() { // Create parameter class // (Send "GetOrders" as parameter to call UOC_GetOrders in business logic class) OrderParameterValue param = new OrderParameterValue(this.ContentPageFileNoEx, "", "GetOrders", "SQL", this.UserInfo); // Create return value class OrderReturnValue returnValue; // Call business logic class OrdersLogic logic = new OrdersLogic(); returnValue = (OrderReturnValue)logic.DoBusinessLogic(param); // Display the result in gridview. this.gvwOrdersList.DataSource = returnValue.Orders; this.gvwOrdersList.DataBind(); } protected override void UOC_FormInit_PostBack() { }
-
Add a method to
OrdersList.aspx.csfor transitioning to order details form when clicking the button in each rows of gridview.protected string UOC_gvwOrdersList_RowCommand(FxEventArgs eventArgs) { // Get index of selected row int RowIndex = int.Parse(eventArgs.PostBackValue); // Get Order Id of selected row string OrderId = this.gvwOrdersList.Rows[RowIndex].Cells[1].Text; // Store Order Id in session Session["OrderId"] = OrderId; // Transfer screen according to the label defined in SCDefinitions.xml return "Detail"; }
-
In Solution Explorer, open
Aspx\sample\OrderDetails.aspx.cs. -
In the same way to section 4.7.3, inherit Screen Parent Class of Open Touryo to
OrderDetailsclass. -
Remove auto-generated
Page_Loadmethod. -
Override
UOC_FormInitmethod to display the order details information during the form load with the following code. Because no processing should be executed in post back, emptyUOC_FormInit_PostBackmethod.protected override void UOC_FormInit() { // Get Order Id from session string OrderId = Session["OrderId"].ToString(); // Create parameter class // (Send "GetOrderById" as parameter to call UOC_GetOrderById in business logic class) OrderParameterValue param = new OrderParameterValue(this.ContentPageFileNoEx, "", "GetOrderById", "SQL", this.UserInfo); // Send order id for search criteria param.OrderId = OrderId; // Create return value class OrderReturnValue returnValue; // Call business logic class OrdersLogic logic = new OrdersLogic(); returnValue = (OrderReturnValue)logic.DoBusinessLogic((BaseParameterValue)param); // Store order information in session Session["Orders"] = returnValue.Orders; Session["OrderDetails"] = returnValue.OrderDetails; // Display result in gridview this.gvwOrderSummary.DataSource = returnValue.Orders; this.gvwOrderSummary.DataBind(); this.gvwOrderDetails.DataSource = returnValue.OrderDetails; this.gvwOrderDetails.DataBind(); } protected override void UOC_FormInit_PostBack() { }
-
In Solution Explorer, open
Aspx\sample\OrderDetails.aspx. -
Select
gvwOrderSummarycontrol and click event icon in the property window.
-
Double click
RowEditingevent andRowCancelingEditevent in event list.
-
Since
gvwOrderSummary_RowEditingmethod andgvwOrderSummary_RowCancelingEditmethod have been generated inOrderDetails.aspx.cs, implement as follows:protected void gvwOrderSummary_RowEditing(object sender, GridViewEditEventArgs e) { // Switch gvwOrderSummary to edit mode this.gvwOrderSummary.EditIndex = e.NewEditIndex; this.gvwOrderSummary.DataSource = (System.Data.DataTable)Session["Orders"]; this.gvwOrderSummary.DataBind(); // Set primary key and foreign key columns as read only ((TextBox)this.gvwOrderSummary.Rows[e.NewEditIndex].Cells[1].Controls[0]).Enabled = false; ((TextBox)this.gvwOrderSummary.Rows[e.NewEditIndex].Cells[2].Controls[0]).Enabled = false; ((TextBox)this.gvwOrderSummary.Rows[e.NewEditIndex].Cells[3].Controls[0]).Enabled = false; } protected void gvwOrderSummary_RowCancelingEdit(object sender, GridViewCancelEditEventArgs e) { // Switch gvwOrderSummary to display mode this.gvwOrderSummary.EditIndex = -1; this.gvwOrderSummary.DataSource = (System.Data.DataTable)Session["Orders"]; this.gvwOrderSummary.DataBind(); }
Note:
Event handling feature of Open Touryo does not supportRowEditingevent andRowCancelingEditevent of GridView. Therefore, to handle these events, event handling feature of .NET Framework should be used. So, the flow control feature, e.g. pre-process of event hander or post-process of event hander or error handler, can not be used. If using the flow control feature for these events, customize Screen Parent Class. For more details, refer to Open Touryo user guide (Common Edition). -
Add a method to
OrderDetails.aspx.csfor saving the changes of order information (summary).protected string UOC_gvwOrderSummary_RowUpdating(FxEventArgs eventArgs, GridViewUpdateEventArgs e) { // Save the changes of order information (summary) System.Data.DataTable Orders = (System.Data.DataTable)Session["Orders"]; foreach (string key in e.NewValues.Keys) { Orders.Rows[0][key] = e.NewValues[key]; } // Switch gvwOrderSummary to display mode this.gvwOrderSummary.EditIndex = -1; this.gvwOrderSummary.DataSource = (System.Data.DataTable)Session["Orders"]; this.gvwOrderSummary.DataBind(); // Return empty string (Don't need screen transition) return string.Empty; }
-
In the same way, add
RowEditingevent handler,RowCancelingEditevent handler,UOC_gvwOrderDetails_RowUpdatingmethods togvwOrderDetailscontrol. Implement as follows:protected void gvwOrderDetails_RowEditing(object sender, GridViewEditEventArgs e) { // Switch order information (Details) to edit mode this.gvwOrderDetails.EditIndex = e.NewEditIndex; this.gvwOrderDetails.DataSource = (System.Data.DataTable)Session["OrderDetails"]; this.gvwOrderDetails.DataBind(); // Set primary key and foreign key read only ((TextBox)this.gvwOrderDetails.Rows[e.NewEditIndex].Cells[1].Controls[0]).Enabled = false; ((TextBox)this.gvwOrderDetails.Rows[e.NewEditIndex].Cells[2].Controls[0]).Enabled = false; } protected void gvwOrderDetails_RowCancelingEdit(object sender, GridViewCancelEditEventArgs e) { // Switch order information (details) to display mode this.gvwOrderDetails.EditIndex = -1; this.gvwOrderDetails.DataSource = (System.Data.DataTable)Session["OrderDetails"]; this.gvwOrderDetails.DataBind(); } protected string UOC_gvwOrderDetails_RowUpdating(FxEventArgs eventArgs, GridViewUpdateEventArgs e) { // Save the changes of order information (details) System.Data.DataTable OrderDetails = (System.Data.DataTable)Session["OrderDetails"]; foreach (string key in e.NewValues.Keys) { OrderDetails.Rows[e.RowIndex][key] = e.NewValues[key]; } // Switch order infroamtion (details) to display mode this.gvwOrderDetails.EditIndex = -1; this.gvwOrderDetails.DataSource = (System.Data.DataTable)Session["OrderDetails"]; this.gvwOrderDetails.DataBind(); // Return empty string (Don't need screen transition) return string.Empty; }
-
Add a method for reflecting the changes on database.
protected string UOC_btnUpdateOrder_Click(FxEventArgs eventArgs)
{
    // Get the value of gridview from session
    System.Data.DataTable orderTable = (System.Data.DataTable)Session["Orders"];
    System.Data.DataTable orderDetailTable = (System.Data.DataTable)Session["OrderDetails"];

    // Create parameter value class
    OrderParameterValue param = new OrderParameterValue(this.Title, "", "UpdateOrder", "SQL", this.UserInfo);

    // Send the value of gridview to business logic class
    param.Orders = orderTable;
    param.OrderDetails = orderDetailTable;

    // Create return value class
    OrderReturnValue returnValue;

    // Call business logic class
    OrdersLogic logic = new OrdersLogic();
    returnValue = (OrderReturnValue)logic.DoBusinessLogic(param);

    // Return empty string (Don't need screen transition)
    return string.Empty;
}
-
In the Solution Explorer, open
web.config. -
Check
connectionStringssection, and confirm that the connection string is correct.<connectionStrings> <!-- SQL Server / SQL Client用 --> <add name="ConnectionString_SQL" connectionString="Data Source=localhost\sqlexpress;Initial Catalog=Northwind;Integrated Security=True;"/> </connectionStrings>
-
Run
services.mscin the Search programs and files box on the start menu.
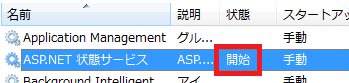
-
In Services window, right-click ASP.NET state service and select Start.

-
Confirm that the status of ASP.NET state services has been changed to Started.
-
Run
inetcpl.cplin the Search programs and files box on the start menu.
-
Select Security tab in Internet Properties dialog. And, select Local intranet and click Sites.

-
In Local intranet dialog, set the properties as follows and click OK.
- Automatically detect intranet network: uncheck
- Other than the above: check

-
Click OK to close Internet Properties dialog.
-
In Solution Explorer, right-click
Aspx\start\menu.aspxand select Set As Start Page.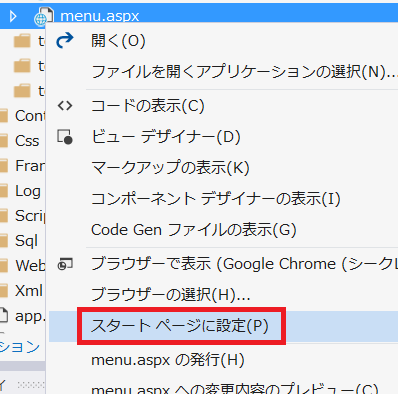
-
Debug the sample application with Visual Studio.
-
Since the browser is launched and login form is shown, input the value as follows and click ログイン (Login in Japanese).

-
Since menu screen is shown, click Get order information list.

-
Confirm that orders are displayed and click Select in any row.

-
Confirm that order detail is displayed and click Edit in the row that will be modified.

-
Since the clicked row is switched to Edit mode, edit the value in the row. When completing editing, click Update to save the changes.

-
Click Update order Information to reflect the changes on database.

-
Execute the following command and confirm that database is updated successfully. In the following command, replace order number (OrderId) that has been selected in previous step from [Selected order no.].
"C:\Program Files\Microsoft SQL Server\100\Tools\Binn\SQLCMD.EXE" -S localhost\SQLExpress -E -d Northwind -Q "Select * From Orders Inner Join [Order Details] On Orders.OrderId=[Order Details].OrderId Where Orders.OrderId=[Selected order no.]"
-
Click メニュー画面 to back to menu screen.

-
Click Display modal dialog.

-
Confirm that pdf file is displayed in dialog and close dialog.

-
Move to
http://localhost:9999/WebForms_Sample/Aspx/sample/OrdersList.aspxwith browser.
-
Confirm that the error message of Open Touryo is shown.

Note:
This error message shows that the screen transition toOrdersList.aspxwith GET method is not permitted. This is becausedirectLinkproperty of orders list form and order details form is set todenyinSCDefinitions.xmlin section 4.3.2.
-
Open log file -
C:\root\files\resource\Log\ACCESS.yyyy-mm-dd.log(where, yyyy-mm-dd is executed date) in Notepad. -
Confirm that the access to
OrderListandOrderDetailsis logged.[2017/04/06 11:24:54,043],[INFO ],[9],Splash [2017/04/06 11:24:54,058],[INFO ],[10],Splash [2017/04/06 11:24:57,084],[INFO ],[9],,-,-,Login,Form_Load [2017/04/06 11:25:00,060],[INFO ],[9],,-,----->,Login,btnButton1 [2017/04/06 11:25:00,065],[INFO ],[9],,user01,-,Login,Form_Closed [2017/04/06 11:25:00,076],[INFO ],[9],,user01,<-----,Login,btnButton1,16,0 [2017/04/06 11:25:00,099],[INFO ],[9],,user01,-,OrdersForm,Form_Load [2017/04/06 11:25:00,667],[INFO ],[9],,user01,xxx,----->>,OrdersForm,,GetOrders, [2017/04/06 11:25:03,008],[INFO ],[9],,user01,xxx,<<-----,OrdersForm,,GetOrders,,2341,203 [2017/04/06 11:28:46,964],[INFO ],[9],,user01,----->,OrdersForm,btnShowOrderDetail [2017/04/06 11:28:46,983],[INFO ],[9],,user01,-,OrderDetailsForm,Form_Load [2017/04/06 11:28:46,986],[INFO ],[9],,user01,xxx,----->>,OrderDetailsForm,,GetOrderById, [2017/04/06 11:28:49,486],[INFO ],[9],,user01,xxx,<<-----,OrderDetailsForm,,GetOrderById,,2501,31 [2017/04/06 11:28:49,537],[INFO ],[9],,user01,<-----,OrdersForm,btnShowOrderDetail,2573,109 [2017/04/06 11:36:09,282],[INFO ],[9],,user01,----->,OrderDetailsForm,btnUpdateOrder [2017/04/06 11:36:09,456],[INFO ],[9],,user01,xxx,----->>,OrderDetailsForm,,UpdateOrder, [2017/04/06 11:36:10,000],[INFO ],[9],,user01,xxx,<<-----,OrderDetailsForm,,UpdateOrder,,543,47 [2017/04/06 11:39:11,799],[INFO ],[9],,user01,<-----,OrderDetailsForm,btnUpdateOrder,182512,125 [2017/04/06 11:39:13,542],[INFO ],[9],,user01,-,OrderDetailsForm,Form_Closed [2017/04/06 11:39:15,232],[INFO ],[9],,user01,-,OrdersForm,Form_Closed
-
Open log file -
C:\root\files\resource\Log\SQLTRACE.yyyy-mm-dd.log(where, yyyy-mm-dd is executed date) in Notepad. -
Confirm the executed SQL text for Orders and OrderDetails table with the following SQL trace log.
[2017/04/06 11:25:03,006],[INFO ],[9],207,16,[commandText]:SELECT Orders.OrderID, Customers.CompanyName, Customers.ContactName, Employees.LastName As EmployeeLastName, Employees.FirstName As EmployeeFirstName, Orders.OrderDate FROM Orders INNER JOIN Customers ON Orders.CustomerID = Customers.CustomerID INNER JOIN Employees ON Orders.EmployeeID = Employees.EmployeeID    [commandParameter]:
[2017/04/06 11:28:49,335],[INFO ],[9],51,16,[commandText]: -- DaoOrders_D2_Select -- 2012/7/30 日立 太郎 SELECT [OrderID], [CustomerID], [EmployeeID], [OrderDate], [RequiredDate], [ShippedDate], [ShipVia], [Freight], [ShipName], [ShipAddress], [ShipCity], [ShipRegion], [ShipPostalCode], [ShipCountry] FROM [Orders] WHERE [OrderID] = @OrderID    [commandParameter]:OrderID=10248,
[2017/04/06 11:28:49,486],[INFO ],[9],150,0,[commandText]: -- DaoOrder_Details_D2_Select -- 2012/7/30 日立 太郎 SELECT [OrderID], [ProductID], [UnitPrice], [Quantity], [Discount] FROM [Order Details] WHERE [OrderID] = @OrderID    [commandParameter]:OrderID=10248,