-
Notifications
You must be signed in to change notification settings - Fork 55
Tutorial_Automatic_Screen_Generation(DataMaintenance)
September 15th, 2016
D layer auto generation tool (DaoGen_Tool), bundled in Open Touryo, can generate The screen that has crud feature for single table. However, DaoGen_Tool can not generate the screen that has crud feature for joined table. This tutorial describes how to generate the screen that has crud feature for joined table. In this tutorial, the screen that has crud feature is referred to Data maintenance screen.
This tutorial targets SE and developers who are considering generating data maintenance screen for joined table in ASP.NET application development with Open Touryo.
This tutorial describes the generation flow for data maintenance screen for joined table. The sample program attached to Open Touryo Visual Studio 2015 template base is used as the material of this tutorial.
As we are pressed for time, some images are only displayed in Japanese.
The company names and product names used in this document are the trademarks or registered trademarks of the respective companies.
This document can use Creative commons CC BY 2.1 JP license.
1. Overview of Open Touryo framework
5. Exercise 1: Generate data maintenance screen
6. Exercise 2: Customize generated screen
Open Touryo framework is an application framework for .NET. Open Touryo framework targets .NET Framework 4.6 or above and can be used in various applications like C/S (Windows Forms, WPF), Web (ASP.NET) and RIA (Silverlight).
Figure 1-1 shows the class configuration of Open Touryo framework.

Figure 1-1 Class diagram of Open Touryo framework
This tutorial describes how to use dynamic parameterized query analytical tool (DPQuery_Tool) to generate data maintenance screen for joined table. Sql statements for joining tables can be defined as xml format with DPQuery_Tool.
The following figure shows the overview of the feature of generating data maintenance screen.

The followings are the prerequisites for this tutorial.
- Development environment
- IDE
- Visual Studio 2015 (Express Edition is also available)
- Application framework
- Open Touryo Template Base for Visual Studio 2015
- IDE
- Runtime environment
- Runtime
- .NET Framework 4.6
- Web Server
- IIS Express
- DB
- SQL Server Express 2008 R2
- Runtime
- Others
- OS
- Windows 7
- OS
Install Visual Studio referring to Microsoft homepage beforehand.
Next, set up Open Touryo Template Base and database.
-
Click [Download ZIP] button on GitHub and obtain OpenTouryoTemplates.zip. Unzip this zip file and obtain Open Touryo Template Base for Visual Studio 2015.
-
Set up Open Touryo Template Base and database according to Readme.md in root_VS2015 folder.
-
To create the test tables that are used in chapter 5, create
createTestTable.sqlin any folder and edit as follows. (In this tutorial, createcreateTestTable.sqlinC:\users\[username]\Documentsfoleder.)USE [Northwind] GO /****** Object: Table [dbo].[TABL1] Script Date: 05/27/2016 14:12:04 ******/ SET ANSI_NULLS ON GO SET QUOTED_IDENTIFIER ON GO SET ANSI_PADDING ON GO CREATE TABLE [dbo].[TABL1]( [A] [int] NOT NULL, [Y] [varchar](50) NULL, [Z] [varchar](50) NULL, CONSTRAINT [PK_TABL1] PRIMARY KEY CLUSTERED ( [A] ASC ) WITH (PAD_INDEX = OFF, STATISTICS_NORECOMPUTE = OFF, IGNORE_DUP_KEY = OFF, ALLOW_ROW_LOCKS = ON, ALLOW_PAGE_LOCKS = ON) ON [PRIMARY] ) ON [PRIMARY] GO SET ANSI_PADDING OFF GO INSERT [dbo].[TABL1] ([A], [Y], [Z]) VALUES (1, N'Insert_1Y', N'Insert_1Z') INSERT [dbo].[TABL1] ([A], [Y], [Z]) VALUES (2, N'Insert_1Y2', N'Insert_1Z2') INSERT [dbo].[TABL1] ([A], [Y], [Z]) VALUES (3, N'Insert_1Y3', N'Insert_1Z3') INSERT [dbo].[TABL1] ([A], [Y], [Z]) VALUES (4, N'Insert_1Y4', N'Insert_1Z4') /****** Object: Table [dbo].[TABL2] Script Date: 05/27/2016 14:12:04 ******/ SET ANSI_NULLS ON GO SET QUOTED_IDENTIFIER ON GO SET ANSI_PADDING ON GO CREATE TABLE [dbo].[TABL2]( [A] [int] NOT NULL, [B] [varchar](50) NULL, [C] [varchar](50) NULL, [AX] [int] NOT NULL, CONSTRAINT [PK_TABL2] PRIMARY KEY CLUSTERED ( [A] ASC ) WITH (PAD_INDEX = OFF, STATISTICS_NORECOMPUTE = OFF, IGNORE_DUP_KEY = OFF, ALLOW_ROW_LOCKS = ON, ALLOW_PAGE_LOCKS = ON) ON [PRIMARY] ) ON [PRIMARY] GO SET ANSI_PADDING OFF GO INSERT [dbo].[TABL2] ([A], [B], [C], [AX]) VALUES (1, N'Insert_2B', N'Insert_2C1', 1) INSERT [dbo].[TABL2] ([A], [B], [C], [AX]) VALUES (2, N'Insert_2B2', N'Insert_2C2', 2) INSERT [dbo].[TABL2] ([A], [B], [C], [AX]) VALUES (3, N'Insert_2B3', N'Insert_2C3', 3) INSERT [dbo].[TABL2] ([A], [B], [C], [AX]) VALUES (4, N'Insert_2B4', N'Insert_2C4', 4) /****** Object: Table [dbo].[TABL3] Script Date: 05/27/2016 14:12:04 ******/ SET ANSI_NULLS ON GO SET QUOTED_IDENTIFIER ON GO CREATE TABLE [dbo].[TABL3]( [D] [int] IDENTITY(1,1) NOT NULL, [E] [nvarchar](50) NULL, [F] [nvarchar](50) NULL, [A] [int] NOT NULL, CONSTRAINT [PK_TABL3] PRIMARY KEY CLUSTERED ( [D] ASC ) WITH (PAD_INDEX = OFF, STATISTICS_NORECOMPUTE = OFF, IGNORE_DUP_KEY = OFF, ALLOW_ROW_LOCKS = ON, ALLOW_PAGE_LOCKS = ON) ON [PRIMARY] ) ON [PRIMARY] GO SET IDENTITY_INSERT [dbo].[TABL3] ON INSERT [dbo].[TABL3] ([D], [E], [F], [A]) VALUES (1, N'Insert_3D1', N'Insert_3E1', 1) INSERT [dbo].[TABL3] ([D], [E], [F], [A]) VALUES (2, N'Insert_3D2', N'Insert_3E2', 2) INSERT [dbo].[TABL3] ([D], [E], [F], [A]) VALUES (3, N'Insert_3D3', N'Insert_3E3', 3) INSERT [dbo].[TABL3] ([D], [E], [F], [A]) VALUES (4, N'Insert_3D4', N'Insert_3E4', 4) SET IDENTITY_INSERT [dbo].[TABL3] OFF /****** Object: ForeignKey [FK_TABL2_TABL1] Script Date: 05/27/2016 14:12:04 ******/ ALTER TABLE [dbo].[TABL2] WITH CHECK ADD CONSTRAINT [FK_TABL2_TABL1] FOREIGN KEY([AX]) REFERENCES [dbo].[TABL1] ([A]) GO ALTER TABLE [dbo].[TABL2] CHECK CONSTRAINT [FK_TABL2_TABL1] GO /****** Object: ForeignKey [FK_TABL3_TABL2] Script Date: 05/27/2016 14:12:04 ******/ ALTER TABLE [dbo].[TABL3] WITH CHECK ADD CONSTRAINT [FK_TABL3_TABL2] FOREIGN KEY([A]) REFERENCES [dbo].[TABL2] ([A]) GO ALTER TABLE [dbo].[TABL3] CHECK CONSTRAINT [FK_TABL3_TABL2] GO /****** Object: Table [dbo].[TABL4] Script Date: 08/23/2016 14:26:23 ******/ SET ANSI_NULLS ON GO SET QUOTED_IDENTIFIER ON GO SET ANSI_PADDING ON GO CREATE TABLE [dbo].[TABL4]( [A] [int] NOT NULL, [Y] [varchar](50) NULL, [Z] [varchar](50) NULL, [TimeStamp] [datetime] NULL, CONSTRAINT [PK_TABL4] PRIMARY KEY CLUSTERED ( [A] ASC ) WITH (PAD_INDEX = OFF, STATISTICS_NORECOMPUTE = OFF, IGNORE_DUP_KEY = OFF, ALLOW_ROW_LOCKS = ON, ALLOW_PAGE_LOCKS = ON) ON [PRIMARY] ) ON [PRIMARY] GO SET ANSI_PADDING OFF GO INSERT [dbo].[TABL4] ([A], [Y], [Z], [TimeStamp]) VALUES (1, N'Insert_1Y', N'Insert_1Z', CAST(0x0000A66B00EDAAD3 AS DateTime)) INSERT [dbo].[TABL4] ([A], [Y], [Z], [TimeStamp]) VALUES (2, N'Insert_1Y2', N'Insert_1Z2', CAST(0x0000A66B00EDAAD3 AS DateTime)) INSERT [dbo].[TABL4] ([A], [Y], [Z], [TimeStamp]) VALUES (3, N'Insert_1Y3', N'Insert_1Z3', CAST(0x0000A66B00EDAAD3 AS DateTime)) INSERT [dbo].[TABL4] ([A], [Y], [Z], [TimeStamp]) VALUES (4, N'Insert_1Y4', N'Insert_1Z4', CAST(0x0000A66B00EDAAD3 AS DateTime)) /****** Object: Table [dbo].[TABL5] Script Date: 08/23/2016 14:26:23 ******/ SET ANSI_NULLS ON GO SET QUOTED_IDENTIFIER ON GO SET ANSI_PADDING ON GO CREATE TABLE [dbo].[TABL5]( [A] [int] NOT NULL, [B] [varchar](50) NULL, [C] [varchar](50) NULL, [AX] [int] NOT NULL, [TimeStamp] [datetime] NULL, CONSTRAINT [PK_TABL5] PRIMARY KEY CLUSTERED ( [A] ASC ) WITH (PAD_INDEX = OFF, STATISTICS_NORECOMPUTE = OFF, IGNORE_DUP_KEY = OFF, ALLOW_ROW_LOCKS = ON, ALLOW_PAGE_LOCKS = ON) ON [PRIMARY] ) ON [PRIMARY] GO SET ANSI_PADDING OFF GO INSERT [dbo].[TABL5] ([A], [B], [C], [AX], [TimeStamp]) VALUES (1, N'Insert_2B', N'Insert_2C1', 1, CAST(0x0000A66B00EDAAD3 AS DateTime)) INSERT [dbo].[TABL5] ([A], [B], [C], [AX], [TimeStamp]) VALUES (2, N'Insert_2B2', N'Insert_2C2', 2, CAST(0x0000A66B00EDAAD3 AS DateTime)) INSERT [dbo].[TABL5] ([A], [B], [C], [AX], [TimeStamp]) VALUES (3, N'Insert_2B3', N'Insert_2C3', 3, CAST(0x0000A66B00EDAAD3 AS DateTime)) INSERT [dbo].[TABL5] ([A], [B], [C], [AX], [TimeStamp]) VALUES (4, N'Insert_2B4', N'Insert_2C4', 4, CAST(0x0000A66B00EDAAD3 AS DateTime)) /****** Object: Table [dbo].[TABL6] Script Date: 08/23/2016 14:26:23 ******/ SET ANSI_NULLS ON GO SET QUOTED_IDENTIFIER ON GO CREATE TABLE [dbo].[TABL6]( [D] [int] NOT NULL, [E] [nvarchar](50) NULL, [F] [nvarchar](50) NULL, [A] [int] NOT NULL, [TimeStamp] [datetime] NULL, CONSTRAINT [PK_TABL6] PRIMARY KEY CLUSTERED ( [D] ASC ) WITH (PAD_INDEX = OFF, STATISTICS_NORECOMPUTE = OFF, IGNORE_DUP_KEY = OFF, ALLOW_ROW_LOCKS = ON, ALLOW_PAGE_LOCKS = ON) ON [PRIMARY] ) ON [PRIMARY] GO INSERT [dbo].[TABL6] ([D], [E], [F], [A], [TimeStamp]) VALUES (1, N'Insert_3D1', N'Insert_3E1', 1, CAST(0x0000A66B00EDAAD3 AS DateTime)) INSERT [dbo].[TABL6] ([D], [E], [F], [A], [TimeStamp]) VALUES (2, N'Insert_3D2', N'Insert_3E2', 2, CAST(0x0000A66B00EDAAD3 AS DateTime)) INSERT [dbo].[TABL6] ([D], [E], [F], [A], [TimeStamp]) VALUES (3, N'Insert_3D3', N'Insert_3E3', 3, CAST(0x0000A66B00EDAAD3 AS DateTime)) INSERT [dbo].[TABL6] ([D], [E], [F], [A], [TimeStamp]) VALUES (4, N'Insert_3D4', N'Insert_3E4', 4, CAST(0x0000A66B00EDAAD3 AS DateTime)) /****** Object: Default [DF_TABL4_TimeStamp] Script Date: 08/23/2016 14:26:23 ******/ ALTER TABLE [dbo].[TABL4] ADD CONSTRAINT [DF_TABL4_TimeStamp] DEFAULT (getdate()) FOR [TimeStamp] GO /****** Object: Default [DF_TABL5_TimeStamp] Script Date: 08/23/2016 14:26:23 ******/ ALTER TABLE [dbo].[TABL5] ADD CONSTRAINT [DF_TABL5_TimeStamp] DEFAULT (getdate()) FOR [TimeStamp] GO /****** Object: Default [DF_TABL6_TimeStamp] Script Date: 08/23/2016 14:26:23 ******/ ALTER TABLE [dbo].[TABL6] ADD CONSTRAINT [DF_TABL6_TimeStamp] DEFAULT (getdate()) FOR [TimeStamp] GO /****** Object: ForeignKey [FK_TABL5_TABL4] Script Date: 08/23/2016 14:26:23 ******/ ALTER TABLE [dbo].[TABL5] WITH CHECK ADD CONSTRAINT [FK_TABL5_TABL4] FOREIGN KEY([AX]) REFERENCES [dbo].[TABL4] ([A]) GO ALTER TABLE [dbo].[TABL5] CHECK CONSTRAINT [FK_TABL5_TABL4] GO /****** Object: ForeignKey [FK_TABL6_TABL5] Script Date: 08/23/2016 14:26:23 ******/ ALTER TABLE [dbo].[TABL6] WITH CHECK ADD CONSTRAINT [FK_TABL6_TABL5] FOREIGN KEY([A]) REFERENCES [dbo].[TABL5] ([A]) GO ALTER TABLE [dbo].[TABL6] CHECK CONSTRAINT [FK_TABL6_TABL5] GO
-
Run the following command with command prompt to create test tables that are used in this tutorial.
"C:\Program Files\Microsoft SQL Server\100\Tools\Binn\SQLCMD.EXE" -S localhost\SQLExpress -E -i "C:\Users\[username]\Documents\createTestTable.sql"
Users of this tutorial can practice by adding screen and logic, generated with the feature of generation data maintenance screen, to the sample program that bundled with Open Touryo template base. Figure 3-1 shows the configuration of sample program and Figure 3-2 shows the Screen transition diagram of the tutorial.
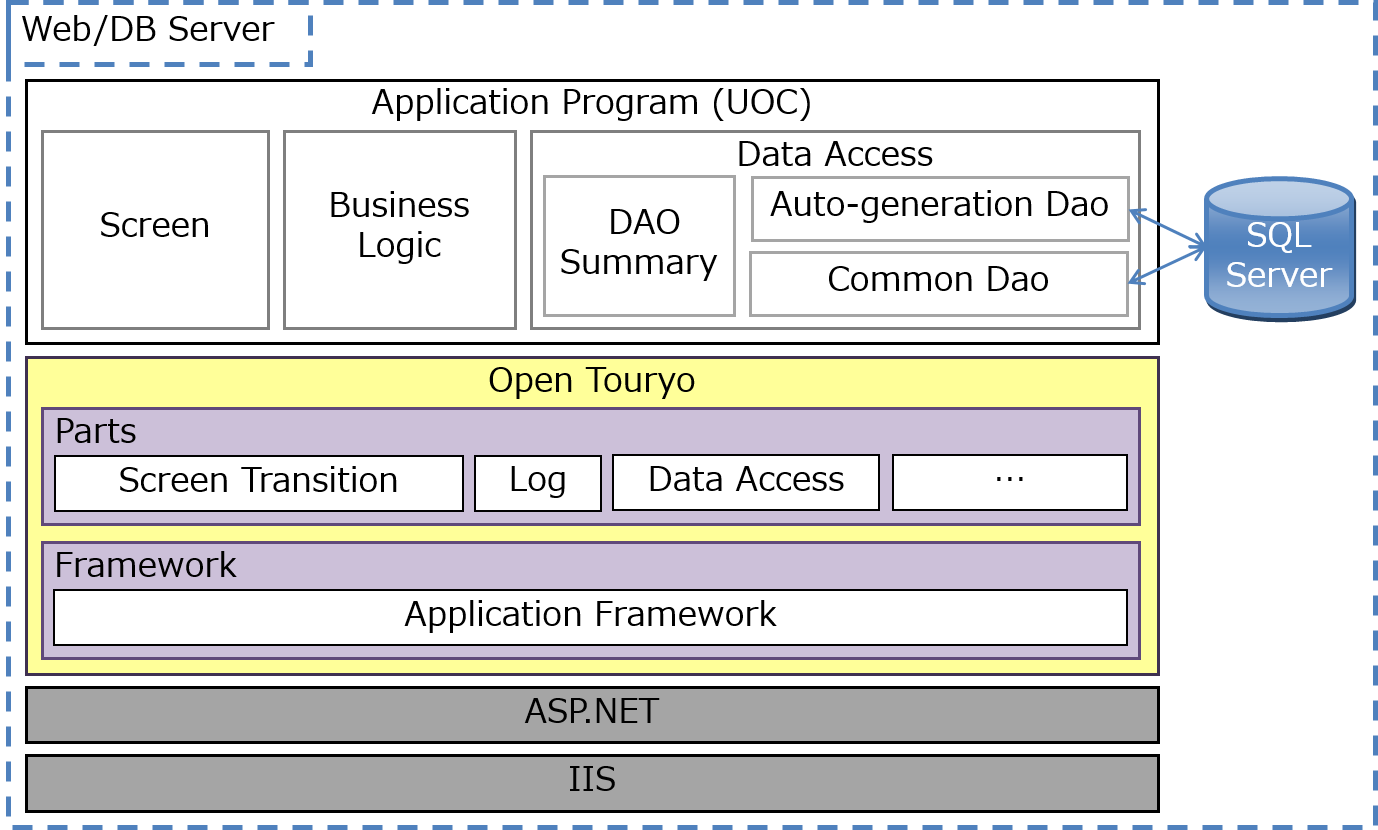
Figure 3-1 Configuration of sample program

Figure 3-2 Screen transition diagram of tutorial
Preceding exercise, generate data access class and SQL files that implement simple CRUD operation for table or view, using the D layer auto generation tool (DaoGen_Tool) bundled with Open Touryo template base.
-
Run
C:\root\programs\C#\Frameworks\DaoGen_Tool\bin\Debug\DaoGen_Tool.exeto launch DaoGen_Tool. -
In the STEP1 screen, set database information as follows and click acquisition.
- Data provider: SQL Server Client
- Connection string: Data Source=localhost\SQLExpress;Initial Catalog=Northwind;Integrated Security=true;
- Schema Info: Summary Information
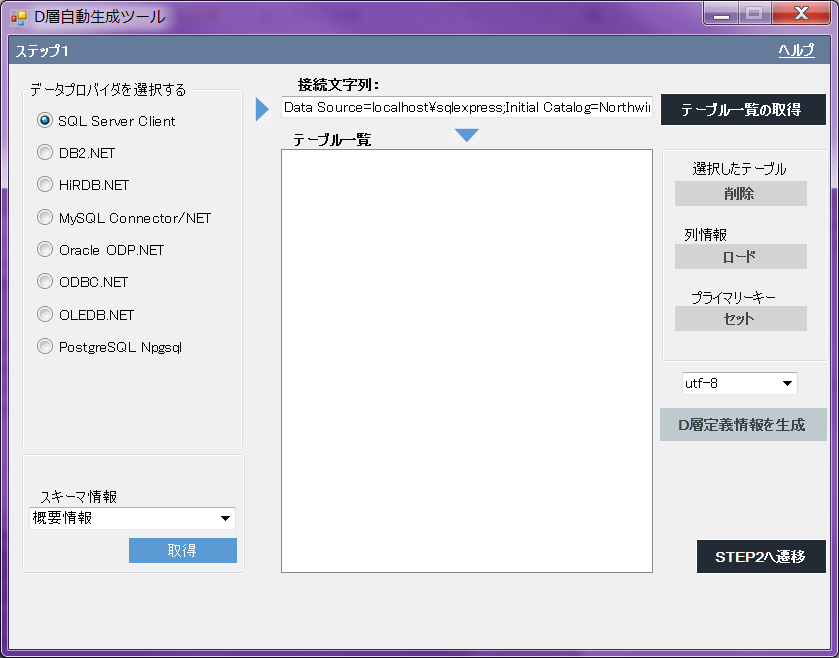
-
If database information, such as connection string, are correct, Display (Summary Information) dialog of schema information of DBMS screen is shown.
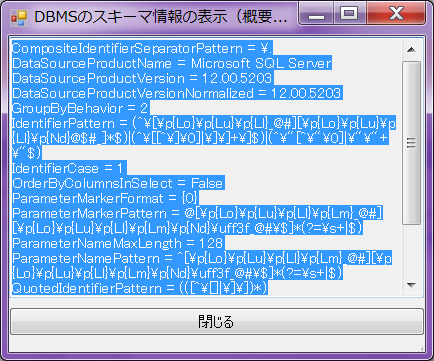
Click Close to close the dialog box.
-
Click Get Table List.

In the Note? (prerequisites) dialog box, click OK.
-
Tables and views in Northwind database are shown in list box. Since Categories table and Products table, and from TABL1 table to TABL6 table will be used in this tutorial, select all tables and views except these tables, and click Delete.

-
Confirm whether Table List contains only Categories table and Products table, and from TABL1 table to TABL6 table, and click Load.
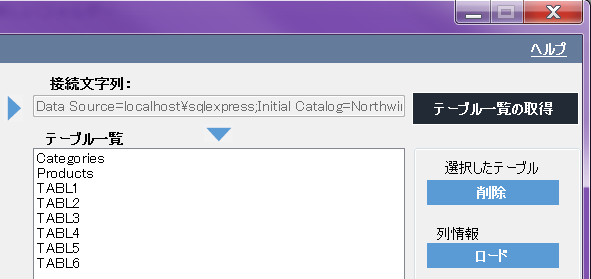
-
The Generate D layer definition file button is activated. Select utf-8 as file encoding and click Generate D layer definition file.

Save as
C:\root\Info.csv. -
Click OK in the dialog box displaying the message Completion of generation of the D-layer definition information!.
-
Click Go to STEP 2.

-
In the STEP2 screen, enter input / output settings as follows:
- D layer definition file: C:\root\Info.csv
- Source Template Folder: C:\root\files\tools\DGenTemplates
- Output File: C:\root
- Leave the other fields as default.

Click Generate Program.
-
Click OK in the dialog box displaying the message Automatic Generation Completed!.

-
Confirm that data access classes and SQL files are generated in
C:\rootfolder.
Note:
In the Open Touryo framework, the files with extensions.sqland.xmlare SQL files. (For more details, refer to the Open Touryo framework user guide)
Deploy sql files that are generated in section 4.1 to the folder that is prescribed by Open Touryo. The folder that is prescribed by Open Touryo is defined in application configuration file (app.config) and developers can customize this folder path. In this tutorial, deploy sql files to C:\root\files\resource\Sql, the default folder path.
Copy generated sql files (.sql) and xml files (.xml) to C:\root\files\resource\Sql.

This section describes how to use the features of generation data maintenance screen, that is how to use the tools, customize generated class, and confirm the result.
-
Copy
C:\root\Info.csvand save asC:\root\Info2.csv. -
Because Categories table and Products table will be used in this section, remove the definition information for from TABL1 table to TABL6 table.
Table name, column information -
Categories,CategoryID,
,CategoryName,Description,Picture,
Products,ProductID,
,ProductName,SupplierID,CategoryID,QuantityPerUnit,UnitPrice,UnitsInStock,UnitsOnOrder,ReorderLevel,Discontinued,
-
Create xml file in
C:\root\files\resource\Sqlfolder and save asDaoCategories_Products_JOIN_S2_Select.xml. -
Edit
DaoCategories_Products_JOIN_S2_Select.xmlas follows.<?xml version="1.0" encoding="UTF-8"?> <ROOT> SELECT Categories.CategoryID [Categories.CategoryID], Categories.CategoryName [Categories.CategoryName], Categories.Description [Categories.Description], Products.CategoryID [Products.CategoryID], Products.ProductID [Products.ProductID], Products.ProductName [Products.ProductName], Products.QuantityPerUnit [Products.QuantityPerUnit], Products.ReorderLevel [Products.ReorderLevel], Products.UnitPrice [Products.UnitPrice], Products.UnitsInStock [Products.UnitsInStock], Products.UnitsOnOrder [Products.UnitsOnOrder] FROM Categories,Products <WHERE> WHERE Categories.CategoryID = Products.CategoryID <IF>AND Categories.CategoryID = @Categories_CategoryID<ELSE>AND Categories.CategoryID IS NULL</ELSE></IF> <IF>AND Categories.CategoryName = @Categories_CategoryName<ELSE>AND Categories.CategoryName IS NULL</ELSE></IF> <IF>AND Categories.Description= @Categories_Description<ELSE>AND Categories.Description IS NULL</ELSE></IF> <IF>AND Products.CategoryID= @Products_CategoryID<ELSE>AND Products.CategoryID IS NULL</ELSE></IF> <IF>AND Products.ProductID = @Products_ProductID<ELSE>AND Products.ProductID IS NULL</ELSE></IF> <IF>AND Products.ProductName = @Products_ProductName<ELSE>AND Products.ProductName IS NULL</ELSE></IF> <IF>AND Products.QuantityPerUnit = @Products_QuantityPerUnit<ELSE>AND Products.QuantityPerUnit IS NULL</ELSE></IF> <IF>AND Products.ReorderLevel = @Products_ReorderLevel<ELSE>AND Products.ReorderLevel IS NULL</ELSE></IF> <IF>AND Products.UnitPrice = @Products_UnitPrice<ELSE>AND Products.UnitPrice IS NULL</ELSE></IF> <IF>AND Products.UnitsInStock = @Products_UnitsInStock<ELSE>AND Products.UnitsInStock IS NULL</ELSE></IF> <IF>AND Products.UnitsOnOrder = @Products_UnitsOnOrder<ELSE>AND Products.UnitsOnOrder IS NULL</ELSE></IF> </WHERE> </ROOT>
Note:
In case of generating data maintenance screen for joined table with DPQuery_Tool, developers should obey the following rules:- Alias name
When joining tables, alias name should be [TableName].[ColumnName]. If table name contains the empty string, replace the empty string to underscore. - Timestamp column If the sql query for joining tables contains TimeStamp column, the column does not appear in data maintenance screen, and is used only for condition search. When using Optimistic concurrency control, all tables that are related to data maintenance screen should have the column that stores timestamp. Section 5.3 describes how to generate the data maintenance screen using Optimistic concurrency control.
- Alias name
-
Run
C:\root\programs\C#\Frameworks\Tools\DPQuery_Tool\bin\Debug\DPQuery_Tool.exe. -
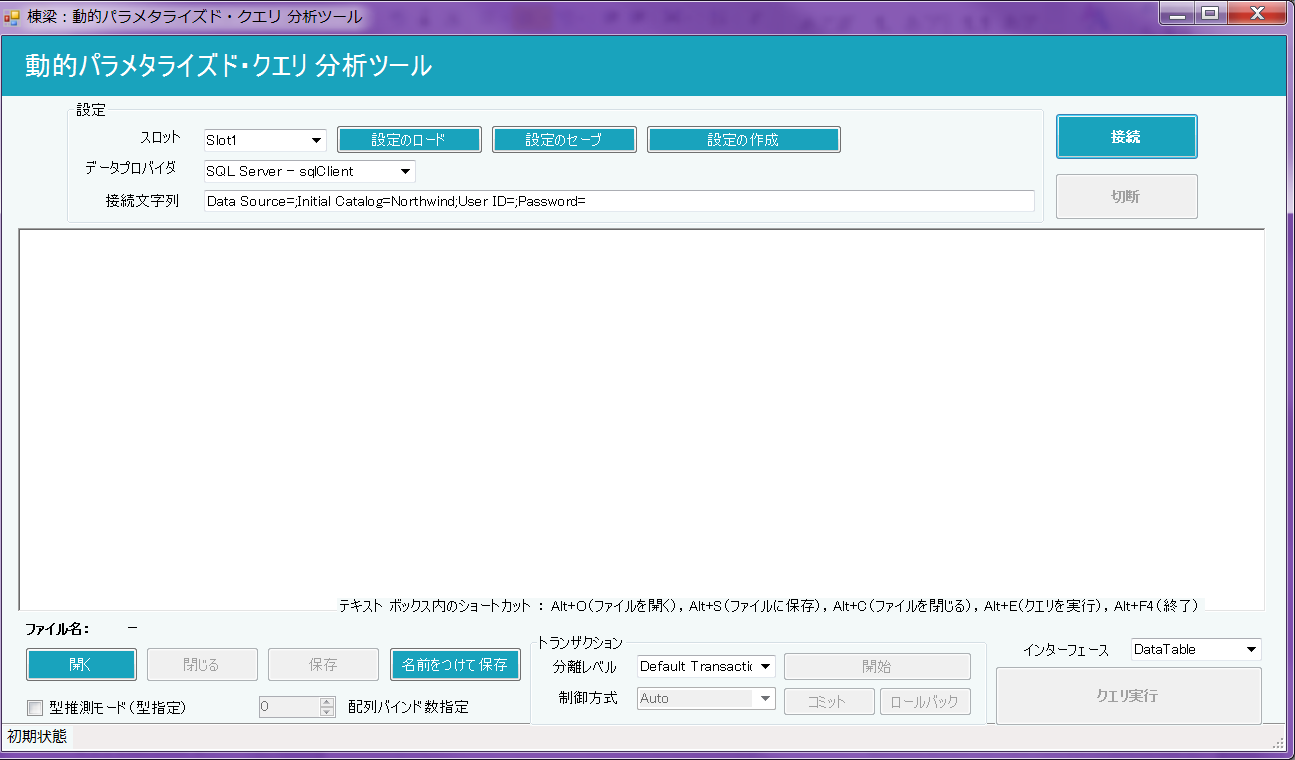
Confirm that DPQuery_Tool is launched.
-
Set the properties as follows and click Connect.
- Data provider: SQL Server - sqlClient
- Connection string: Data Source=localhost\sqlexpress;Initial Catalog=Northwind;Integrated Security=True;
Confirm that the connection is successfully performed, Connect button is deactivated, Disconnect button and Execute Query button are activated.
-
Click Open.

-
Select
DaoCategories_Products_JOIN_S2_Select.xml, is created in section 4.2.1, in Open file dialog. -
Confirm that the content of
DaoCategories_Products_JOIN_S2_Select.xmlare shown in the textbox in the screen center, and click Execute Query.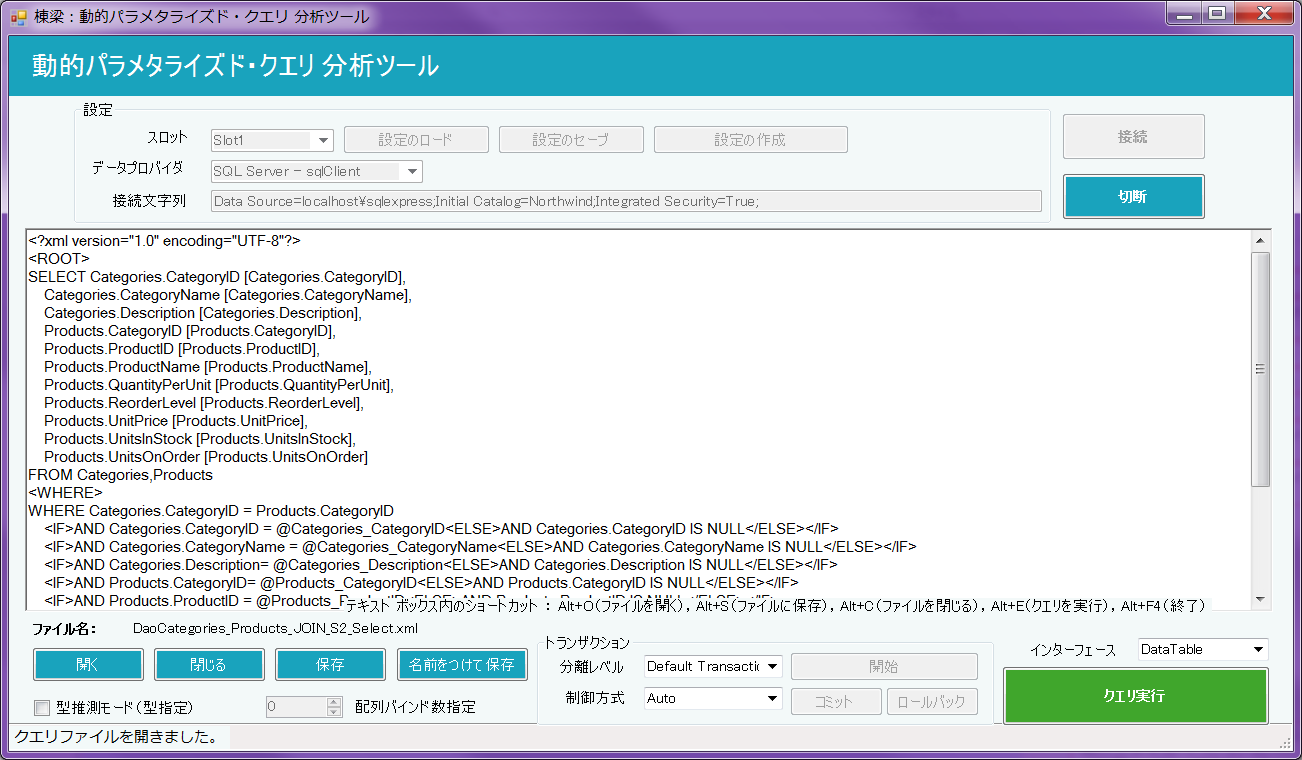
-
Confirm that the query has executed successfully by displaying the following dialog, and click OK.

-
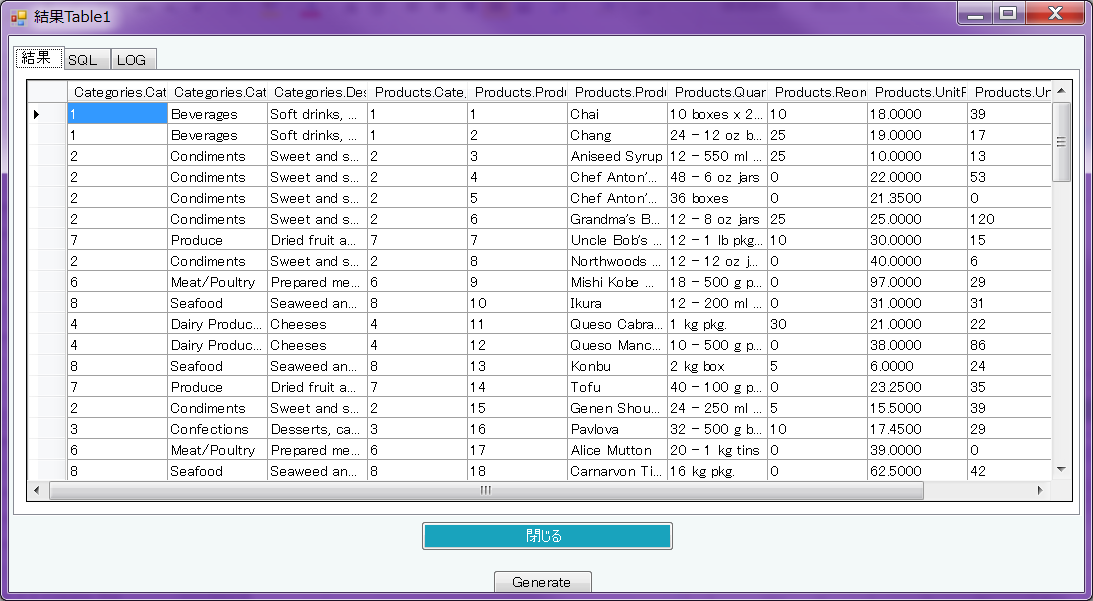
Confirm that the execution result is shown in 結果Table1 screen, and click Generate.
-
Set the properties in 結合SELECT文をするための画面を生成する screen as follows, and click ステップ2 tab.
- D layer definition file: C:\root\Info2.csv
- Source template file: C:\root\files\tools\DGenTemplates
- Output file: C:\root\files\AutoGeneratedFiles
- Leave the other fields as default.

-
Confirm the SQL Server Client is selected as data provider, click - Dao・SQL、DTOファイルを生成します -1.

-
Confirm that data maintenance screens are generated successfully. Click OK.

-
Confirm that data maintenance screen files are generated in the folder that is specified as the output folder.

-
Open
C:\root\programs\C#\Samples\WebApp_sample\WebForms_Sample\WebForms_Sample.sln. -
Copy all data maintenance screens that are generated in section 4.2.2.
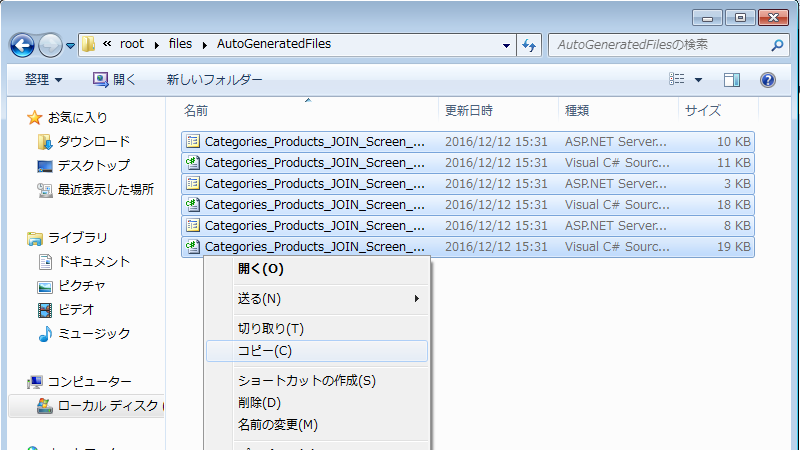
-
Right-click
Aspx\sample\3Tierfolder and select Paste in the Solution Explorer.
-
Confirm that data maintenance screens are added in
3Tierfolder.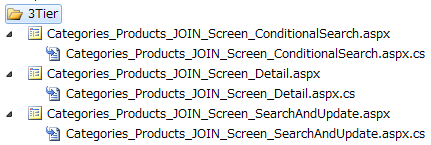
Note:
When using generating data maintenance screen feature of DPQuery_Tool, ASPX files, that are implemented HTML code, and C# files, that are implemented code behind, are generated. When developing web application project (not web site project), .designer.cs files, that are generated by Visual Studio designer, are necessary. Because the sample project bundled in template base is web application project, .designer.cs files should be added. -
Right-click project name and select Convert to Web Application in the Solution Explorer.

-
Click Yes in the following dialog.
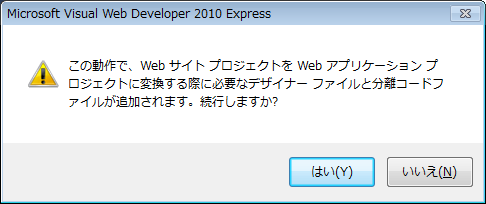
-
Confirm that .designer.cs files are generated in
3Tierfolder.
-
Right-click
Aspx\sample\3Tier\Categories_Products_JOIN_Screen_ConditionalSearch.aspxand select Set as Start Page in the Solution Explorer.
-
Build the application.
-
Run
services.mscin the Search programs and files box on the start menu.
-
In Services window, right-click ASP.NET state service and select Start.

Note:
By default, the startup type of ASP.NET state service is Disabled. So, change the startup type to Manual in ASP.NET state service properties.
-
Debug the application with Visual Studio.
-
Since the browser is launched and login form is shown, input the value as follows and click ログイン (Login in Japanese).ブラウザが起動し、ログイン画面が表示されますので、以下のように値を入力し、「ログイン」ボタンを押下します。
-
ユーザID (User Id in Japanese): Arbitrary string, NOT allowed empty string
-
パスワード (Password in Japanese): Arbitrary string, allowed empty string

-
Confirm that the following screen is shown.
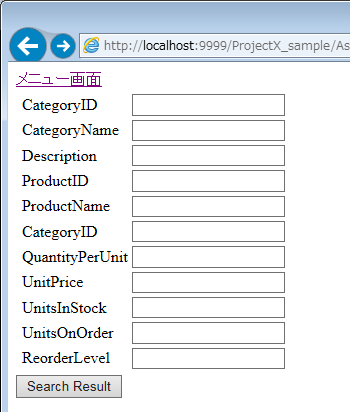
-
When inputting the search criteria and clicking Search Result, the result is shown in the lower part of the screen. The specification of this screen is the following.
- Nothing has been typed: Search all records.
- Anything has been typed: AND search with inputted text.
First, input nothing and click Search Result.
-
Confirm that all records are shown.
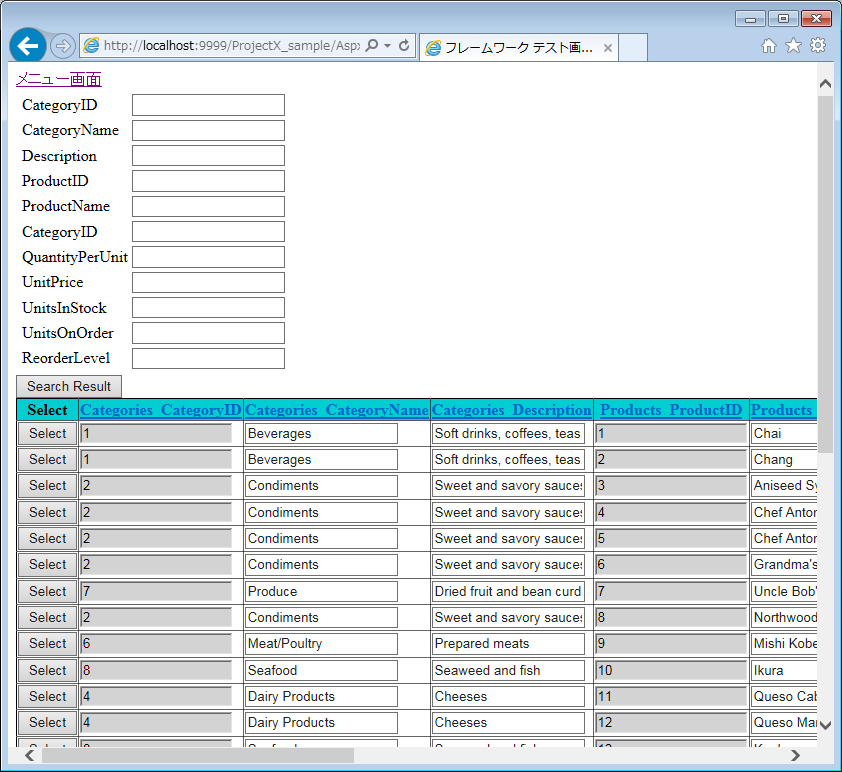
Note:
As shown in the above, primary key columns, that is CategoryID column in Category table and ProductID column in Products table in this sample, are read-only. -
Input "1" in CategoryID textbox as search criteria and click Search Result.
-
Confirm that the records, that the value of CategoryID is "1", are shown.
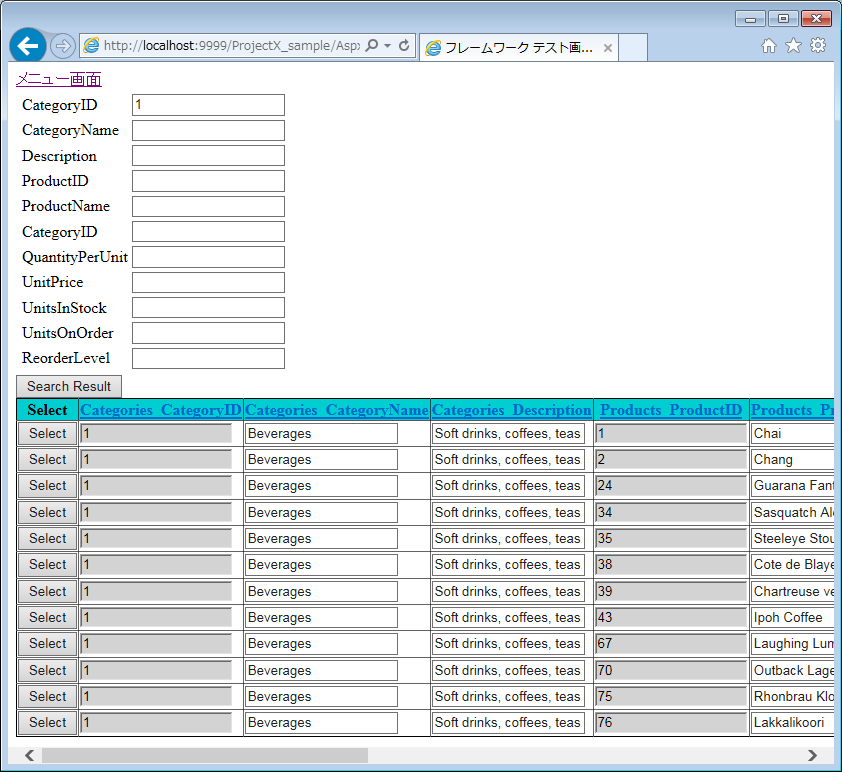
-
Next, by confirming AND search, input "1" in CategoryID textbox and input "2" in ProductID textbox, and click Search Result.
-
Confirm that the record, that the value of CategoryID is "1" and the value of ProductID is "2", is shown.

-
After performing the steps in section 4.3.2, click Select in the result set.
-
Confirm that the following screen is shown, and click Edit Record. (By default all items are read-only.)

-
Edit any text and click Update Record.

-
When updating database Successfully, the message "n Table Data Updated Successfully" is shown as the following figure.
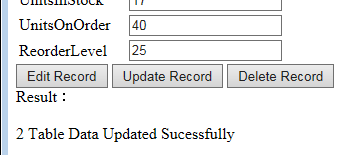
Note:
Internally, Products table and Categories table are updated. Users can confirm by the sql trace log.[2016/12/02 11:59:39,908],[INFO ],[8],22,0,[commandText]: -- DaoProducts_S3_Update -- 2016/12/1 日立 太郎 UPDATE [Products] SET [ProductName] = @Set_ProductName_forUPD, [CategoryID] = @Set_CategoryID_forUPD, [QuantityPerUnit] = @Set_QuantityPerUnit_forUPD, [UnitPrice] = @Set_UnitPrice_forUPD, [UnitsInStock] = @Set_UnitsInStock_forUPD, [UnitsOnOrder] = @Set_UnitsOnOrder_forUPD, [ReorderLevel] = @Set_ReorderLevel_forUPD WHERE [ProductID] = @ProductID [commandParameter]:ProductID=2,CategoryID=1,Set_ProductName_forUPD=Chang,Set_CategoryID_forUPD=1,Set_QuantityPerUnit_forUPD=24 - 12 oz bottles,Set_UnitPrice_forUPD=20,Set_UnitsInStock_forUPD=17,Set_UnitsOnOrder_forUPD=40,Set_ReorderLevel_forUPD=25, [2016/12/02 11:59:39,924],[INFO ],[8],3,0,[commandText]: -- DaoCategories_S3_Update -- 2016/12/1 日立 太郎 UPDATE [Categories] SET [CategoryName] = @Set_CategoryName_forUPD, [Description] = @Set_Description_forUPD WHERE [CategoryID] = @CategoryID [commandParameter]:ProductID=2,CategoryID=1,Set_CategoryName_forUPD=Beverages,Set_Description_forUPD=Soft drinks, coffees, teas, beers, and ales,
If clicking Delete Record, the delete statement for Products table and Categories table is executed. However, when a foreign key constraints is set in the parent table, if the delete statement for the parent table is executed before child table, or the records in child table that refer the record in parent table still remain, a foreign key constraint fails. When deleting the record, confirm that a foreign key constraint or the generated programs, and customize the generated programs if necessary. Section 6.1 describes how to customize the deletion program.
-
Right-click
Aspx\sample\3Tier\Categories_Products_JOIN_Screen_SearchAndUpdate.aspxand select Set as start page in the Solution Explorer.
-
Debug the application.
-
Since the browser is launched and login form is shown, input the value as follows and click ログイン (Login in Japanese).ブラウザが起動し、ログイン画面が表示されますので、以下のように値を入力し、「ログイン」ボタンを押下します。
-
ユーザID (User Id in Japanese): Arbitrary string, NOT allowed empty string
-
パスワード (Password in Japanese): Arbitrary string, allowed empty string

-
Confirm that the following screen is shown.
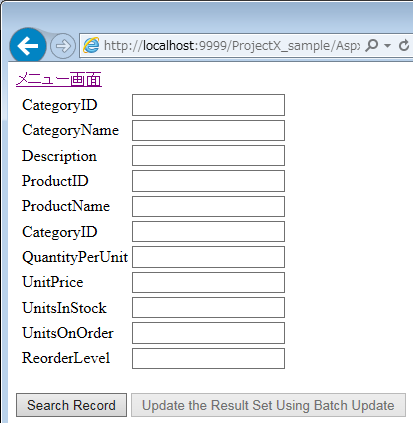
-
When inputting the search criteria and clicking Search Result, the result is shown in the lower part of the screen. The specification of this screen is the following.
- Nothing has been typed: Search all records.
- Anything has been typed: AND search with inputted text.
First, input nothing and click Search Result.
-
Confirm that all records are shown. When updating record, input new value in textbox and click Update. When deleting record, click Delete in the record that you want to delete.

Note:
Changes are not yet reflected to database. By clicking Update the Result Set Using Batch Update, changes are reflected to database. -
Confirm that Update the Result Set Using Batch Update button is activated, click Update the Result Set Using Batch Update.

Note:
Same as section 4.3.3, Products table and Categories table are updated. Users can confirm by the sql trace log.
Previous chapter described the basic usage of data maintenance screen. This chapter describes how to customize generated screen or program.
This section describes how to customize the generated deletion program. When deleting record, developers should confirm the relationship of the primary key and foreign key, that is which table is the parent and which table is the child, and decide the sequence of the deletion program.
This section uses the test tables. Figure 6-1 shows the relationship of the test tables that are used in this section. A column in TABL3 table references A column in TABL2 table, and AX column in TABL2 table references A column in TABL1 table. That is, TABL1 table is the parent and TABL2 table is the child. TABL2 table is the parent and TABL3 table is the child.

Figure 6-1 ER diagram of the test tables
-
Copy
C:\root\Info.csvand save asC:\root\Info3.csv. -
Because TABL1, TABL2, TABL3 tables will be used in this section, remove the definition information for Categories table, Products table, and from TABL4 table to TABL6 table.
Table name, column information -
TABL1,A,
,Y,Z,
TABL2,A,
,B,C,AX,
TABL3,D,
,E,F,A,
-
Create xml file in
C:\root\files\resource\Sqlfolder and save asDaoTABL1_TABL2_TABL3_JOIN_S2_Select.xml. -
Edit
DaoTABL1_TABL2_TABL3_JOIN_S2_Select.xmlas follows.<?xml version="1.0" encoding="UTF-8"?> <ROOT> SELECT TABL1.A [TABL1.A], TABL1.Y [TABL1.Y], TABL1.Z [TABL1.Z], TABL2.A [TABL2.A], TABL2.B [TABL2.B], TABL2.C [TABL2.C], TABL2.AX [TABL2.AX], TABL3.D [TABL3.D], TABL3.E [TABL3.E], TABL3.F [TABL3.F], TABL3.A [TABL3.A] FROM TABL1, TABL2, TABL3 <WHERE> WHERE TABL1.A = TABL2.AX AND TABL2.A = TABL3.A <IF>AND TABL1.A = @TABL1_A<ELSE>AND TABL1.A IS NULL</ELSE></IF> <IF>AND TABL1.Y = @TABL1_Y<ELSE>AND TABL1.Y IS NULL</ELSE></IF> <IF>AND TABL1.Z = @TABL1_Z<ELSE>AND TABL1.Z IS NULL</ELSE></IF> <IF>AND TABL2.A = @TABL2_A<ELSE>AND TABL2.A IS NULL</ELSE></IF> <IF>AND TABL2.B = @TABL2_B<ELSE>AND TABL2.B IS NULL</ELSE></IF> <IF>AND TABL2.C = @TABL2_C<ELSE>AND TABL2.C IS NULL</ELSE></IF> <IF>AND TABL2.AX = @TABL2_AX<ELSE>AND TABL2.AX IS NULL</ELSE></IF> <IF>AND TABL3.D = @TABL3_D<ELSE>AND TABL3.D IS NULL</ELSE></IF> <IF>AND TABL3.E = @TABL3_E<ELSE>AND TABL3.E IS NULL</ELSE></IF> <IF>AND TABL3.F = @TABL3_F<ELSE>AND TABL3.F IS NULL</ELSE></IF> <IF>AND TABL3.A = @TABL3_A<ELSE>AND TABL3.A IS NULL</ELSE></IF> </WHERE> </ROOT>
-
By referring section 4.2.2 and 4.2.3, generate data maintenance screen based on the result set of
DaoTABL1_TABL2_TABL3_JOIN_S2_Select.xmlwith DPQuery_Tool. Deploy the generated screens toAspx\sample\3Tierfolder. -
Right-click project name and select Convert to Web Application in the Solution Explorer.

Confirm that .designer.cs files are generated in
3Tierfolder.
-
Open
TABL1_TABL2_TABL3_JOIN_Screen_Detail.aspx.csin the Solutions Explorer. -
Select
UOC_btnDelete_Clickin the dropdown list in the upper part of code editor.
-
Confirm that
UOC_btnDelete_Clickmethod is shown in code editor. Find Delete the data from the XXXX table code block inUOC_btnDelete_Clickmethod.
Note:
In this figure, the order of code block is TABL1, TABL2, and TABL3. This means that the deletion programs will be executed in this order. However, TABL1 table is the parent of TABL2 table. So, the deletion programs should be executed in the order of TABL3, TABL2, and TABL1.
In the actual development, the various requirements to the application, such as "the parent record should be deleted after confirming no child records refer the parent record". In such case, the program to check the existence of child record should be added between Delete the data from the XXXX table code blocks. To make the program more understandable, this tutorial describes how to change the order of deletion program only. -
Modify the program to change the order of deletion program to TABL3, TABL2, and TABL1. (From child table to parent table)

-
Same as the previous step, modify
UOC_btnBatUpd_Clickmethod inTABL1_TABL2_TABL3_JOIN_Screen_SearchAndUpdate.aspx.csto change the order of deletion program to TABL3, TABL2, and TABL1.
-
By referring section 4.3, set
TABL1_TABL2_TABL3_JOIN_Screen_ConditionalSearch.aspxas start page and debug application. -
Search any record and click Delete Record. Confirm that 3 Data is Deleted from the table Successfully message is shown.

-
Open sql trace log and the deletion programs are executed in order of TABL3, TABL2, and TABL1.
[2016/12/05 16:17:01,891],[INFO ],[6],21,0,[commandText]: -- DaoTABL3_S4_Delete -- 2016/12/5 日立 太郎 DELETE FROM [TABL3] WHERE [D] = @D    [commandParameter]:D=1,TABL2_A=1,TABL1_A=1,
[2016/12/05 16:17:01,910],[INFO ],[6],1,0,[commandText]: -- DaoTABL2_S4_Delete -- 2016/12/5 日立 太郎 DELETE FROM [TABL2] WHERE [A] = @A    [commandParameter]:TABL3_D=1,A=1,TABL1_A=1,
[2016/12/05 16:17:01,928],[INFO ],[6],1,0,[commandText]: -- DaoTABL1_S4_Delete -- 2016/12/5 日立 太郎 DELETE FROM [TABL1] WHERE [A] = @A    [commandParameter]:TABL3_D=1,TABL2_A=1,A=1,
Optimistic locking, or optimistic concurrency control, is the one of the exclusive control method. Before updating the record, confirm whether the record already has been updated by other users. If the record has not been updated, continue the update program. If the record already has been updated, cancel the update program. To confirm whether the record already has been updated by other users, timestamp is often used.
Figure 6-2 shows the overview of optimistic locking with timestamp.
タイムスタンプを使用した、楽観的排他制御の仕組みを図 6-2 に示します。

Figure 6-2 Overview of optimistic locking
Data maintenance screen with optimistic locking can be generated with DPQuery_Tool.
Figure 6-3 shows the relationship of the test tables that are used in this section. Each tables have timestamp column, compared with Figure 6-1.

Figure 6-3 ER diagram of the test tables
-
Copy
C:\root\Info.csvand save asC:\root\Info4.csv. -
Because TABL4, TABL5, TABL6 tables will be used in this section, remove the definition information for Categories table, Products table, and from TABL1 table to TABL3 table.
Table name, column information -
TABL4,A,
,Y,Z,TimeStamp,
TABL5,A,
,B,C,AX,TimeStamp,
TABL6,D,
,E,F,A,TimeStamp,
-
Create xml file in
C:\root\files\resource\Sqlfolder and save asDaoTABL4_TABL5_TABL6_JOIN_S2_Select.xml. -
Edit
DaoTABL4_TABL5_TABL6_JOIN_S2_Select.xmlas follows.<?xml version="1.0" encoding="UTF-8"?> <ROOT> SELECT TABL4.A [TABL4.A], TABL4.Y [TABL4.Y], TABL4.Z [TABL4.Z], TABL4.TimeStamp [TABL4.TimeStamp], TABL5.A [TABL5.A], TABL5.B [TABL5.B], TABL5.C [TABL5.C], TABL5.AX [TABL5.AX], TABL5.TimeStamp [TABL5.TimeStamp], TABL6.D [TABL6.D], TABL6.E [TABL6.E], TABL6.F [TABL6.F], TABL6.A [TABL6.A], TABL6.TimeStamp [TABL6.TimeStamp] FROM TABL4, TABL5, TABL6 <WHERE> WHERE TABL4.A = TABL5.AX AND TABL5.A = TABL6.A <IF>AND TABL4.A = @TABL4_A<ELSE>AND TABL4.A IS NULL</ELSE></IF> <IF>AND TABL4.Y = @TABL4_Y<ELSE>AND TABL4.Y IS NULL</ELSE></IF> <IF>AND TABL4.Z = @TABL4_Z<ELSE>AND TABL4.Z IS NULL</ELSE></IF> <IF>AND TABL5.A = @TABL5_A<ELSE>AND TABL5.A IS NULL</ELSE></IF> <IF>AND TABL5.B = @TABL5_B<ELSE>AND TABL5.B IS NULL</ELSE></IF> <IF>AND TABL5.C = @TABL5_C<ELSE>AND TABL5.C IS NULL</ELSE></IF> <IF>AND TABL5.AX = @TABL5_AX<ELSE>AND TABL5.AX IS NULL</ELSE></IF> <IF>AND TABL6.D = @TABL6_D<ELSE>AND TABL6.D IS NULL</ELSE></IF> <IF>AND TABL6.E = @TABL6_E<ELSE>AND TABL6.E IS NULL</ELSE></IF> <IF>AND TABL6.F = @TABL6_F<ELSE>AND TABL6.F IS NULL</ELSE></IF> <IF>AND TABL6.A = @TABL6_A<ELSE>AND TABL6.A IS NULL</ELSE></IF> </WHERE> </ROOT>
-
By referring section 4.2.2, generate data maintenance screen based on the result set of
DaoTABL4_TABL5_TABL6_JOIN_S2_Select.xmlwith DPQuery_Tool. Here, to generate program for optimistic locking, set the items in Step 2 tab as follows and click Generate Screens.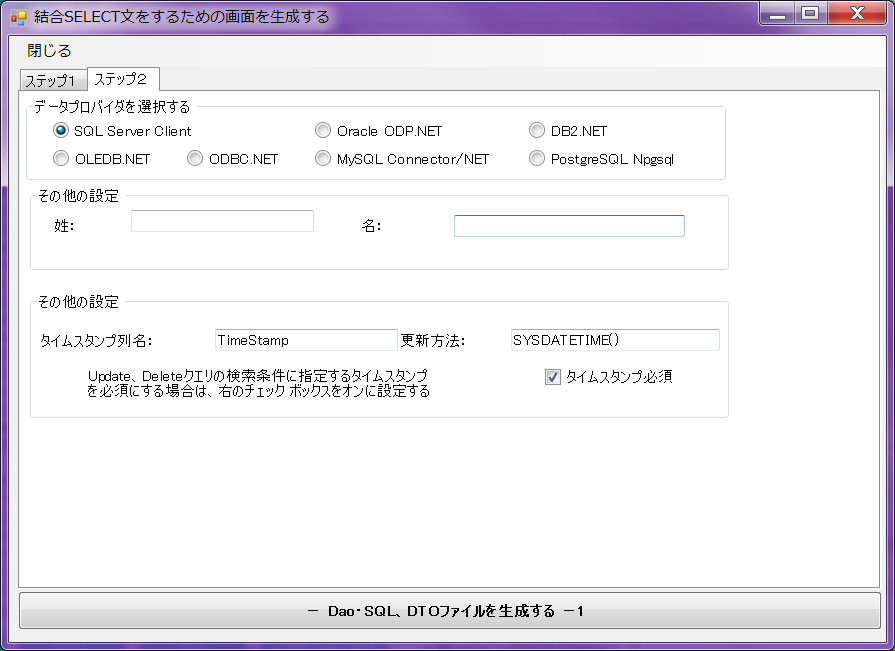
- Timestamp column name: TimeStamp
- How to Update: SYSDATETIME()
- Timestamp required: Set checked
-
By referring section 4.2.3, deploy the generated screens to
Aspx\sample\3Tierfolder. -
Right-click project name and select Convert to Web Application in the Solution Explorer.

-
Open
TABL4_TABL5_TABL6_JOIN_Screen_SearchAndUpdate.aspx.csin the Solutions Explorer. -
Select
UOC_btnBatUpd_Clickin the dropdown list in the upper part of code editor.
-
Search the following code.
//Timestamp column
parameterValue.AndEqualSearchConditions.Add("TimeStamp", "");
Note:
This is a code to add timestamp column to the search criteria. This code is implemented in the update program for each tables, that is TABL4, TABL5, and TABL6 table. So, it is necessary to specify the table name. -
Modify the above code as follows.
-
Update program for TABL4
//Timestamp column
parameterValue.AndEqualSearchConditions.Add("TABL4_TimeStamp", "");
-
Update program for TABL5
//Timestamp column
parameterValue.AndEqualSearchConditions.Add("TABL5_TimeStamp", "");
-
Update program for TABL6
//Timestamp column
parameterValue.AndEqualSearchConditions.Add("TABL6_TimeStamp", "");
-
-
By referring section 4.3, set
TABL4_TABL5_TABL6_JOIN_Screen_ConditionalSearch.aspxas start page and debug application. -
Search any record and click Delete Record. Confirm that 3 Data is Deleted from the table Successfully message is shown.

-
Next, to test optimistic locking, launch two browsers and search same record.
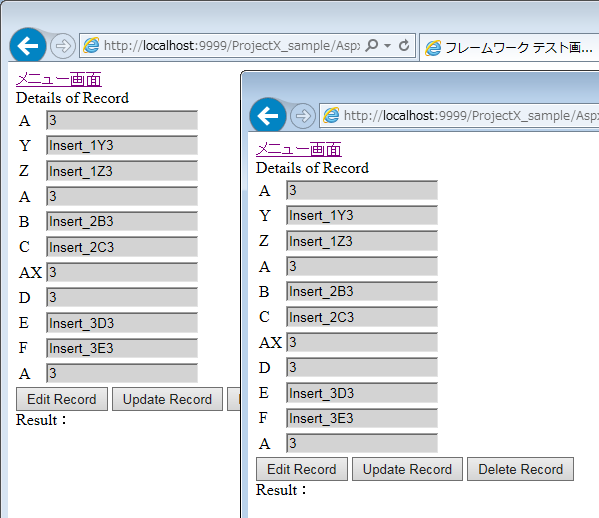
-
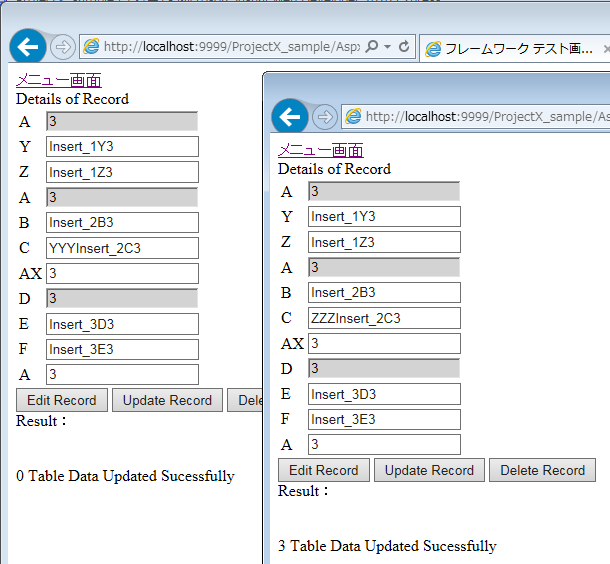
Update the record with one browser.

-
Update the record with the other browser. However, the record already has been updated by other browser (other user). So, confirm that the record is NOT updated for optimistic locking.
Depending on the business requirements, relation check may be required. For example, when updating Start date and End date, End date should be after start date. This section describes how to add relation check to the generated data maintenance screen.
-
Right-click
AppCode\sample\Businessfolder and select Add -> Class in the Solution Explorer. -
Add new class named
My3TierEngine.cs. -
Add the following namespaces in
My3TierEngine.csto import the classes provided by Open Touryo.// Business using Touryo.Infrastructure.Business.Business; using Touryo.Infrastructure.Business.Common; using Touryo.Infrastructure.Business.Dao; using Touryo.Infrastructure.Business.Exceptions; using Touryo.Infrastructure.Business.Presentation; using Touryo.Infrastructure.Business.Util; // Framework using Touryo.Infrastructure.Framework.Business; using Touryo.Infrastructure.Framework.Common; using Touryo.Infrastructure.Framework.Dao; using Touryo.Infrastructure.Framework.Exceptions; using Touryo.Infrastructure.Framework.Presentation; using Touryo.Infrastructure.Framework.Util; using Touryo.Infrastructure.Framework.Transmission; // Parts using Touryo.Infrastructure.Public.Db; using Touryo.Infrastructure.Public.IO; using Touryo.Infrastructure.Public.Log; using Touryo.Infrastructure.Public.Str; using Touryo.Infrastructure.Public.Util; // B 層クラス using WebForms_Sample.AppCode.sample.Business;
-
By default, Open Touryo performs maintenance by using
_3TierEngineclass, that is provided by Open Touryo. Inherit_3TierEngineclass toMy3TierEngineclass.public class My3TierEngine : _3TierEngine { }
-
Implement
My3TierEngineclass as follows. The point isUOC_RelatedCheckmethod for implementing relation check. By implementing relation check program in this method, relation check can be executed before updating the table. (This tutorial describes the implementing position only, and does not describe how to implement relation check.)public class My3TierEngine : _3TierEngine { /// <summary>Constructor</summary> public My3TierEngine() { // TODO: Add the constructor logic here } #region Fixed execution /// <summary>Call base</summary> /// <param name="parameterValue">Argument class</param> protected override void UOC_SelectRecord(_3TierParameterValue parameterValue) { base.UOC_SelectRecord(parameterValue); } /// <summary>Call base</summary> /// <param name="parameterValue">Argument class</param> protected override void UOC_UpdateRecordDM(_3TierParameterValue parameterValue) { base.UOC_UpdateRecordDM(parameterValue); } /// <summary>Call base</summary> /// <param name="parameterValue"> Argument class </param> protected override void UOC_DeleteRecordDM(_3TierParameterValue parameterValue) { base.UOC_DeleteRecordDM(parameterValue); } /// <summary>Call base</summary> /// <param name="parameterValue"> Argument class </param> protected override void UOC_BatchUpdateDM(_3TierParameterValue parameterValue) { base.UOC_BatchUpdateDM(parameterValue); } #endregion /// <summary> Work code class for three layer data bind related check </summary> /// <param name="parameterValue"> Argument class </param> protected override void UOC_RelatedCheck(_3TierParameterValue parameterValue) { // TODO: ここに、値の関連チェックを実装する } }
-
Set a breakpoint to
UOC_RelatedCheckmethod.
-
Open
TABL1_TABL2_TABL3_JOIN_Screen_Detail.aspx.csand search the code that refers_3TierEngineclass inUOC_btnUpdate_Clickmethod andUOC_btnDelete_Clickmethod.// B layer Initialize _3TierEngine b = new _3TierEngine();
-
Modify the above code as follows. (Change referred class to
My3TierEngine.)// B layer Initialize My3TierEngine b = new My3TierEngine();
-
Set
TABL1_TABL2_TABL3_JOIN_Screen_ConditionalSearch.aspxas start page and debug application. -
Confirm that the breakpoint, that is set at
UOC_RelatedCheckmethod, is hit during update program.