-
Notifications
You must be signed in to change notification settings - Fork 55
Tutorial_MVC_CSharp
January 22th, 2015
By developing a sample program in accordance with the practices of this tutorial, this tutorial aims to acquire Development flow / Class creation method / Creation method of all kinds of definition file / Tool usage method / Implementation result check method, etc., when Open Touryo and ASP.NET MVC are used.
This tutorial mainly explains the development flow when Touryo and ASP.NET MVC are used. For this reason ASP.NET MVC is not explained in detail. For information about ASP.NET MVC refer books and site separately.
SE/Developers who consider Open Touryo and ASP.NET MVC application.
This tutorial describes the development flow for ASP.NET MVC by using Open Touryo framework. The sample program attached to Open Touryo Visual Studio 2015 template base (/root_VS2015/) is used as the material of this tutorial.
As we are pressed for time, some images are only displayed in Japanese.
The company names and product names used in this document are the trademarks or registered trademarks of the respective companies.
This document can use Creative commons CC BY 2.1 JP license.
1. Overview of Open Touryo framework
Open Touryo is an application framework for .NET. Open Touryo targets .NET Framework 2.0 and above and can be used in various applications like C/S (Windows Forms, WPF), Web (ASP.NET) and RIA (Silverlight). ASP.NET MVC is a framework of ASP.NET to develop web application using MVC pattern.
Figure 1 1 shows the class configuration diagram of Open Touryo. Compared to traditional ASP.NET, configuration of B layer (business logic layer) and D layer (data access layer) part of existing Open Touryo does not change even in ASP.NET MVC. Thus, for developers who is experienced in using Open Touryo in ASP.NET, can use know-how development of B layer and D layer part.

Figure 1-1 Class configuration diagram of Open Touryo
This tutorial explains the complete method to create Screen / Business logic class / DB access class to be implemented by developer by following Class configuration diagram of Figure 1-1. Further, this tutorial uses Razor syntax to create view.
The followings are the prerequisites for this tutorial.
- Development environment
- IDE
- Visual Studio 2015 (Express Edition is also available)
- Application framework
- Open Touryo Template Base for Visual Studio 2015
- IDE
- Runtime environment
- Runtime
- .NET Framework 4.6
- DB
- SQL Server
- Runtime
- Others
- OS
- Windows 7
- Programming language
- C#
- OS
Install Visual Studio referring to Microsoft homepage beforehand.
Next, set up Open Touryo Template Base and database.
-
Click [Download ZIP] button on GitHub and obtain OpenTouryoTemplates.zip. Unzip this zip file and obtain Open Touryo Template Base for Visual Studio 2015.
-
Set up Open Touryo Template Base and database according to Readme.md in root_VS2015 folder.
Users of this tutorial can practice by adding screen or logic to the sample program that bundled with Open Touryo template base. Figure 3-1 shows the configuration of sample program and Figure 3-2 shows the Screen transition diagram of the tutorial.
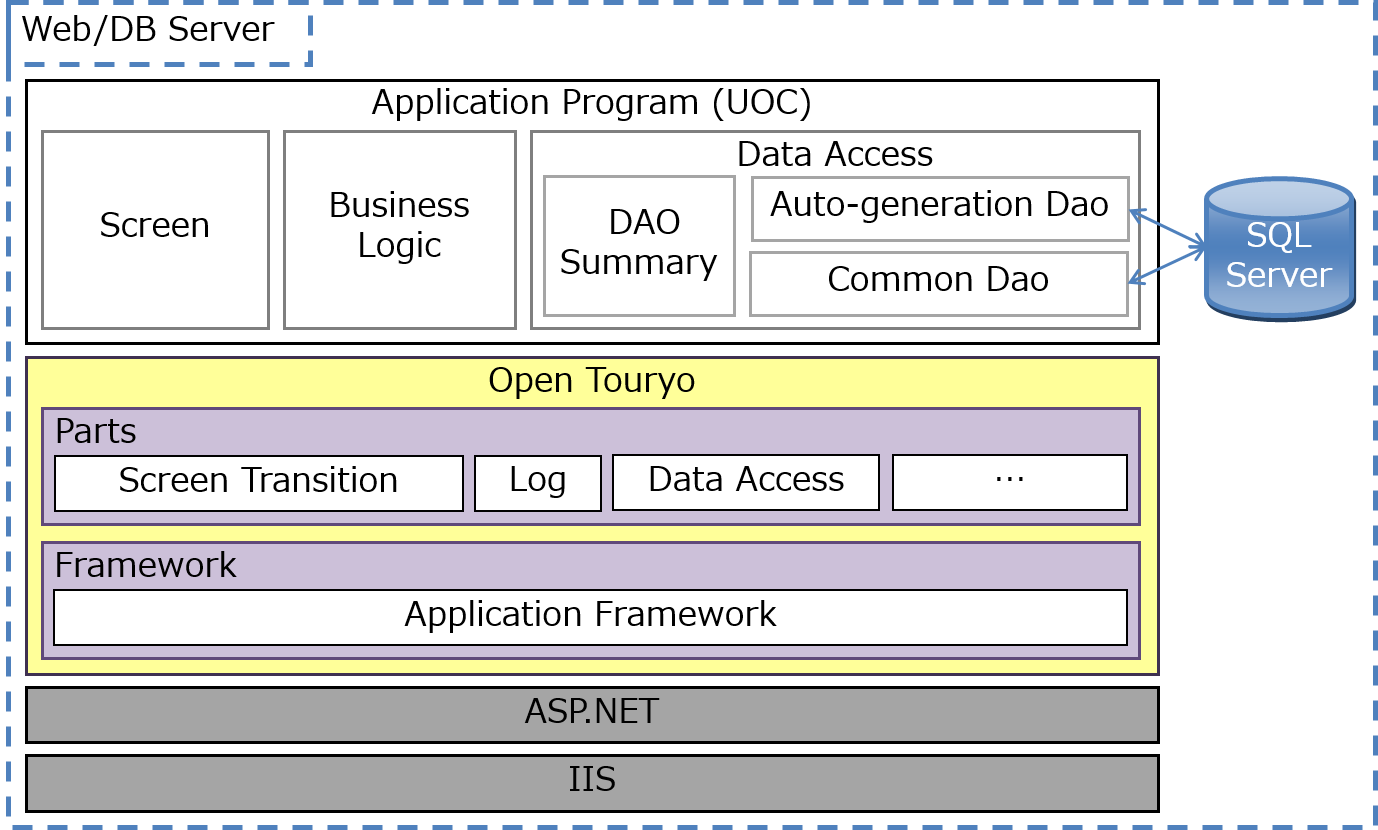
Figure 3-1 Configuration of sample program
When the exercise of this tutorial is completed, three types of class, indicated in the following table, are created for data access class. For details on these classes, refer User guide of Open Touryo (Better use and FAQ Edition).
| Data Access class | Explanation |
|---|---|
| Auto generation DAO | DAO class that is generated by D layer auto generation tool bundled with Open Touryo template base. This class is used while performing simple CRUD process in table/view. |
| Common DAO | DAO class that is provided by Open Touryo framework. This class is used when D layer auto generation tool can not be used, such as the case of obtaining the result based on joined tables. |
| DAO summary class | Facade class in D layer. This class is used for summarizing requests from business logic class when using multiple DAO classes in one transaction. |

Figure 3-2 Screen transition diagram of tutorial
The following section describes development flow using Open Touryo framework.
-
Open
C:\root\programs\C#\Samples\WebApp_sample\MVC_Sample\MVC_Sample.sln. -
Confirm that Visual Studio is launched and the sample program that bundled with Open Touryo template base is opened.

-
Select
Logic\Commonfolder in the Solution Explorer. And click Project -> Add Class in toolbar.
-
Add new class named
OrderParameterValue.cs. -
Add the following namespaces in
OrderParameterValue.csto import the classes provided by Open Touryo.using Touryo.Infrastructure.Business.Util; using Touryo.Infrastructure.Business.Common;
-
Inherit Parameter Value Parent Class of Open Touryo to
OrderParameterValueclass as shown below.public class OrderParameterValue : MyParameterValue
-
Create
OrderParameterValueconstructor with the following code.public OrderParameterValue(string screenId, string controlId, string methodName, string actionType, MyUserInfo user) : base(screenId, controlId, methodName, actionType, user) { }
-
Create the following properties in
OrderParameterValueclass to transfer data from form to data access class./// <summary>Order ID</summary> public string OrderId; /// <summary>Order information (Summary)</summary> public System.Data.DataTable Orders; /// <summary>Order information (Details)</summary> public System.Data.DataTable OrderDetails;
-
In the same way to section 4.2.1, create new class named
OrderReturnValue.csinLogic\Commonfolder. -
Add the following namespace in
OrderReturnValue.csto import the classes provided by Open Touryo.using Touryo.Infrastructure.Business.Common;
-
Inherit the Return Value Parent Class of Open Touryo to
OrderReturnValueclass as shown below.public class OrderReturnValue : MyReturnValue
-
Create the following properties in
OrderReturnValueclass to transfer the resultant data from data access class to form./// <summary>Message ID</summary> public string Message; /// <summary>Order ID</summary> public int OrderID; /// <summary>Order information (Summary)</summary> public System.Data.DataTable Orders; /// <summary>Order information (Details)</summary> public System.Data.DataTable OrderDetails;
Perform the following steps to generate data access class and SQL files that implement simple CRUD operation for table or view, using the D layer auto generation tool (DaoGen_Tool) bundled with Open Touryo template base.
-
Open
C:\root\programs\C#\Frameworks\DaoGen_Tool\bin\Debug\DaoGen_Tool.exe. -
In the STEP1 screen, set database information as follows and click acquisition.
- Data provider: SQL Server Client
- Connection string: Data Source=localhost\SQLExpress;Initial Catalog=Northwind;Integrated Security=true;
- Schema Info: Summary Information

-
If database information, such as connection string, are correct, Display (Summary Information) dialog of schema information of DBMS screen is shown.

Click Close to close the dialog box.
-
Click Get Table List.

In the Note? (prerequisites) dialog box, click OK.
-
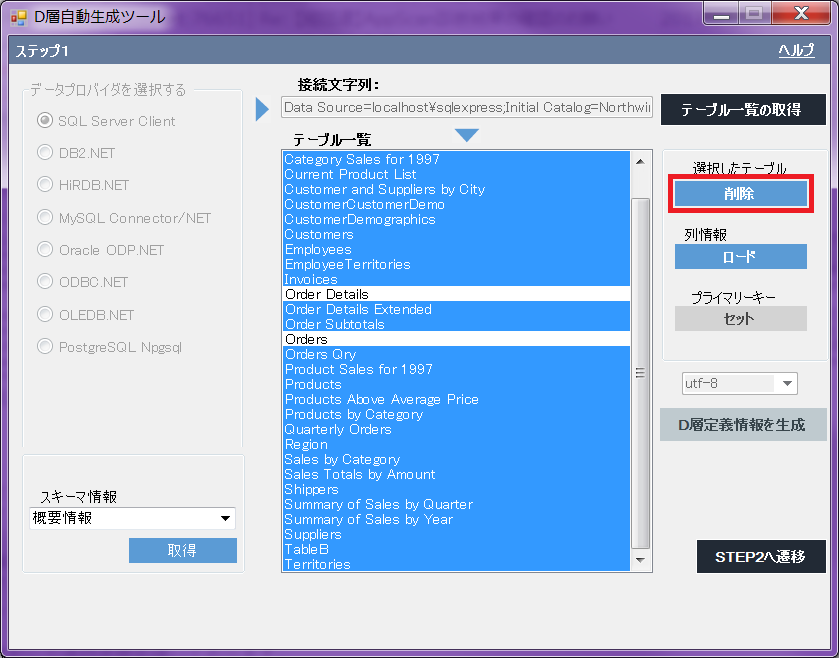
Tables and views in Northwind database are shown in list box. Since Orders table and Order Details table will be used in this tutorial, select all tables and views except Order table and Order Details table, and click Delete.
-
Confirm whether Table List contains only Order table and Order Details table, and click Load.

-
The Generate D layer definition file button is activated. Select utf-8 as file encoding and click Generate D layer definition file.

Save as
C:\root\Info.csv. -
Click OK in the dialog box displaying the message Completion of generation of the D-layer definition information!.

-
Click Go to STEP 2.

-
In the STEP2 screen, enter input / output settings as follows:
- D layer definition file: C:\root\Info.csv
- Source Template Folder: C:\root\files\tools\DGenTemplates
- Output File: C:\root
- Leave the other fields as default.
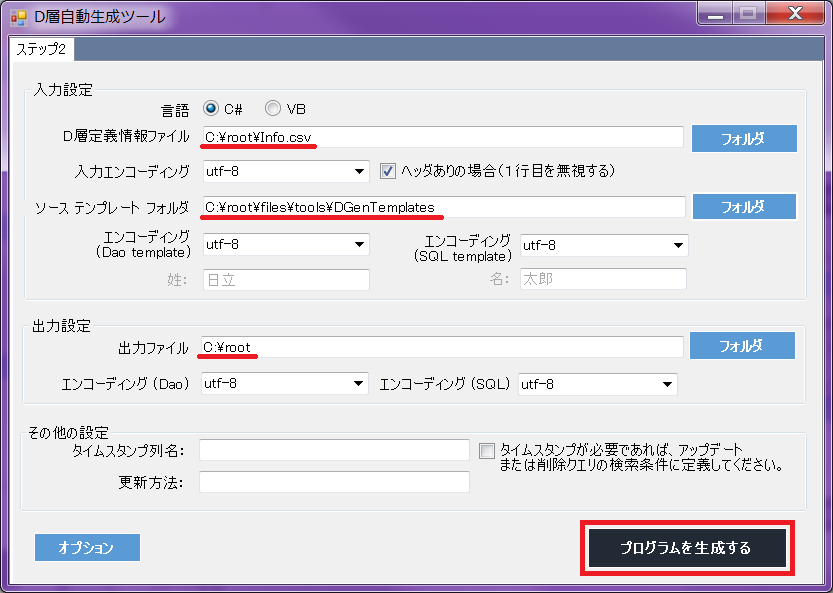
Click Generate Program.
-
Click OK in the dialog box displaying the message Automatic Generation Completed!.

-
Confirm that data access classes and SQL files are generated in
C:\rootfolder.
Note:
In the Open Touryo framework, the files with extensions.sqland.xmlare SQL files. (For more details, refer to the Open Touryo framework user guide) -
To add generated data access class to sample program, select
MVC_Sample\Logic\Daofolder in Solution Explorer, and click Project -> Add Existing File in toolbar.
-
In the Add Existing Item screen, select
DaoOrders.csandDaoOrder_Details.csinC:\rootfolder. Click Add. -
Copy the generated SQL and XML files in
C:\roottoC:\root\files\resource\Sqlfolder. -
Close D layer auto generation tool.
D layer auto generation tool can generate data access class and SQL file for simple CRUD processing. However, the developer should create sql file individually for complicated processing, such as join multiple tables.
-
Create
SelectOrders.sqlfile inC:\root\files\resource\Sqlfolder. -
Add the following SQL scripts in SelectOrders.sql to get the list of orders.
SELECT
    Orders.OrderID, Customers.CompanyName, Customers.ContactName, Employees.LastName As EmployeeLastName, Employees.FirstName As EmployeeFirstName, Orders.OrderDate
FROM
    Orders
        INNER JOIN Customers ON Orders.CustomerID = Customers.CustomerID
        INNER JOIN Employees ON Orders.EmployeeID = Employees.EmployeeID
In this tutorial, the following data access classes are used.
- DaoOrders
- For access to Orders table
- DaoOrder_Details
- For access to Order Details table
- CmnDao (Common data access class with Open Touryo)
- For access with SQL file created in section 4.5.2.
In this section describes how to create Dao Summary Class. Dao summary Class is Facade for business logic class, and controls the call the above data access classes.
-
Select
Daofolder in the Solution Explorer. And click Project -> Add Class in toolbar.
-
Add class named
ConsolidatedLayerD.cs. -
Add the following namespaces to
ConsolidatedLayerD.csto import the classes provided by Open Touryo, and parameter and return value class created in section 4.3.// Open Touryo using Touryo.Infrastructure.Business.Dao; using Touryo.Infrastructure.Public.Db; // Parameter and return value class using MVC_Sample.Logic.Common;
-
Inherit Data Access Parent Class of Open Touryo framework to
ConsolidatedLayerDclass as shown below.public class ConsolidatedLayerD : BaseConsolidateDao
-
Create ConsolidatedLayerD constructor with the following code.
public ConsolidatedLayerD(BaseDam dam) : base(dam) { }
-
Create
GetOrdersmethod to get the list of orders with the following code.public OrderReturnValue GetOrders(OrderParameterValue orderParameter) { // Create an object of Return Value class OrderReturnValue returnValue = new OrderReturnValue(); // Create an object of common DAO and assign SQL file CmnDao dao = new CmnDao(this.Dam); dao.SQLFileName = "SelectOrders.sql"; // Create an object of DataTable System.Data.DataTable table = new System.Data.DataTable(); // Get the list of orders information from the database and stored in a DataTable dao.ExecSelectFill_DT(table); // Store the orders information to the Return Value class and return to the B layer returnValue.Orders = table; return returnValue; }
-
Create
GetOrderByIdmethod to get the details of specific order summary and order details information based on the Order ID with the following code.public OrderReturnValue GetOrderById(OrderParameterValue orderParameter) { // Create an object of Return Value class OrderReturnValue returnValue = new OrderReturnValue(); // Create an object of auto generated DAO classes DaoOrders orderDao = new DaoOrders(this.Dam); DaoOrder_Details orderDetailsDao = new DaoOrder_Details(this.Dam); // Create objects of DataTable to store the details of specified order information System.Data.DataTable orderTable = new System.Data.DataTable(); System.Data.DataTable orderDetailsTable = new System.Data.DataTable(); // Set the required parameters orderDao.PK_OrderID = orderParameter.OrderId; orderDetailsDao.PK_OrderID = orderParameter.OrderId; // Get the details of specific order information from the database and stored in the DataTable orderDao.D2_Select(orderTable); orderDetailsDao.D2_Select(orderDetailsTable); // Store the details of specific order information to the Return Value class and return to the B layer returnValue.Orders = orderTable; returnValue.OrderDetails = orderDetailsTable; return returnValue; }
-
Create
UpdateOrdermethod to update the details of specified order summary and order details information with the following code.public OrderReturnValue UpdateOrder(OrderParameterValue orderParameter) { // Create an object of Return Value class OrderReturnValue returnValue = new OrderReturnValue(); // Create an object of auto generated DAO classes DaoOrders orderDao = new DaoOrders(this.Dam); DaoOrder_Details orderDetailsDao = new DaoOrder_Details(this.Dam); // Create an object of DataTable to store order information and order details information System.Data.DataTable orderTable = orderParameter.Orders; System.Data.DataTable orderDetailsTable = orderParameter.OrderDetails; // Judge the state of DataRow, and update database if DataRow is modified if (orderTable.Rows[0].RowState == System.Data.DataRowState.Modified) { // Set the parameters of the order information orderDao.PK_OrderID = orderTable.Rows[0]["OrderId"]; orderDao.Set_OrderDate_forUPD = orderTable.Rows[0]["OrderDate"]; orderDao.Set_RequiredDate_forUPD = orderTable.Rows[0]["RequiredDate"]; orderDao.Set_ShippedDate_forUPD = orderTable.Rows[0]["ShippedDate"]; orderDao.Set_ShipVia_forUPD = orderTable.Rows[0]["ShipVia"]; orderDao.Set_Freight_forUPD = orderTable.Rows[0]["Freight"]; orderDao.Set_ShipName_forUPD = orderTable.Rows[0]["ShipName"]; orderDao.Set_ShipAddress_forUPD = orderTable.Rows[0]["ShipAddress"]; orderDao.Set_ShipCity_forUPD = orderTable.Rows[0]["ShipCity"]; orderDao.Set_ShipRegion_forUPD = orderTable.Rows[0]["ShipRegion"]; orderDao.Set_ShipPostalCode_forUPD = orderTable.Rows[0]["ShipPostalCode"]; orderDao.Set_ShipCountry_forUPD = orderTable.Rows[0]["ShipCountry"]; // Update the order information to the database orderDao.D3_Update(); } foreach (System.Data.DataRow row in orderDetailsTable.Rows) { // Judge the state of DataRow, and update database if DataRow is modified if (row.RowState == System.Data.DataRowState.Modified) { // Set the parameters of the order details information orderDetailsDao.PK_OrderID = row["OrderId"]; orderDetailsDao.PK_ProductID = row["ProductId"]; orderDetailsDao.Set_UnitPrice_forUPD = row["UnitPrice"]; orderDetailsDao.Set_Quantity_forUPD = row["Quantity"]; orderDetailsDao.Set_Discount_forUPD = row["Discount"]; // Update the order details information to the database orderDetailsDao.D3_Update(); } } // Return result value return returnValue; }
-
Select
MVC_Sample\Logic\Businessfolder in the Solution Explorer. And click Project -> Add Class in toolbar.
-
Add class named
OrdersLogic.cs. -
Add the following namespaces to
OrdersLogic.csto import the classes provided by Open Touryo, and parameter and return value class, and data access class.// Open Touryo // Business using Touryo.Infrastructure.Business.Business; using Touryo.Infrastructure.Business.Common; using Touryo.Infrastructure.Business.Dao; using Touryo.Infrastructure.Business.Exceptions; using Touryo.Infrastructure.Business.Presentation; using Touryo.Infrastructure.Business.Util; using Touryo.Infrastructure.Business.RichClient.Asynchronous; using Touryo.Infrastructure.Business.RichClient.Business; using Touryo.Infrastructure.Business.RichClient.Presentation; // Framework using Touryo.Infrastructure.Framework.Business; using Touryo.Infrastructure.Framework.Common; using Touryo.Infrastructure.Framework.Dao; using Touryo.Infrastructure.Framework.Exceptions; using Touryo.Infrastructure.Framework.Presentation; using Touryo.Infrastructure.Framework.Util; using Touryo.Infrastructure.Framework.Transmission; using Touryo.Infrastructure.Framework.RichClient.Presentation; // Public using Touryo.Infrastructure.Public.Db; using Touryo.Infrastructure.Public.IO; using Touryo.Infrastructure.Public.Log; using Touryo.Infrastructure.Public.Str; using Touryo.Infrastructure.Public.Util; // Parameter and Return value class using MVC_Sample.Logic.Common; // Data access class using MVC_Sample.Logic.Dao;
-
Inherit Business Parent Class of Open Touryo framework to
OrdersLogicclass as shown below.public class OrdersLogic : MyFcBaseLogic
-
Create
UOC_GetOrdersmethod to get the list of orders with the following code.private void UOC_GetOrders(OrderParameterValue orderParameter) { // Create an object DAO Summary class ConsolidatedLayerD facade = new ConsolidatedLayerD(this.GetDam()); // Get the list of orders information OrderReturnValue returnValue = facade.GetOrders(orderParameter); // Return the object of Return Value class this.ReturnValue = returnValue; } *Note:* The method to be called from the forms is required to be created as `UOC_xx` (xx is arbitrary string). When the forms send xx as parameter, Open Touryo framework allocates the processing to `UOC_xx` method in business logic class.
-
Create
UOC_GetOrderByIdmethod to get the details of specific order summary and order details information based on the Order ID with the following code.private void UOC_GetOrderById(OrderParameterValue orderParameter) { // Create an object DAO Summary class ConsolidatedLayerD facade = new ConsolidatedLayerD(this.GetDam());
 // Get the details of specific order information and order details information based on Order ID
 OrderReturnValue returnValue = facade.GetOrderById(orderParameter);

 // Return the object of Return Value class
 this.ReturnValue = returnValue;
}
-
Create
UOC_UpdateOrdermethod to update the details of specified order summary and order details information with the following code.private void UOC_UpdateOrder(OrderParameterValue orderParameter) { // Create an object DAO Summary class ConsolidatedLayerD facade = new ConsolidatedLayerD(this.GetDam());
 // Update the specified order information and order details information
 OrderReturnValue returnValue = facade.UpdateOrder(orderParameter);

 // Return the object of Return Value class
 this.ReturnValue = returnValue;
}
Similar to master page in ASP.NET Web application, layout is used to maintain the consistency of UI components and theme throughout the application. To be referred commonly by multiple views, layout is arranged in Views\Shared folder. By creating ASP.NET MVC application by Visual Studio, layout called _Layout.cshtml is created by default. Common UI components and theme can be defined throughout the application in this _Layout.cshtml. Multiple layouts can be created in one application.
In this tutorial, create new layout and define view in compliance with this layout.
-
Right-click
Views\Sharedfolder and select Add -> View option.
-
In the Add View dialog, set the properties as follows and click Add.
- View name: _SampleLayout
- View engine: Razor (CSHTML)
- Create a strongly-typed view: Uncheck the box
- Create as a partial view: Uncheck the box
- Use a layout or master page: Uncheck the box

-
Define the layout in
_SampleLayout.cshtmlas follows.@{ Layout = null; } <!DOCTYPE html> <html> <head> <meta charset="utf-8" /> <meta name="viewport" content="width=device-width" /> @* Value specified in ViewBag.Title is made as Screen title *@ <title>@ViewBag.Title</title> @* Define shared Common JavaScript, CSS in application *@ @Styles.Render("~/Content/css") @Scripts.Render("~/bundles/modernizr") <script src="~/Scripts/jquery-1.8.2.min.js"></script> <script src="~/Scripts/jquery.unobtrusive-ajax.min.js"></script> <link href="~/Content/themes/base/jquery-ui.css" rel="stylesheet" type="text/css" /> <link href="~/Content/themes/base/jquery.ui.all.css" rel="stylesheet" type="text/css" /> @* Define section that can be described in view *@ @RenderSection("scripts", required: false) </head> <body> @* Example of common UI components in application (Define h1 tag here) *@ <h1>Touryo Sample</h1> @* Contents part *@ @RenderBody() </body> </html> -
Build the sample project.
-
Right-click
Controllersfolder and click Add -> Controller option.
-
In the Add Controller dialog, set the properties as follows and click Add.
- Controller name: MenuController
- Template: Empty MVC controller

-
Create an action method in
MenuController.csto accept request from views.public ActionResult GotoList() { return RedirectToAction("Index", "Order"); }
Note:
When views send the request tohttp://~/Menu/GotoList, the above program redirects the request to OrderController (Discussed later).
-
In code view of Visual Studio, right-click somewhere of Index method of MenuController class and select Add View.

-
In the Add View dialog, set the properties as follows and click Add.
- View name: Index
- View engine: Razor (CSHTML)
- Create a strongly-typed view: Uncheck the box
- Create as a partial view: Uncheck the box
- Use a layout or master page: Check the box
- Layout: ~/Views/Shared/_SampleLayout.cshtml

-
Confirm that
Menufolder andIndex.cshtmlfile are created inViewsfolder.
-
Define the title of view in
Index.cshtml.@{ ViewBag.Title = "Menu"; Layout = "~/Views/Shared/_SampleLayout.cshtml"; }
*Note: *
The value substituted inViewBag.Titleis used as the value of<title>. -
Define the content area in
Index.cshtml. (Replace auto-generated<h2>Index</h2>to the following code.)<fieldset> <legend> Please Select Link to Check the functionality </legend> <br /> <b>@Html.ActionLink("Go to the List page", "GotoList")</b> </fieldset>
【注意】
HTML components described in the view are embedded in the definition position of each section in layout. As described above, HTML components described without section are embedded in the position describedRenderBocymethod in layout. And,Html.ActionLinkis the helper class to generate<a>tag. Since "GotoList" is specified in second argument ofActionLinkas action name, the aboveActionLinkmethod generates ` at run time. When clicking this link, "GotoList" action method in MenuController (Created in Section 4.6.1) will be executed according to the default URL routing.
-
In the same way to section 4.6.1, create
OrderControllerinControllersfolder. -
Add the following namespaces in
OrderController.csto import Model classes and the classes provided by Open Touryo.// Business Logics of Touryo framework using Touryo.Infrastructure.Business.Business; using Touryo.Infrastructure.Business.Common; using Touryo.Infrastructure.Business.Dao; using Touryo.Infrastructure.Business.Exceptions; using Touryo.Infrastructure.Business.Presentation; using Touryo.Infrastructure.Business.Util; // Framework Logics of Touryo framework using Touryo.Infrastructure.Framework.Business; using Touryo.Infrastructure.Framework.Common; using Touryo.Infrastructure.Framework.Dao; using Touryo.Infrastructure.Framework.Exceptions; using Touryo.Infrastructure.Framework.Presentation; using Touryo.Infrastructure.Framework.Util; using Touryo.Infrastructure.Framework.Transmission; // Public Logic of Touryo framework using Touryo.Infrastructure.Public.Db; // External Business application Logic nameapces using System.Data; using MVC_Sample.Logic.Business; using MVC_Sample.Logic.Common; using MVC_Sample.Logic.Dao; using MVC_Sample.Models;
-
Inherit Parent Class of Open Touryo to
OrderControllerclass as shown below.public class OrderController : MyBaseMVController
-
Implement the code to call Model (business logic class) class in
Indexmethod ofOrderControllerclass.public ActionResult Index() { // Define the parameter to send to Model (business logic class) OrderParameterValue param = new OrderParameterValue( this.RouteData.Values["controller"].ToString(), this.RouteData.Values["action"].ToString(), "GetOrders", "SQL", new MyUserInfo("user01", this.Request.ServerVariables["REMOTE_ADDR"])); // Call the method in Model (business logic class) OrdersLogic lb = new OrdersLogic(); OrderReturnValue retValue = (OrderReturnValue)lb.DoBusinessLogic(param); if (retValue.ErrorFlag == true) { // If the error occurs, store error information in Model class string Message = "ErrorMessageID:" + retValue.ErrorMessageID + ";"; Message += "ErrorMessage:" + retValue.ErrorMessage + ";"; Message += "ErrorInfo:" + retValue.ErrorInfo; retValue.Message = Message; } // Send the object of return value class to the view, and display view return View(retValue); }
*Note: *
Here, the string "GetOrders" is set in the third argument of the constructor ofOrderParameterValueclass. Thus Open Touryo executesUOC_GetOrdersmethod created in section 4.4.
First, create the view for displaying the list of order information, that is, the result set of sql created in section 4.3.2.
-
In the same way to section 4.6.2, right-click somewhere of Index method of OrderController class and select Add View.
-
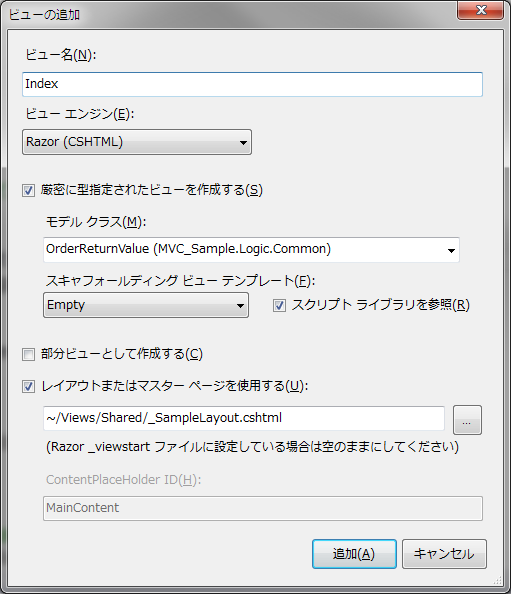
In the Add View dialog, set the properties as follows and click Add.
- View name: Index
- View engine: Razor (CSHTML)
- Create a strongly-typed view: Check the box
- Model class: MVC_Sample.Logic.Common.OrderReturnValue
- Create as a partial view: Uncheck the box
- Use a layout or master page: Check the box
- Layout: ~/Views/Shared/_SampleLayout.cshtml
-
Add using directive and define the title of view.
@model MVC_Sample.Logic.Common.OrderReturnValue
@using System.Data;

@{
    ViewBag.Title = "Order List";
    Layout = "~/Views/Shared/_SampleLayout.cshtml";
}
-
Define the content area in
Index.cshtml.<fieldset> <legend>List of Orders</legend> @{ // Create grid from the Model contents passed from controller var grid = new WebGrid(Model.Orders.AsEnumerable(), canPage: true, rowsPerPage: 10, selectionFieldName: "selectedRow"); grid.Pager(WebGridPagerModes.NextPrevious); } <div id="gridContent"> @* Display the value stored in Model in grid *@ @grid.GetHtml( tableStyle: "webGrid", headerStyle: "header", alternatingRowStyle: "alt", selectedRowStyle: "select", columns: grid.Columns( grid.Column("Select", format: @<text>@Html.ActionLink("Select", "Order", new { OrderId = item.Value["OrderID"] }) </text>), grid.Column("OrderID", format: (item) => item.GetSelectLink(item.Value["OrderID"].ToString())), grid.Column("CompanyName", format: (item) => item.Value["CompanyName"].ToString()), grid.Column("ContactName", format: (item) => item.Value["ContactName"].ToString(), style: "description"), grid.Column("LastName", format: (item) => item.Value["EmployeeLastName"].ToString()), grid.Column("OrderDate", format: (item) => item.Value["OrderDate"].ToString(), style: "description") ) ) @if (grid.HasSelection) { // If row is selected, display the value of selected row DataRow order = (DataRow)grid.Rows[grid.SelectedIndex].Value; <b>OrderID</b>@order["OrderID"].ToString()<br /> <b>CompanyName</b> @order["CompanyName"].ToString()<br /> <b>ContactName</b>@order["ContactName"].ToString()<br /> <b>FirstName</b>@order["EmployeeFirstName"].ToString()<br /> <b>LastName</b>@order["EmployeeLastName"].ToString()<br /> <b>OrderDate</b>@order["OrderDate"].ToString()<br /> } </div> </fieldset>
*Note: *
Here,WebGridhelper class is used to display the list of order information. To useWebGridhelper class, it is necessary to add reference toSystem.Web.Helpers.dll. For the details ofWebGridhelper class, refer MSDN.
Next, add the process to get and display the details of order information by order id to controller and view. Figure 4-1 shows the completed drawing of order details view. Here, create partial views to display the records of Order table and Order Details table, as shown in Figure 4-1.

Figure 4-1 Completed drawing of order details view
-
Create the action method to get an order information by order id in
OrderControllerclass.public ActionResult Order(string OrderId) { // Define the parameter to send to Model (business logic class) OrderParameterValue param = new OrderParameterValue( this.RouteData.Values["controller"].ToString(), this.RouteData.Values["action"].ToString(), "GetOrderById", "SQL", new MyUserInfo("user01", this.Request.ServerVariables["REMOTE_ADDR"])); param.OrderId = OrderId; // Call the method in Model (business logic class) OrdersLogic logic = new OrdersLogic(); OrderReturnValue retValue = (OrderReturnValue)logic.DoBusinessLogic(param); if (retValue.ErrorFlag == true) { // If the error occurs, store error information in Model class string Message = "ErrorMessageID:" + retValue.ErrorMessageID + ";"; Message += "ErrorMessage:" + retValue.ErrorMessage + ";"; Message += "ErrorInfo:" + retValue.ErrorInfo; retValue.Message = Message; } else { // If the process finished successfully, store the result set in Session Session["Orders"] = retValue.Orders; Session["OrderDetails"] = retValue.OrderDetails; } return View(retValue); } public ActionResult GetOrderDetails(int? id) { // Get the order information from Session and store in Model class OrderReturnValue retValue = new OrderReturnValue(); retValue.OrderDetails = (System.Data.DataTable)Session["OrderDetails"]; retValue.Orders = (System.Data.DataTable)Session["Orders"]; retValue.OrderID = Convert.ToInt32(id); return View("Order", retValue); }
-
Next, create view to display order details information. In the same way to section 4.6.2, right-click
Ordermethod and createOrder.cshtml. Even every option of Add view dialog is similar to the value specified in section 4.6.2. -
Define the title of view.
@model MVC_Sample.Logic.Common.OrderReturnValue

@{
    ViewBag.Title = "Order Details and Order Information Summary";
    Layout = "~/Views/Shared/_SampleLayout.cshtml";
}
-
Define content area in
Order.cshtml. As shown in Figure 4-1, define the display area of order information as partial view.<div id="orderInfo" style="width: 100%"> @* Define the partial view for displaying order information *@ @Html.Partial("_OrderInfo") </div> <div id="orderDetailsInfo" style="width: 100%"> @* Define the partial view for displaying order details information *@ @Html.Partial("_OrderDetailsInfo") </div> @* Create form to post to controller *@ @using (Html.BeginForm("UpdateDatabase", "Order", FormMethod.Post, new { id = "form3" })) { <input type="submit" id="btnUpdateDb" value="Update to Database" /> }
-
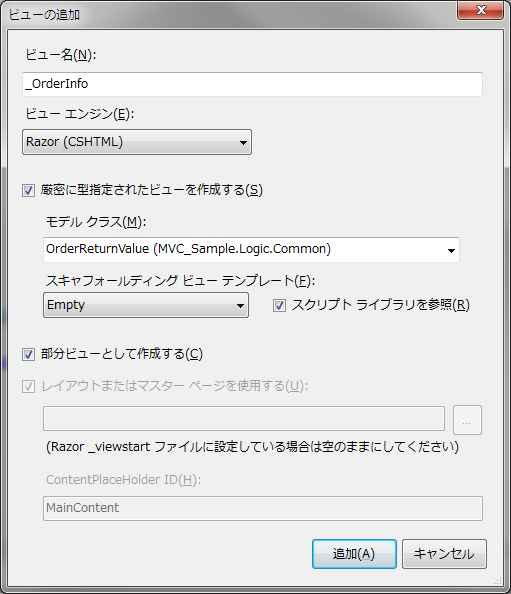
Create partial view to display order information. Right-click
Views\Orderfolder and click Add -> View. -
In the Add View dialog, set the properties as follows and click Add.
- View name: _OrderInfo
- View engine: Razor (CSHTML)
- Create a strongly-typed view: Check the box
- Model class: MVC_Sample.Logic.Common.OrderReturnValue
- Create as a partial view: Check the box
-
Define content area to display order information in
_OrderInfo.cshtml.@model MVC_Sample.Logic.Common.OrderReturnValue @using System.Data; @{ // Define grid to display order information (Get order information from Model) var gridorder = new WebGrid(Model.Orders.AsEnumerable(), canPage: true, rowsPerPage: 10, selectionFieldName: "selectedRow", ajaxUpdateContainerId: "gridContentdetail", fieldNamePrefix: "g1", pageFieldName: "p1"); gridorder.Pager(WebGridPagerModes.NextPrevious); } <fieldset> <legend>Order Information Summary</legend> <div id="gridContentdetail"> @* Display order information *@ @gridorder.GetHtml( tableStyle: "webGrid", headerStyle: "header", alternatingRowStyle: "alt", selectedRowStyle: "select", // Column definitions columns: gridorder.Columns( gridorder.Column("Details", format: @<text>@Html.ActionLink("Details", "GetOrderDetails", new { id = item.Value["OrderID"] }) </text>), gridorder.Column("OrderID", format: (item) => { // By default, it is possible to acquire a link to select a row of the grid in WebGrid by GetSelectLink and GetSelectUrl method. // In this case, "Action method name executed just before" is used in the URL link. // Since URL changes for each action execution, it is necessary to perform the process to fix URL. string queryStrings = item.GetSelectUrl().Substring(item.GetSelectUrl().IndexOf("?") + 1); string OrderID = item.Value["OrderID"].ToString(); RouteValueDictionary queryDic = new RouteValueDictionary(); foreach (string query in queryStrings.Split('&')) { queryDic.Add(query.Split('=')[0], query.Split('=')[1]); } return Html.ActionLink(OrderID, "GetOrderDetails", queryDic); }), gridorder.Column("CustomerID", format: (item) => item.Value["CustomerID"].ToString()), gridorder.Column("EmployeeID", format: (item) => item.Value["EmployeeID"].ToString(), style: "description"), gridorder.Column("OrderDate", format: (item) => item.Value["OrderDate"].ToString()), gridorder.Column("RequiredDate", format: (item) => item.Value["RequiredDate"].ToString(), style: "description"), gridorder.Column("ShippedDate", format: (item) => item.Value["ShippedDate"].ToString()), gridorder.Column("ShipVia", format: (item) => item.Value["ShipVia"].ToString(), style: "description"), gridorder.Column("Freight", format: (item) => item.Value["Freight"].ToString()), gridorder.Column("ShipName", format: (item) => item.Value["ShipName"].ToString(), style: "description"), gridorder.Column("ShipAddress", format: (item) => item.Value["ShipAddress"].ToString()), gridorder.Column("ShipCity", format: (item) => item.Value["ShipCity"].ToString(), style: "description"), gridorder.Column("ShipRegion", format: (item) => item.Value["ShipRegion"].ToString()), gridorder.Column("ShipPostalCode", format: (item) => item.Value["ShipPostalCode"].ToString(), style: "description"), gridorder.Column("ShipCountry", format: (item) => item.Value["ShipCountry"].ToString()) ) ) @if (gridorder.HasSelection) { System.Data.DataRow order = (System.Data.DataRow)gridorder.SelectedRow.Value; <fieldset><legend>Update Order Table</legend> @* Create input form to modify order information *@ @* Controller name, action name to send request can be specified in the parameter of BeginForm method *@ @using (Html.BeginForm("UpdateModel_OrderSummary", "Order", FormMethod.Post, new { id = "form1" })) { <table> <tr> <td><b>OrderID</b></td> <td>@Html.TextBox("txtOrderID", @order["OrderID"], new {@readonly = "readonly"})</td> <td><b>CustomerID</b></td> <td>@Html.TextBox("txtCustomerID", @order["CustomerID"], new {@readonly = "readonly"})</td> </tr> <tr> <td><b>EmployeeID</b></td> <td>@Html.TextBox("txtEmployeeID", @order["EmployeeID"], new {@readonly = "readonly"})</td> <td><b>OrderDate</b></td> <td>@Html.TextBox("txtOrderDate", @order["OrderDate"])</td> </tr> <tr> <td><b>RequiredDate</b></td> <td>@Html.TextBox("txtRequiredDate", @order["RequiredDate"])</td> <td><b>ShippedDate</b></td> <td>@Html.TextBox("txtShippedDate", @order["ShippedDate"])</td> </tr> <tr> <td><b>ShipVia</b></td> <td>@Html.TextBox("txtShipVia", @order["ShipVia"])</td> <td><b>Freight</b></td> <td>@Html.TextBox("txtFreight", @order["Freight"])</td> </tr> <tr> <td><b>ShipName</b></td> <td>@Html.TextBox("txtShipName", @order["ShipName"])</td> <td><b>ShipAddress</b></td> <td>@Html.TextBox("txtShipAddress", @order["ShipAddress"])</td> </tr> <tr> <td><b>ShipCity</b></td> <td>@Html.TextBox("txtShipCity", @order["ShipCity"])</td> <td><b>ShipRegion</b></td> <td>@Html.TextBox("txtShipRegion", @order["ShipRegion"])</td> </tr> <tr> <td><b>ShipPostalCode</b></td> <td>@Html.TextBox("txtShipPostalCode", @order["ShipPostalCode"])</td> <td><b>ShipCountry</b></td> <td>@Html.TextBox("txtShipCountry", @order["ShipCountry"])</td> </tr> </table> <input type="submit" id="btnUpdateOrder" value="Update Order" /> } </fieldset> } </div> </fieldset> -
Similarly, create partial view to display order details information named
_OrderDetailsInfo. -
Define content area to display order details information in
_OrderDetailsInfo.cshtml.@model MVC_Sample.Logic.Common.OrderReturnValue @using System.Data; @if (Model.OrderDetails != null && Model.OrderID != 0) { // Define grid to display order details information (Get order details information from Model) var grid = new WebGrid(Model.OrderDetails.AsEnumerable(), canPage: true, rowsPerPage: 10, selectionFieldName: "selectedRow"); grid.Pager(WebGridPagerModes.NextPrevious); <div id="gridContentdetailUpdate"> <fieldset> <legend>Order Details</legend> @* Display order details information *@ @grid.GetHtml(tableStyle: "webGrid", headerStyle: "header", alternatingRowStyle: "alt", selectedRowStyle: "select", // Column definitions columns: grid.Columns( grid.Column("OrderID", format: (item) => { // Similar to _OrderInfo.cshtml, fix the URL link to select grid column Perform process string queryStrings = item.GetSelectUrl().Substring(item.GetSelectUrl().IndexOf("?") + 1); string OrderID = item.Value["OrderID"].ToString(); RouteValueDictionary queryDic = new RouteValueDictionary(); queryDic.Add("id", OrderID); foreach (string query in queryStrings.Split('&')) { queryDic.Add(query.Split('=')[0], query.Split('=')[1]); } return Html.ActionLink(OrderID, "GetOrderDetails", queryDic); }), grid.Column("ProductID", format: (item) => item.Value["ProductID"].ToString()), grid.Column("Discount", format: (item) => item.Value["Discount"].ToString(), style: "description"), grid.Column("UnitPrice", format: (item) => item.Value["UnitPrice"].ToString()), grid.Column("Quantity", format: (item) => item.Value["Quantity"].ToString(), style: "description") ) ) @if (grid.HasSelection) { System.Data.DataRow orderDetails = (System.Data.DataRow)grid.SelectedRow.Value; <fieldset> <legend>Update Order Details</legend> @* Create input form to modify order details information *@ @* Controller name, action name can be specified in the parameters of BeginForm method to send request *@ @using (Html.BeginForm("UpdateModel_OrderDetails", "Order", FormMethod.Post, new { id = "form2" })) { <table> <tr> <td><b>OrderID</b></td> <td>@Html.TextBox("txtOrderID", @orderDetails["OrderID"], new { @readonly = "readonly" })</td> </tr> <tr> <td><b>ProductID</b></td> <td>@Html.TextBox("txtProductID", @orderDetails["ProductID"], new { @readonly = "readonly" })</td> </tr> <tr> <td><b>Discount</b></td> <td>@Html.TextBox("txtDiscount", @orderDetails["Discount"])</td> </tr> <tr> <td><b>UnitPrice</b></td> <td>@Html.TextBox("txtUnitPrice", @orderDetails["UnitPrice"])</td> </tr> <tr> <td><b>Quantity</b></td> <td>@Html.TextBox("txtQuantity", @orderDetails["Quantity"])</td> </tr> <tr> <td colspan="2"> <input id="btnUpdate" value="Update" style="width: 50%;" type="submit"> </td> </tr> </table> } </fieldset> } </fieldset> </div> }
-
Add action method in
OrderControllerto update order details information.[HttpPost] public ActionResult UpdateModel_OrderDetails(string txtOrderID, string txtProductID, string txtDiscount, string txtUnitPrice, string txtQuantity) { // Modify the Model value by input value OrderReturnValue retValue = new OrderReturnValue(); retValue.OrderDetails = (System.Data.DataTable)Session["OrderDetails"]; System.Data.DataRow row = retValue.OrderDetails.Select("OrderID='" + txtOrderID + "' AND ProductID ='" + txtProductID + "'").FirstOrDefault(); row["Discount"] = Convert.ToSingle(txtDiscount); row["UnitPrice"] = Convert.ToDecimal(txtUnitPrice); row["Quantity"] = Convert.ToInt16(txtQuantity); // Restore the record of Order table from Session and store in Model retValue.Orders = (System.Data.DataTable)Session["Orders"]; retValue.OrderID = Convert.ToInt32(txtOrderID); // Displays view return View("Order", retValue); }
*Note: *
This method updates the values stored in Model class, that is, this method does not update database value. The method to update database will be created later. -
Create action method to update order summary information in
OrderController.[HttpPost] public ActionResult UpdateModel_OrderSummary(string txtOrderID, string txtCustomerID, string txtEmployeeID, string txtOrderDate, string txtRequiredDate,string txtShippedDate, string txtShipVia, string txtFreight, string txtShipName, string txtShipAddress, string txtShipCity, string txtShipRegion, string txtShipPostalCode, string txtShipCountry) { OrderReturnValue retValue = new OrderReturnValue(); if (txtCustomerID != null) { // Modify the Model value by input value retValue.Orders = (DataTable)Session["Orders"]; DataRow rows = retValue.Orders.Select("OrderID='" + txtOrderID + "'").FirstOrDefault(); rows["OrderDate"] = txtOrderDate; rows["RequiredDate"] = txtRequiredDate; rows["ShippedDate"] = txtShippedDate; rows["ShipVia"] = txtShipVia; rows["Freight"] = txtFreight; rows["ShipName"] = txtShipName; rows["ShipAddress"] = txtShipAddress; rows["ShipCity"] = txtShipCity; rows["ShipRegion"] = txtShipRegion; rows["ShipPostalCode"] = txtShipPostalCode; rows["ShipCountry"] = txtShipCountry; // Restore the record of Order Details table from Session and store in Model retValue.OrderDetails = (DataTable)Session["OrderDetails"]; retValue.OrderID = 0; } else { // Restore the order information from Session and store in Model retValue.Orders = (DataTable)Session["Orders"]; retValue.OrderDetails = (DataTable)Session["OrderDetails"]; } // Displays view return View("Order", retValue); }
*Note: *
This method also updates the values stored in Model class, that is, this method does not update database value. -
Create action method to reflect the updated data in
UpdateModel_OrderDetailsmethod andUpdateModel_OrderSummarymethod in database.[HttpPost] public ActionResult UpdateDatabase() { // Get the order information that includes modifications from Session DataTable orderTable = (DataTable)Session["Orders"]; DataTable orderDetailTable = (DataTable)Session["OrderDetails"]; // Define the parameters to be passed to Model (Business logic class) OrderParameterValue param = new OrderParameterValue( this.RouteData.Values["controller"].ToString(), this.RouteData.Values["action"].ToString(), "UpdateOrder", "SQL", new MyUserInfo("user01", this.Request.ServerVariables["REMOTE_ADDR"])); param.Orders = orderTable; param.OrderDetails = orderDetailTable; // Execute Model (Business logic class) method OrdersLogic logic = new OrdersLogic(); OrderReturnValue retValue = (OrderReturnValue)logic.DoBusinessLogic(param); // Accept the changes of Model orderTable.AcceptChanges(); orderDetailTable.AcceptChanges(); // Display view retValue.Orders = orderTable; retValue.OrderDetails = orderDetailTable; return View("Order", retValue); }
Define uniform appearance of view in the application by using CSS file.
-
Open
Content\Site.csswith Visual Studio. -
Add the following style to
Site.css./* Styles for basic forms -----------------------------------------------------------*/ fieldset { border: 1px solid #ddd; padding: 0 1.4em 1.4em 1.4em; margin: 0 0 1.5em 0; width: 75%; border:1px solid green; -webkit-border-radius: 10px; -moz-border-radius: 10px; border-radius: 10px; } legend { font-weight: bold; display: block; margin-left: 3px; padding-top: 2px; text-shadow: 2px 2px 3px rgba(150, 150, 150, 0.75); font-family: Verdana, Geneva, sans-serif; font-size: 1.2em; } textarea { min-height: 75px; } .editor-label { margin: 1em 0 0 0; } .editor-field { margin: 0.5em 0 0 0; } /* Styles for validation helpers -----------------------------------------------------------*/ .field-validation-error { color: #f00; } .field-validation-valid { display: none; } .input-validation-error { border: 1px solid #f00; background-color: #fee; } .validation-summary-errors { font-weight: bold; color: #f00; } .validation-summary-valid { display: none; } h1, h2, h3 { text-align: justify } .webGrid { margin: 4px; border-collapse: collapse; width: 500px; background-color: #FCFCFC; } .header { background-color: #C1D4E6; font-weight: bold; color: #FFF; } .webGrid th, .webGrid td { border: 1px solid #C0C0C0; padding: 5px; } .alt { background-color: #E4E9F5; color: #000; } .gridHead a:hover { text-decoration: underline; } .description { width: auto; }
-
In the Solution Explorer, open
web.config. (notViews\web.config) -
Check
connectionStringssection, and confirm that the connection string is correct.<connectionStrings> <!-- SQL Server / SQL Client用 --> <add name="ConnectionString_SQL" connectionString="Data Source=localhost\sqlexpress;Initial Catalog=Northwind;Integrated Security=True;"/> </connectionStrings>
-
Run
services.mscin the Search programs and files box on the start menu.
-
In Services window, right-click ASP.NET state service and select Start.

-
Confirm that the status of ASP.NET state services has been changed to Started.

-
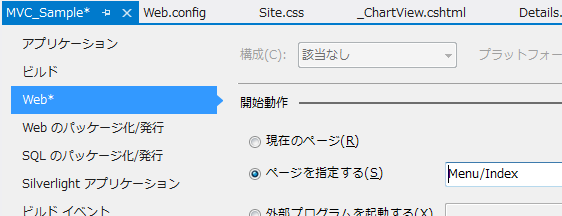
In Solution Explorer, right-click
MVC_Sampleproject and click Properties. -
In MVC_Sample property window, select Web and set start action as follows:
- Start Action: Spacific Page
- Page: Menu/Index
-
Debug the sample application with Visual Studio.
-
Confirm that menu screen is displayed and click Go to Order List Page.

-
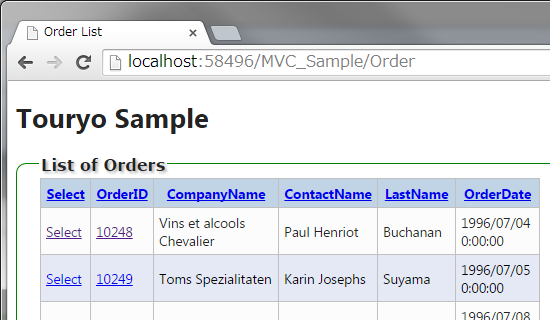
Confirm that orders are displayed and click Select in any row.
-
Confirm that order summary information, that has selected order id, is displayed and click Details.

-
Confirm that order details information is displyaed.

-
Click the link in OrderId column in order summary information.

-
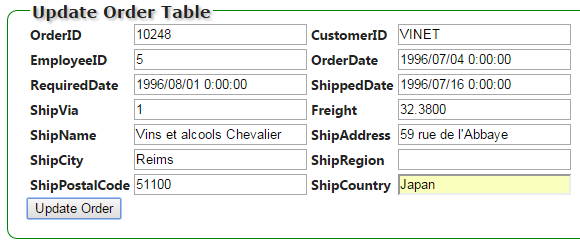
Confirm that edit view of order summary information is displayed and edit values. Here, OrderID, EmployeeID, CustomerID are read-only. When finishing editing, click Update Order.
-
Similarly, click the link in OrderId column in order details information and display edit view. Edit value and click Update.

-
Click Update to Database and reflect the changes in database.

-
Open log file -
C:\root\files\resource\Log\ACCESS.yyyy-mm-dd.log(where, yyyy-mm-dd is executed date) in Notepad. -
Confirm that the access to
OrderandOrderDetailsis logged.[2014/09/09 14:54:06,366],[INFO ],[158],,user01,255.255.254.254,----->>,Order,Load_page,GetOrders, [2014/09/09 14:54:08,332],[INFO ],[158],,user01,255.255.254.254,<<-----,Order,Load_page,GetOrders,,1932,94 [2014/09/09 14:54:16,428],[INFO ],[165],,user01,255.255.254.254,----->>,OrderDetails,,GetOrderById, [2014/09/09 14:54:16,697],[INFO ],[165],,user01,255.255.254.254,<<-----,OrderDetails,,GetOrderById,,269,31 [2014/09/09 14:54:48,683],[INFO ],[158],,user01,255.255.254.254,----->>,Update Screen,btnUpdate,UpdateOrder, [2014/09/09 14:54:49,093],[INFO ],[158],,user01,255.255.254.254,<<-----,Update Screen,btnUpdate,UpdateOrder,,410,31
-
Open log file -
C:\root\files\resource\Log\SQLTRACE.yyyy-mm-dd.log(where, yyyy-mm-dd is executed date) in Notepad. -
Confirm the executed SQL text for Orders and OrderDetails table with the following SQL trace log.
[2014/09/09 15:02:18,263],[INFO ],[6],144,31,[commandText]:SELECT Orders.OrderID, Customers.CompanyName, Customers.ContactName, Employees.LastName As EmployeeLastName, Employees.FirstName As EmployeeFirstName, Orders.OrderDate FROM Orders INNER JOIN Customers ON Orders.CustomerID = Customers.CustomerID INNER JOIN Employees ON Orders.EmployeeID = Employees.EmployeeID    [commandParameter]:
[2014/09/09 15:02:20,323],[INFO ],[5],15,0,[commandText]: -- DaoOrders_D2_Select -- 2014/8/21 日立 太郎 SELECT [OrderID], [CustomerID], [EmployeeID], [OrderDate], [RequiredDate], [ShippedDate], [ShipVia], [Freight], [ShipName], [ShipAddress], [ShipCity], [ShipRegion], [ShipPostalCode], [ShipCountry] FROM [Orders] WHERE [OrderID] = @OrderID    [commandParameter]:OrderID=10248,
[2014/09/09 15:02:20,378],[INFO ],[5],11,0,[commandText]: -- DaoOrder_Details_D2_Select -- 2014/8/21 日立 太郎 SELECT [OrderID], [ProductID], [UnitPrice], [Quantity], [Discount] FROM [Order Details] WHERE [OrderID] = @OrderID    [commandParameter]:OrderID=10248,