Accessing IO Peripherals from Swift
The Raspberry Pi has a number of useful attached peripherals documented in the BCM2835 ARM Peripherals datasheet available from the Raspberry Pi website.
While reasonable quality as far as datasheets go, there are still a number of errors and missing details. The eLinux group maintain a BCM2835 datasheet errata that covers many of them.
Finally the datasheets that are available are for the original Raspberry Pi 1, so there are some differences for the newer BCM2836-based Pi 2 and BCM2837-based Pi 3.
I/O Peripherals are accessed by reading from and reading from specific memory addresses that are mapped onto the hardware. We can access these from a user-space program through the special /dev/mem device, but we need to know the addresses to use.
The datasheet covers this in p4–7, however is quite complicated since it covers bus, virtual, physical, kernel, etc. address spaces. The relevant information is as follows:
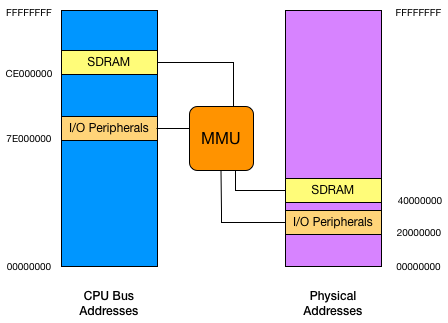
- The datasheet uses the I/O Peripherals bus address of 7E000000.
- The Memory Management Unit maps these to a physical address of 20000000.
When we access through /dev/mem we use the physical address, but when we read the datasheet—and when we provide addresses to hardware, e.g. the DMA engine—we use the bus address.
That's sadly not quite the complete story. As mentioned above, this datasheet is for the first generation Raspberry Pi, later generations actually use different memory mappings. Fortunately the system publishes this information in its "device tree" and we can read it from user-space.
Here's the contents of that file on a Raspberry Pi 3B:
$ od --endian=big -t x4 /proc/device-tree/soc/ranges
0000000 7e000000 3f000000 01000000 40000000
0000020 40000000 00040000
0000030
This tells us that the bus address 7E000000, which we know to be the I/O Peripherals address, is mapped to 3F000000 on this sytem, not 20000000 as documented; the 01000000 is the size of this mapping, and the next three values are the mapping of the SDRAM block.
If we know that we're only ever going to run on a current (or older) generation Raspberry Pi, we can just hardcode these values in our Swift source:
let peripheralBaseAddress = 0x3f000000
let peripheralSize = 0x01000000
If we'd rather obtain it programatically, we can read this file and extract the values:
import Foundation

let bcm2835BaseAddress = 0x20000000
let bcm2835Size = 0x01000000

let socRangesPath = "/proc/device-tree/soc/ranges"

let peripheralAddressBase: Int
let peripheralSize: Int
if let ranges = try? Data(contentsOf: URL(fileURLWithPath: socRangesPath)) {
    (peripheralAddressBase, peripheralSize) = ranges.withUnsafeBytes {
        (bytes: UnsafePointer<Int>) -> (Int, Int) in
        return (bytes.advanced(by: 1).pointee.byteSwapped,
                bytes.advanced(by: 2).pointee.byteSwapped)
    }
} else {
    peripheralAddressBase = bcm2835AddressBase
    peripheralSize = bcm2835Size
}
The majority of this code is covered in a larger document on Swift pointers, but a key point to note is the use of .byteSwapped in the values we read from this file. Linux always writes this file in "big endian" format, while the ARM in the Raspberry Pi is almost certainly in a "little endian" mode.
Now that we know where in physical memory the I/O Peripherals can be accessed, and the amount of memory allocated to them, we can map this into our own program's address space using a few system calls.
import Glibc

let memFd = open("/dev/mem", O_RDWR | O_SYNC)
guard memFd >= 0 else { fatalError("Couldn't open /dev/mem") }
defer { close(memFd) }

guard let peripherals = mmap(nil, peripheralSize, PROT_READ | PROT_WRITE, MAP_SHARED, memFd, off_t(peripheralAddressBase)),
      peripherals != MAP_FAILED else { fatalError("Couldn't mmap peripherals") }
Note that we don't use Data(contentsOf) for this, that would certainly open the device and read the data from it, but it would make a copy as it did so. Reads would come from the copy, and writes would also go to the copy. We want the reads to come from the actual hardware, and likewise the writes to go to the hardware as well. This is why we use the lower-level mmap approach.
If you were to examine the peripherals in a debugger, you'd notice that it's neither the bus address 0x7E000000, or the physical address 0x20000000, but another value unique to our program. That's okay, the MMU handles the translation to the real hardware addresses for us.
To read to and write from the hardware using this map, we need to learn about Swift Pointers.
While there's nothing wrong with mapping the entire I/O Peripheral space like this, in general we'll use discreet maps for each individual peripheral register block. While each is slightly different in size, they each conveniently fit into a single 4K page of memory—and mmap rounds all size values passed to it as multiples of this anyway.
For example if I wanted to use the GPIO peripheral, I would check the datasheet for the address of those registers. It's given on p90 as 0x7E200000, subtracting the peripheral base address of 0x7E000000 gives us an offset of 0x200000.
The same offset works from the physical address base for our platform, so we can use that to map just the GPIO registers:
let peripheralBlockSize = 0x1000

let gpioRegistersOffset = 0x20000

guard let gpioRegisters = mmap(nil, peripheralBlockSize, PROT_READ | PROT_WRITE, MAP_SHARED, memFd, off_t(peripheralAddressBase + gpioRegistersOffset)),
      gpioRegisters != MAP_FAILED else { fatalError("Couldn't mmap GPIO registers") }
To access a specific register, we offset the base pointer for the registers we just mapped, offset it by the number of bytes—since this is a generic raw pointer—and then bind it to the type of the register—generally Int. This is covered in more detail in the coverage of Swift Pointers and Integer Types.
If you're like me, you probably like to edit your Swift code in Xcode on a Mac before copying it over to the Raspberry Pi for compilation. The live-compilation and error checking are invaluable while writing software.
For the most part, since they're both based on UNIX, Linux and macOS share the same low-level system APIs. There are a few minor differences which would be flagged by Xcode as errors.
The first is simply that import Glibc doesn't work on macOS, that is the name of the Linux platform library. The name of the equivalent on macOS is Darwin.
You may also encounter issues where constants or even functions might not exist in Darwin that we use on Linux. The O_SYNC flag to open() is a good example above, it's a Linux-specific flag.
Fortunately since we don't ever intended to run the code on Darwin, defining these constants as zero or placing empty function definitions, works just fine.
Conversely sometimes there are missing definitions from the Linux headers that we might need, for example the MAP_FAILED constant we use above.
We can work around all of these errors very trivially by using platform-specific code branches in Swift:
#if os(Linux)
import Glibc

fileprivate let MAP_FAILED = UnsafeMutableRawPointer(bitPattern: -1)! as UnsafeMutableRawPointer!
#else
import Darwin

fileprivate let O_SYNC = 0
#endif