General
Home > General
When you open the editor, you will see this screen:
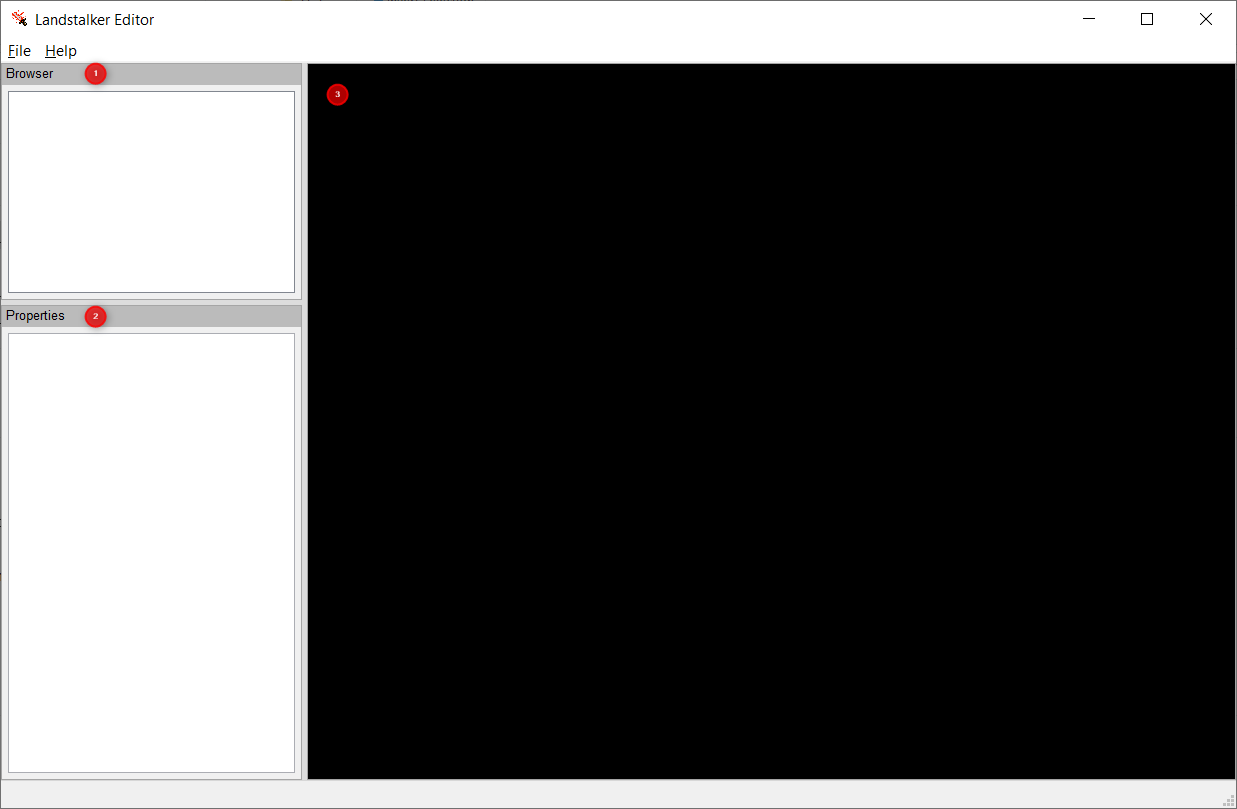
The screen is divided into three sections:
- Browser - this is where you can open the individual assets.
- Properties - this is where you can adjust the properties of assets - e.g. the palette that should be used.
- Editor pane - this is main area where editing takes place
The File menu contains many options for managing files:
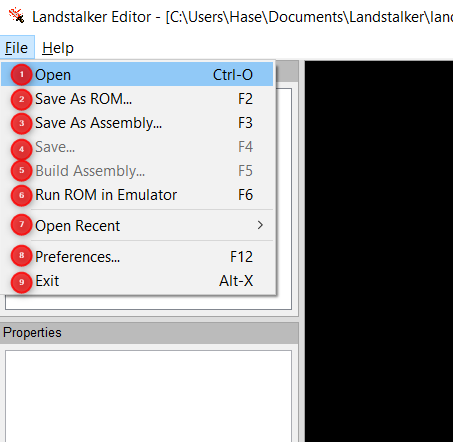
Here is an explanation of each menu item:
Shortcut: Ctrl+O
This will allow the user to open a ROM or Assembly file for editing.
A .bin or .md file can be selected. All six major ROM releases are supported.
This is suitable for exploring the content of a ROM, or for creating simple ROM hacks. For more complex ROM hacks, it is recommended to use Assembly, as this allows for variable-length content (see Opening a Disassembly)
Note: ROMs built from Assembly can not be opened directly. This is because it is not possible for the editor to know the locations of the various game assets.
Please note: SMD format ROMs are not supported at present. Please obtain a BIN or MD format ROM, or use a third-party conversion tool to convert your SMD format ROM to a BIN format ROM.
A .asm file can be opened. This will need to be derived from either the main landstalker_us.asm or landstalker_us_expanded.asm files from the "landstalker_disasm" repository. The editor will automatically locate and open all related assembly files and assets for editing.
Editing a disassembly has a number of advantages over editing a ROM, as the size constraints are much looser. Using an assembly file has the secondary advantage that it is possible to modify the assembly source, allowing for more advanced ROM hacks than is possible from using the editor alone.
Shortcut: F2
Selecting this option will write out a ROM file with the requested modifications.
A popup window will open, showing the output of the ROM patching operation:
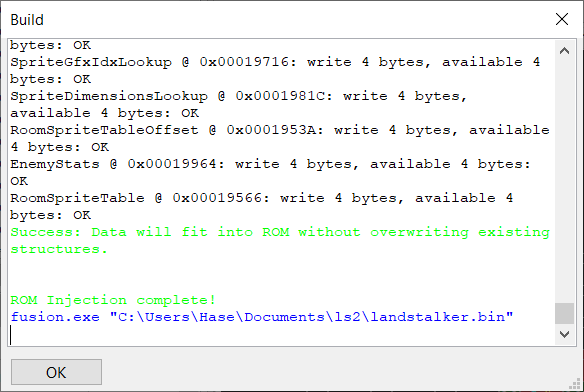
If the save operation is unsuccessful, this is most likely a result of at least one of the assets exceeding the available space in the ROM. Either reduce the size of the asset, or save as an Assembly.
Note: If an Assembly file is being edited, and this option is selected, then you will first be prompted to open a source ROM. This ROM needs to match the region and version of the Assembly that is being edited. Currently, there is only a disassembly for the US version of the game, so this version of the ROM will need to be selected. If the wrong version is opened, then the game is likely to crash.
Shortcut: F3
This will save the current assembly and (if enabled) automatically build and run the assembled ROM. The build step is described in Building A Disassembly.
If a ROM file has been opened, then you will be prompted to select a directory to write the assembly files to. This can either be a blank directory, or a previous assembly. If a blank directory is selected, then the assembly sources will automatically be downloaded from GitHub (this option can be disabled in the Preferences window).
Note: The disassembly will need to match the version of the ROM being edited. Currently, there is only a disassembly available for the US version of the ROM. Attempting to save a ROM to the incorrect version of the disassembly will result in a glitched ROM that is likely not to work correctly.
Shortcut: F4
This option simply repeats the last "Save As" operation, overwriting the previously saved files.
Shortcut: F5
This saves all assets and runs the assembly build process. The output from the build is shown below:
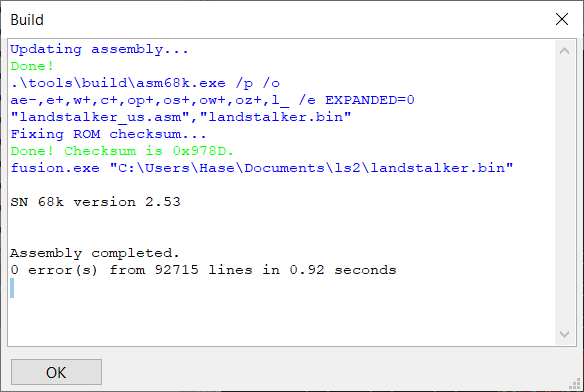
The output ROM is written to the specified file and the checksum is recalculated.
If any warnings or errors are displayed, then these will need to be fixed before the ROM will be generated. Errors are most likely due to the size of the assets exceeding the available space in the ROM. As such, an expanded version of the ROM can be built, with an additional 2MB of extra space. This version can be specified in the Preferences dialog.
Shortcut: F6
This will launch the emulator specified in the Preferences dialog, with the last saved ROM.
This lists the last 10 files that have been opened. The file can be re-opened by clicking on the menu option.
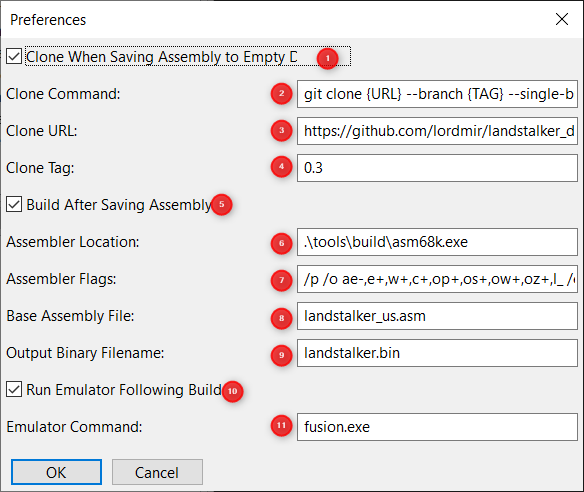
This menu item opens a dialog, allowing various build preferences to be specified.
-
Clone When Saving Assembly to Empty Directory - If ticked, the disassembly repository will automatically be cloned if an empty directory is selected when saving an assembly. Note that this requires git to be installed on the system.
-
Clone Command - the command to be run to clone the disassembly. The special values
{URL}and{TAG}can be used to represent the URL and tag, respectively. Defaults to:
git clone {URL} --branch {TAG} --single-branch
-
Clone URL - The URL to clone. Defaults to https://github.com/lordmir/landstalker_disasm
-
Clone Tag - The version tag to clone. It is recommended to set this to the current version of the disassembly.
-
Build After Saving Assembly - If ticked, the assembly sources will automatically be built on each save.
-
Assembler Location - the location of the
asm68k.exeassembler. Defaults to.\tools\build\asm68k.exe. Note, on Linux platforms, this will need to be run via the Wine emulator, as there is no suitable Linux version of this tool available. -
Assembler Flags - The flags to be passed to the assembler. Defaults to:
/p /o ae-,e+,w+,c+,op+,os+,ow+,oz+,l_ /e EXPANDED=0
Note: To build an expanded ROM, these options should be changed to:
/p /o ae-,e+,w+,c+,op+,os+,ow+,oz+,l_ /e EXPANDED=1
-
Base Assembly File - The top-level assembly file. Defaults to
landstalker_us.asm. Note: To build an expanded ROM, change this option tolandstalker_us_expanded.asm. -
Output Binary Filename - the name of the assembled ROM file. Defaults to
landstalker.bin. -
Run Emulator Following Build - if ticked, automatically start the emulator and load the built ROM.
-
Emulator Comand - the command to run the emulator. Defaults to
fusion.exe. (Note - for the default to work, the location to the Kega Fusion executable will need to be in the system PATH variable.)
Shortcut: Alt-X, Alt-F4
This option closes the editor. If there are unsaved changes, you will be prompted to save them.