Rooms
Home > Rooms
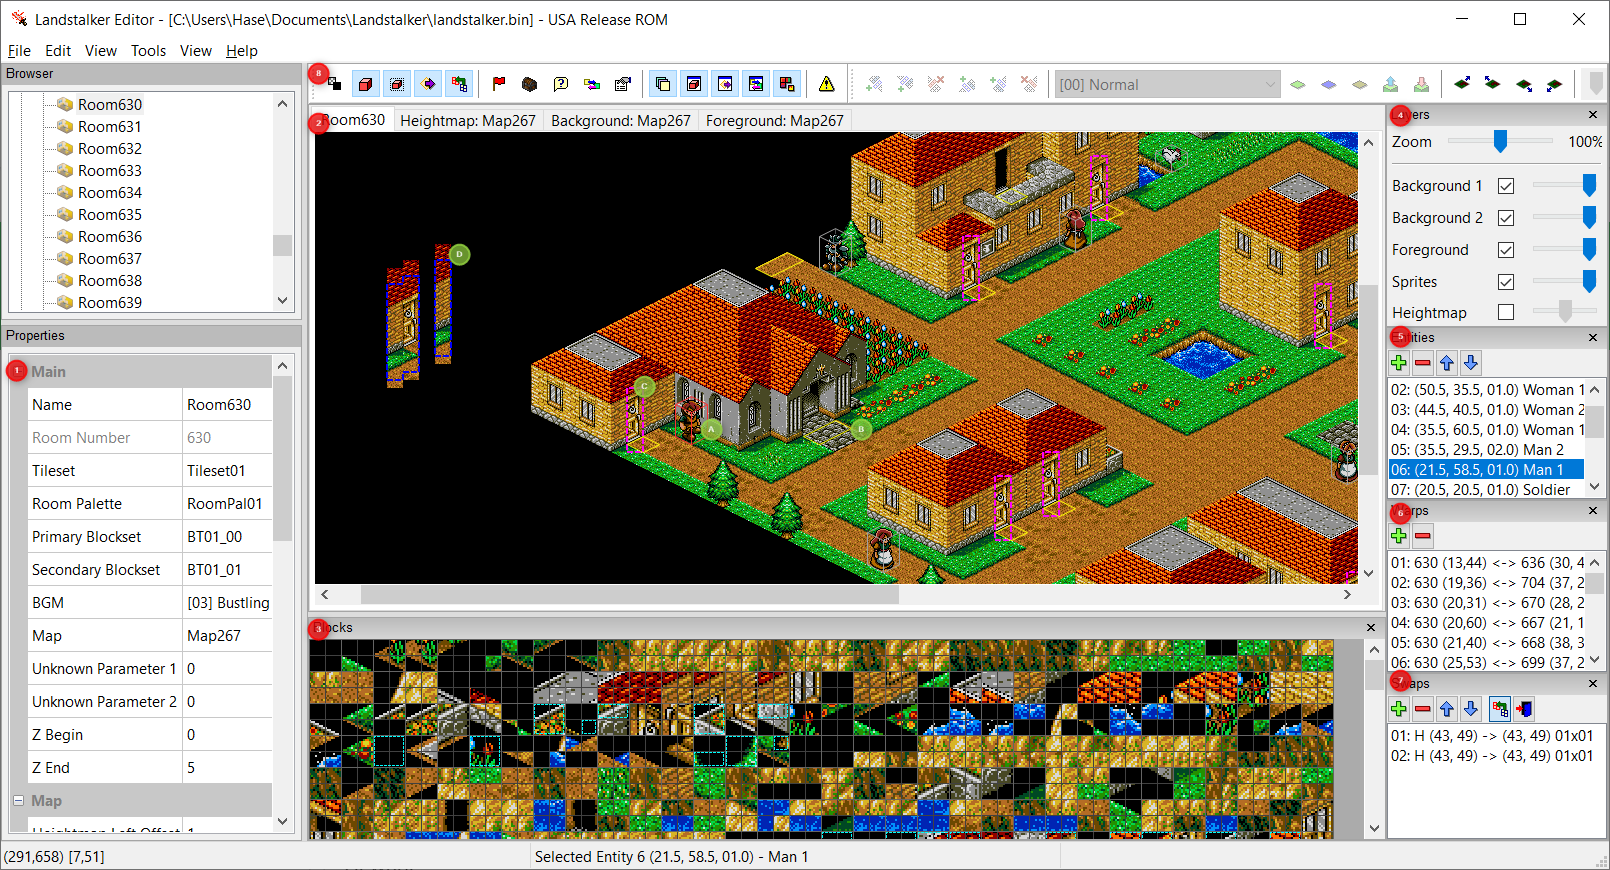
The room editor is where the individual room maps can be viewed and edited.
The following is a summary of each part of the room editor:
-
Properties - This is where the room properties can be seen and edited.
-
Editor Tabs - this is where you can switch betwen the different editor views:
- Room Editor (the default view)
- Heightmap Editor
- Tilemap Background (See 3D Map Editor)
- Tilemap Foreground (See 3D Map Editor)
Editor tabs can be re-arranged into a side-by-side view by dragging the applicable tab to the left or right of the window. This is useful if you want a side-by-side view of a map editor and a live preview:

-
Block palette - this is only used when the 3D Map Editor is active.
-
Layer properties - this allows for individual layers to be hidden or made semitransparent - see Layers.
-
Entity view - this lists all of the entities visible in the room, and provides controls for adding, removing and re-ordering entities. See Editing Entities.
-
Warp view - this lists all of the warps that are active in the room, and provides controls for adding and removing warps. See Editing Warps.
-
Tile Swap view - this lists all of the tile swaps and doors that are active in the room, and provides controls for adding and removing tile swaps and doors. See Editing Tile Swaps and Editing Doors.
-
Room Editor Toolbar - This provides a number of useful controls for editing the room. See Toolbar.
The following items can be selected in the room editor:
A. Entities: these are the moving objects (sprites) that the player interacts with. The entity properties window can be opened by double-clicking on the entity. See Editing Entities.
B. Warps: these are the floor regions that link two rooms together. Right clicking on a warp region will open up the accompanying room. See Editing Warps.
C. Doors: these are used to indicate tiles that should be used for the door open effect. When a player opens a door, the foreground cells of the marked region are cleared. The door open effect can be previewed by right clicking the region. See Editing Doors.
D. Tile Swaps: these are used to indicate tiles that should be copied from source to destination when a specific event occurs. Source regions are marked as blue, and destination regions are marked in red. The tile swap can be previewed by right clicking either region. See Editing Tile Swaps.
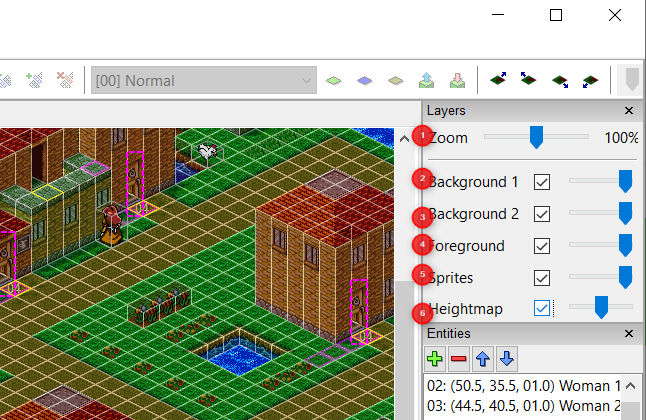
The layers pane can be used to control the visibility and opacity of individual layers. It can also be used to adjust the overall zoom level:
-
Zoom - adjusts the overall zoom level. For best performance, leave this set to 100%.
-
Background 1 - These control the visibility and opacity of the first background layer. This is the layer that can be edited in the Background tab.
-
Background 2 - These control the visibility and opacity of the second background layer (i.e. the background elements in the foreground tilemap). This comprises all blocks in the Foreground tab that do not have the priority bit set.
-
Foreground - These control the visibility and opacity of the foreground layer (i.e. the foreground elements in the foreground tilemap). This comprises all blocks in the Foreground tab that have the priority bit set.
-
Sprites - This controls the opacity and visibility of all entities.
-
Heightmap - This shows a 3D overlay of the heightmap, showing the height of each cell. The colours of each cell have a specific meaning:
- Green: Can be freely travelled on by the player and NPCs.
- Blue: Can be freely travelled on by the player, however, NPCs and enemies cannot travel over these cells.
- Purple: Same as blue. Signifies locked doors.
- Red: Cells are blocked for the player as well as NPCs.
- Yellow: Used to mark predefined tracks for rafts.
The height of each cell is also used by the game to calculate the depth perception effect - i.e. it is used to determine whether an entity should be placed in front of or behind the foreground layer.
Cells containing a number have a special effect. These numbers are discussed in more detail in the Heightmap section.

- Toggle Alpha Transparency - toggles between black and grey/white checkerboard for showing transparent regions.
- Toggle Entities - toggles the visibility of all entities.
- Toggle Entity Hitboxes - toggles the visibility of all entity hitboxes (with the exception of the selected entity).
- Toggle Warps - toggles the visibility of all warps.
- Toggle Tile Swaps - toggles the visibility of all tile swaps and doors.
- Open Flag Editor - opens the flag editor. See the Flag Editor section.
- Open Chest Editor - opens the chest editor. See the Chest Editor section.
- Open Dialogue Editor - opens the dialogue editor. See the Dialogue Editor section.
- Open Tile Swap Editor - opens the tile swap editor. See the Tile Swap Editing and Door Editing sections.
- Open Selection Properties - opens the properties window for the currenty selected element. See the Entity Properties, Warp Properties, Tile Swap Properties and Door Properties sections.
- Toggle Layers Pane - Toggles the visibility of the Layers pane.
- Toggle Entities Pane - Toggles the visibility of the Entities pane.
- Toggle Warps Pane - Toggles the visibility of the Warps pane.
- Toggle Tile Swap Pane - Toggles the visibility of the Tile Swaps pane.
- Toggle Block Palette - Toggles the visibility of the block palette.
- Show Errors Window - Shows the Errors dialog box.
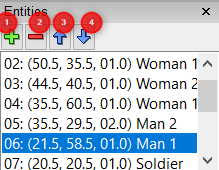
The Entities pane shows all entities that belong to this room. Each line of the list has the following format: Index: (X, Y, Z) Entity Type.
You can select an entity by scrolling through the list and clicking on the appropriate line. Double clicking brings up the Entity Properties window.
The buttons have the following actions:
- Add new entity.
- Delete selected entity.
- Move selected entity up list.
- Move selected entity down list.
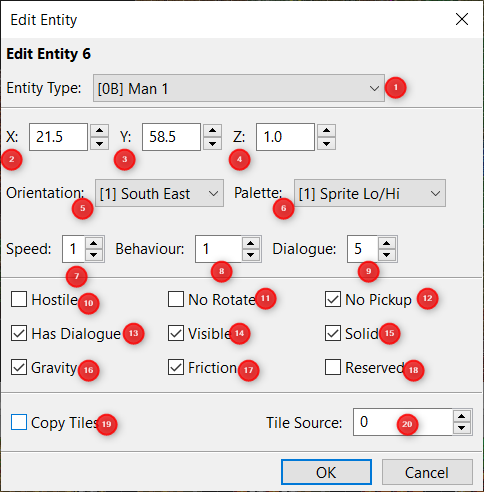
This is the Entity Properties window, it is opened by:
- Double clicking on an entity in the room view.
- Double clicking on an entity description in the Entities pane.
- Selecting an Entity and clicking the Open Properties toolbar button.
The following properties can be changed:
-
Entity Type: The type of the entity.
-
X: The X position of the entity (i.e. the position along the SW/NE axis).
-
Y: The Y position of the entity (i.e. the position along the SE/NW axis).
-
Z: The Z position of the entity (i.e. how high the entity is above the ground).
-
Orientation: The direction that the entity should face. Note that not all entity types support this option.
-
Palette: The palette to use. There are two built-in options: Player and Room. If the other palette options are selected, then the game will attempt to load the appropriate palette for that entity into the selected palette slot. This has the potential to cause a "Palette Clash" - this will show up in the Errors subscreen if this is the case.
-
Speed: How fast the entity moves. Speed 0 is a special value, a speed of 0 means that the entity is fixed in place and will not move from its starting location.
-
Behaviour: The behaviour of the entity. These act as simple scripts that control the entity.
Sample values:
Behaviour Value Description 0 Do nothing 1 Random walk (used for NPCs) 2 Shop item (used for items in shops) 4 Change direction on collision (used for NPC animals) 905 Rebound from walls There are 1023 possible behaviours, they can be discovered by looking at entities in existing rooms.
Note that Enemy AI is handled separately from the behaviour, enemies should usually have a behaviour value of 0.
-
Dialogue: This selects the character ID that should be used when talking with this entity. Each value represents a character slot in the Room Character Table.
-
Hostile: Ticked if the entity should be hostile. This makes the player take damage if he collides with the entity, and makes the entity take damage if the player attacks it. It also enables the enemy AI, if it exists for the selected entity type.
-
No Rotate: If ticked, the entity will not rotate, and stay facing the initially configured direction.
-
No Pickup: If ticked, the player will be prevented from picking up the entity.
-
Has Dialogue: If ticked, the player will be able to talk to the entity.
-
Visible: If unticked, the object will be invisible and the player / other entities will be able to pass through its hitbox.
-
Solid: If unticked, the player and other entities will be able to pass through this entities' hitbox.
-
Gravity: If unticked, then the entity will be frozen in the air and will not fall to the ground.
-
Friction: If ticked, then the entity will also move any entities that are on top of it. If unticked, then any entities resting on top of the entity will slide off.
-
Reserved: A spare value not used in the game.
-
Copy Tiles: If ticked, an optimisation is enabled where the entity graphics are duplicated from another entity. This can save a considerable amount of graphics memory on the console. This setting is best used for entities that the player can't interact with and do not have any special animations.
-
Tile Source: If Copy Tiles is enabled, then this indicates the Entity ID that should be used as the source copy location for the graphics.
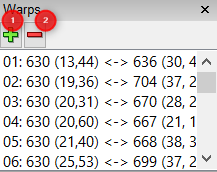
The warp editor lists all the warps in the room. Each line of the list has the following format: Index: <Source Room ID> (<Src X>, <Src Y>) <-> <Destination Room ID> (<Dest X>, <Dest Y>).
You can select a warp by scrolling through the list and clicking on the appropriate line. Double clicking brings up the Warp Properties window. Left clicking on a warp will also select it.
A warp can be traversed by right clicking on it. This will open up the accompanying room in the room editor. The game maps can be navigated in this manner.
Note that warps are always bidirectional. It is not possible to create a one-way warp. You can simulate a one-way warp by not adding the warp to the destination's heightmap.
The selected warp can be deleted by clicking the Delete Warp button (2) or by pressing Shift+Delete. Note: if the warp is no longer required, then it should also be removed from the heightmap.
A warp can be added by clicking the Add Warp button (1) or Shift+Insert. Before the warp can be modified, a destination room will need to be set.
There are two ways to do this:
- Open the destination room in the Browser. Insert a new warp into this room. A link between the two warps will automatically be created.
- Open the warp properties window by double clicking on the warp. Select the destination room from the dropdown box.
Once the destination room has been set, the warp can be moved around using the cursor keys or the properties window.
Note: the warp will also need to be added to the heightmap before it will become active.
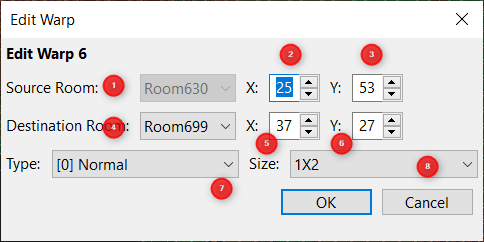
This is the Warp Properties window, it is opened by:
- Double clicking on a warp in the room view.
- Double clicking on an warp description in the Warps pane.
- Selecting a warp and clicking the Open Properties toolbar button.
- Source Room: The current room. This cannot be edited. To change this setting, open up the Destination Room in the room editor and alter the Destination Room value for the applicable warp.
- Source X: The position of the warp in the source room along the X axis (i.e. the position along the SW/NE axis).
- Source Y: The position of the warp in the source room along the Y axis (i.e. the position along the SE/NW axis).
- Destination Room: The destination room for the warp. This can be the same room as the source.
- Destination X: The position of the warp in the destination room along the X axis (i.e. the position along the SW/NE axis).
- Destination Y: The position of the warp in the destination room along the Y axis (i.e. the position along the SE/NW axis).
-
Type: One of
Normal,Stairs SEorStairs SW. A warp should be set toNormalunless it is at the top of a flight of stairs. In this case, the warp type should be set toStairs SEorStairs SWdepending on the orientation of the staircase. TheUnknownvalue isn't used in-game and has unknown effects. - Size The size of the warp, in X-units by Y-units. A warp can be up to three cells in length. Larger warps can be synthesised by using multiple smaller warps.

Tile swaps are used to dynamically modify the tilemap on a specific game event - e.g. a switch being activated or a locked door being unlocked. A block of tiles is copied from the Source Location to the Destination Location. A block of heightmap cells is also copied from an independent Source Location to a separate Destination location on the heightmap.
Tile swaps can be edited through the tilemap and heightmap subviews. However, it is still possible to interract with them through the room view. A tileswap can be selected by clicking on it, or by selecting it in the Swaps pane - a tile swap source is shown in blue, and a tile swap destination is shown in red. A tile swap can be previewed by right clicking on the dashed region. A solid outline indicates that a tile swap is currently being previewed.
The preview can be reset by right clicking on the tile swap. This reverts the border back to a dashed outline.
The buttons have the following effects:
- Add tile swap / door: Adds a new tileswap or door, depending on whether the tileswap subview (5) or door subview (6) is open.
- Delete selected tileswap / door: Deletes the selected tile swap / door.
- Move tileswap up list: Moves the selected tileswap up the list of tileswaps, decrementing its tile swap index.
- Move tileswap down list: Moves the selected tileswap down the list of tileswaps, incrementing its tile swap index.
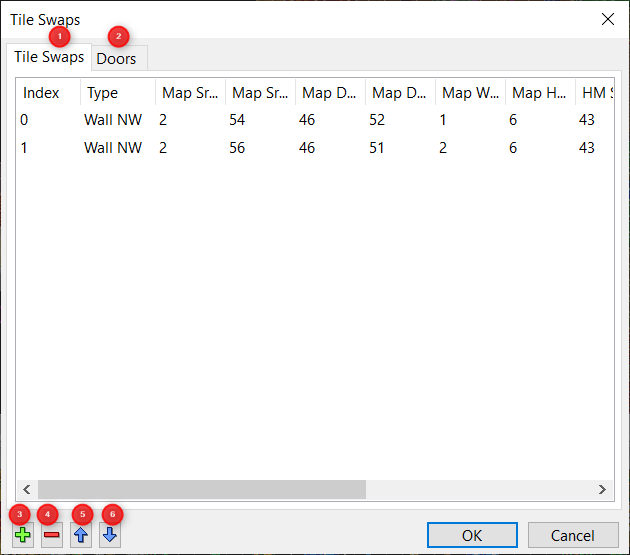
The tile swap properties window can be opened by double clicking on a tile swap or a tile swap entry in the Tile Swaps pane.
The buttons have the following effects:
- Tile Swaps tab: Opens the tile swaps list.
- Doors tab: Opens the door list. Doors are described in Editing Doors.
- Add tile swap / door: Adds a new tileswap or door, depending on whether the tileswap tab (1) or door tab (2) is open.
- Delete selected tileswap / door: Deletes the selected tile swap / door.
- Move tileswap up list: Moves the selected tileswap up the list of tileswaps, decrementing its tile swap index.
- Move tileswap down list: Moves the selected tileswap down the list of tileswaps, incrementing its tile swap index.
The following properties can be edited:
-
Type: Can be one of
Floor,Wall NWorWall NE. This determines the shape of the swap region on the tilemap. - Map Src X: The position of the source swap region on the tilemap along the X axis (i.e. the position along the SW/NE axis).
- Map Src Y: The position of the source swap region on the tilemap along the Y axis (i.e. the position along the SE/NW axis).
- Map Dst X: The position of the destination swap on the tilemap region along the X axis (i.e. the position along the SW/NE axis).
- Map Dst Y: The position of the destination swap on the tilemap region along the Y axis (i.e. the position along the SE/NW axis).
- Map Width: The width of the overall swap region on the tilemap.
- Map Height: The height of the destination swap region on the tilemap.
- Heightmap Src X: The position of the source swap region on the heightmap along the X axis (i.e. the position along the SW/NE axis).
- Heightmap Src Y: The position of the source swap region on the heightmap along the Y axis (i.e. the position along the SE/NW axis).
- Heightmap Dst X: The position of the destination swap region on the heightmap along the X axis (i.e. the position along the SW/NE axis).
- Heightmap Dst Y: The position of the destination swap region on the heightmap along the Y axis (i.e. the position along the SE/NW axis).
- Heightmap Width: The width of the overall swap region on the heightmap.
- Heightmap Height: The height of the overall swap region on the heightmap.
Certain maps contain doors that can be opened by the player or through a scripted event. Doors can be thought of as a specialised case of tile swaps.
A door can only be placed over a heightmap cell that contains one of the "Door Nudger" behaviours. When the door is activated, the foreground blocks that make up the door are cleared, giving the appearance of an open door.
Doors can be edited through the tilemap subview. However, it is still possible to interract with them through the room view. A door can be selected by clicking on it, or by selecting it in the Swaps pane - doors are always shown with a magenta outline. A door opening can be previewed by right clicking on the dashed region. A solid outline indicates that a door is currently being previewed.
The preview can be reset by right clicking on the door. This reverts the border back to a dashed outline.
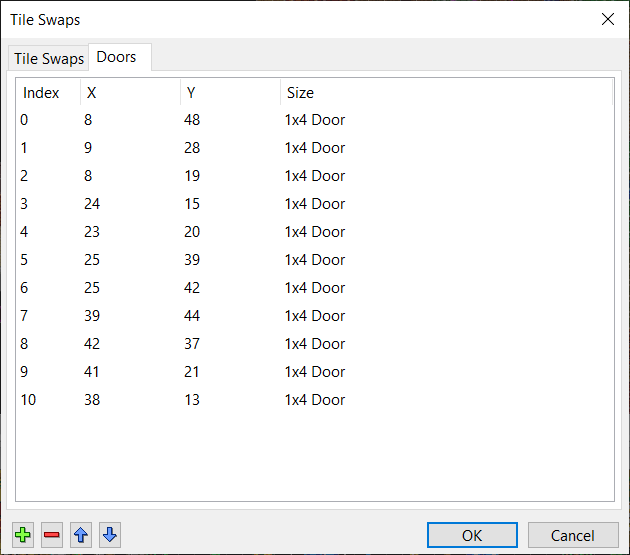
The door properties window can be opened by double clicking on a door or a door entry in the Swaps pane.
The buttons have the same effect as in the Tile Swaps Properties view.
The following properties can be edited:
- X: The position of the door region on the heightmap along the X axis (i.e. the position along the SW/NE axis).
- Y: The position of the door region on the heightmap along the Y axis (i.e. the position along the SE/NW axis).
-
Size: The size of the door. Can be one of
1x4,2x4or2x5. This determines the shape of the door region on the tilemap.
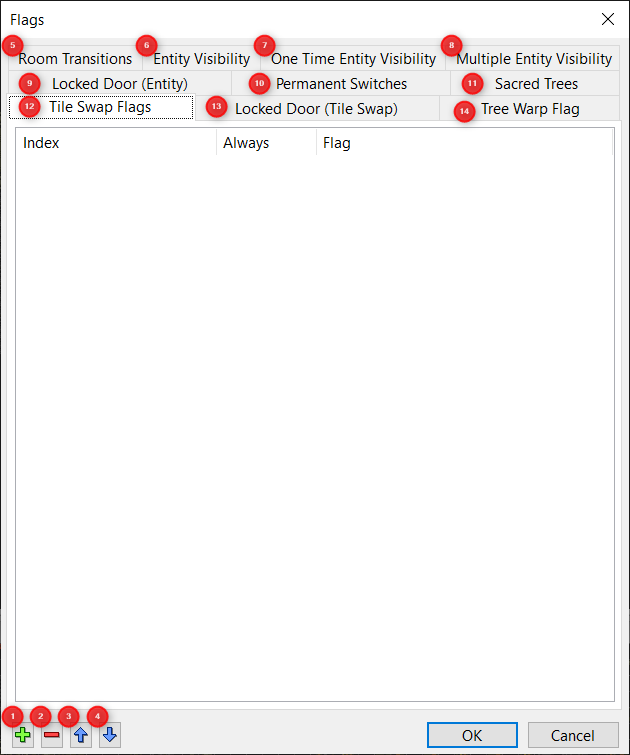
The flags dialog can be opened through the toolbar or by selecting "Flags..." from the "Edit" menu.
There are multiple tabs for all of the different flag types used by the room. Flags are checked each time the room is entered. They are not checked whilst the player is in the room. These flags are explained in detail below.
Flags can be modified by using the buttons in the bottom left:
- A new flag condition can be added by clicking on the "+" button.
- A flag condition can be deleted by clicking on the "-" button.
- When appropriate, a flag condition can be moved up the list by pressing the Up Arrow button.
- When appropriate, a flag condition can be moved down the list by pressing the Down Arrow button.
A flag condition can be modified by slowly double clicking the applicable cell, or by selecting the cell and pressing
Enter.
The following flags can be modified:
- Room Transitions - This is the most basic and flexible flag check. If the specified flag is set, then the player is automatically warped to the specified room. This is useful - e.g. for rooms that have complex tilemap changes (e.g. the Thieves Hideout) or for rooms that have different entity layouts at different stages in the game (e.g. Castle Mercator). Note that warps are preserved from the original room.
- Entity Visibility - This hides a single entity depending on the value of a flag. The entity can be hidden if the flag is set or cleared, depending on the value of the "Hide Entity When" column.
- One Time Entity Visibility - This is similar to the Entity Visibility flag check, except that there are two flag operations. The entity is hidden until the first flag check (Show Flag) is satisfied, and is hidden again when the second flag check (Hide Flag) is satisfied. This gives the effect of only displaying a entity for a fixed period of time. As with Entity Visibility flag conditions, the show and hide operations can be triggered if the flag is set or cleared, depending on the value of the When column.
- Multiple Entity Visibility - This hides multiple entities when the specified flag is set. When the flag is set, all entities with an index greater than or equal to the Start Entity index are hidden when the room is loaded. This is mostly used to permanently remove enemies from a room once it has been cleared. Note that this operation is only triggered on a flag set condition.
- Locked Door (Entity) - This hides the specified "Locked Door" entity once it has been opened with a key. Note that the locked door entity should have the highest index in the room, as all entities with an index above this will be hidden as well.
- Permanent Switches - This sets the specified switch entity as "active" on room load if the specified flag is set.
- Sacred Trees - This tab is used to assign a flag to each sacred tree in the room. The flag is set when the tree is cut down, and if the flag is set on room load then the tree is automatically hidden.
- Tile Swap Flags - Flag conditions on this tab are used to automatically apply a tile swap on entering a room. If the Always box is ticked, then the tile swap is always applied when the room is loaded. Otherwise, the tile swap is applied when the specified flag is set. The Index column needs to match the index of the required tile swap. This is used for certain tile swap effects, like droppable vines.
- Locked Door (Tile Swap) - These are used to check whether a "Tile Swap" locked door has been opened. If the Always box is ticked, then the tile swap is always applied when the room is loaded. Otherwise, the tile swap is applied when the specified flag is set, i.e. when the door is opened with the key. The Index column needs to match the index of the required tile swap.
- Tree Warp Flag - These flags are used to check if a tree warp should be active. The Room 1 and Room 2 parameters should be set to the first and second linked trees. If the flag is active, then the tree link is enabled.
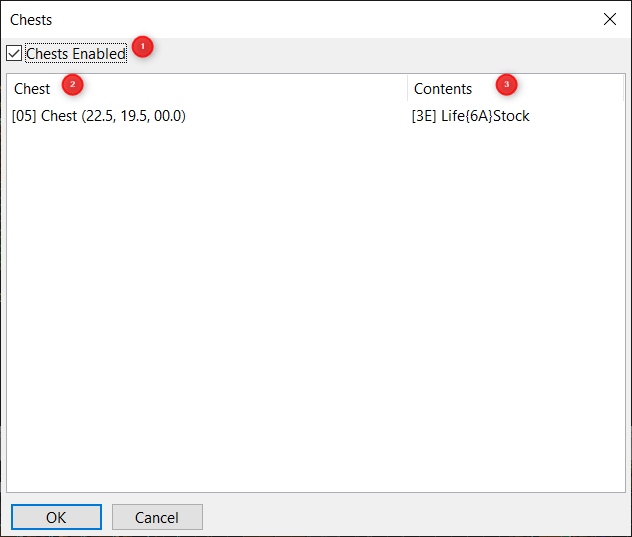
The chests dialog can be opened through the toolbar or by selecting "Chests..." from the "Edit" menu. The list is automatically populated with all chest entities in the room.
If the Chests Enabled box (1) is ticked, then each chest in the room will have unique contents and independent opened flags. Otherwise, the contents and opened flags will be copied from the last room that has chests marked as Enabled. This is useful, e.g. if you have multiple versions of the same room that are active depending on the value of certain game flags.
The chest contents can be set by slowly double clicking on the Contents cell, and then specifying the item from the dropdown.
The following special contents can also be set:
| Item | Contents |
|---|---|
| No63 | Empty Chest |
| Broad Sword | 5 Golds |
| Leather Breast | 20 Golds |
| Leather Boots | 50 Golds |
| None | 200 Golds |
Note that there is a hard limit of 256 total chests in the whole game.
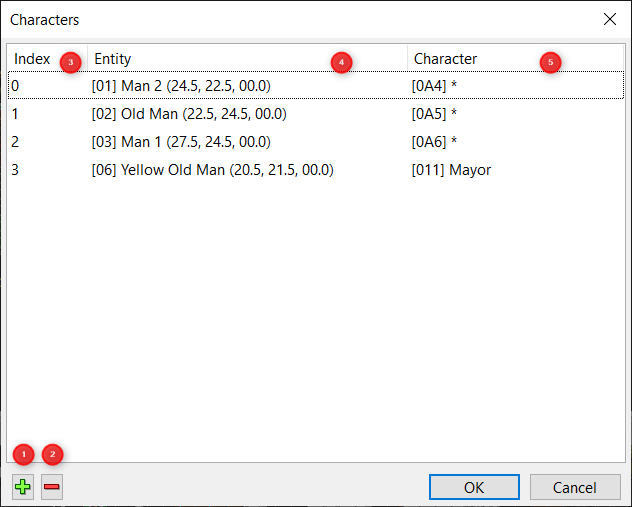
The dialogue window can be opened through the toolbar or by selecting "Dialogue..." from the "Edit" menu.
The game script contains dialogue for each character in the game. Each entity in the room has a Dialogue ID associated with it. This window maps script characters to the entity Dialogue ID.
Characters can be added to the room table by pressing the "+" button (1) and removed by pressing the "-" button (2). The Index and Entity values are filled in automatically. The character that maps to this dialouge ID can be set by slowly double clicking on the Character cell.
Note that signs are marked on the Heightmap. Sign index #0 is always assigned to Dialogue ID 0, sign index #1 to Dialogue ID 1, etc.
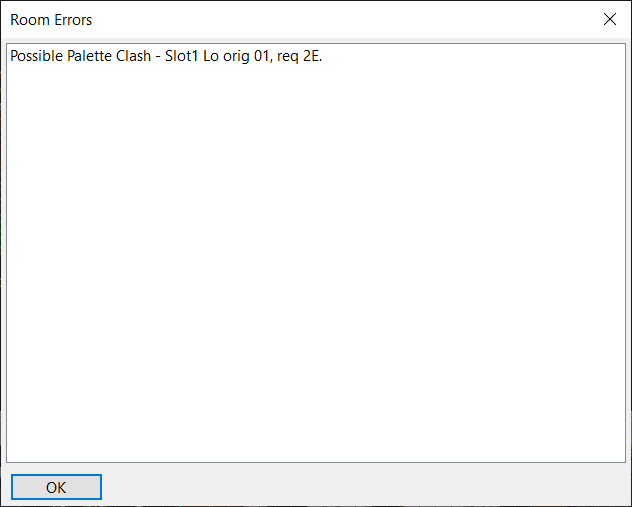
The errors dialogue shows a list of all potential errors that a room contains.
Currently, only palette clash errors are shown. These occur when two entities with different palettes are configured to use the same palette slot. This error can be fixed by:
- Changing one of the entities to use a free palette slot.
- If applicable, changing one of the entities to use the global player palette or room palette.
- Removing the entities that are causing the palette clashes.
This is a summary of all the room properties that can be seen and edited in the Properties window.
| Property | Description |
|---|---|
| Name | The name of the room |
| Room Number | The index number for the room |
| Tileset | The tileset to be used for the room |
| Room Palette | The palette to be used for the room |
| Primary Blockset | The primary blockset to be used for the room |
| Secondary Blockset | The secondary blockset to be used for the room |
| BGM | The background music for the room |
| Map | The map to be used for the room. Note that maps and rooms are independent. The same map can be used by many rooms. |
| Unknown Parameter 1 | Unknown parameter with no known effect, seems to always be zero |
| Unknown Parameter 2 | Unknown parameter with no known effect, seems to always be zero |
| Z Begin | Floor height of the room. this affects when pits are triggered. |
| Z End | Ceiling height of the room. this affects when elevators are triggered and where Nigel spawns after falling down a pit. |
| Heightmap Left Offset | "Left" (NW) offset of the heightmap relative to the tilemap, in cells. |
| Heightmap Top Offset | "Top" (NE) offset of the heightmap relative to the tilemap, in cells. |
| Heightmap Width | "Width" of the heightmap in the SE-NW direction, in cells. |
| Heightmap Height | "Height" of the heightmap in the SW-NE direction, in cells. |
| Tilemap Width | "Width" of the tilemap in the SE-NW direction, in blocks. |
| Tilemap Height | "Height" of the tilemap in the SW-NE direction, in blocks. |
| Fall Destination | The room that will be warped to if Nigel falls down a pit. Can be set to to indicate no room. |
| Climb Destination | The room that will be warped to if Nigel climbs up. Can be set to to indicate no room. |
| Visit Flag | The flag used to indicate the room has been visited. Used by the Oracle Stone as well as for activating tree warps. |
| Paired Tree | Set to the other side of the tree warp pair, in the case of a tree. |
| Tree active flag begin | The flag to check for activating the tree warp. |
| Lantern Room | Checked if the room is dark, and can be illuminated with the lantern. |
| Lantern Activate Flag | The flag to use to mark that the room has been lit with the lantern. |
| Has Tree | Ticked if the current room contains a warp tree. |
| Is Shop/Church/Inn | Ticked if the current room is a shop/church/inn and should follow the shop script routines. |
| Lifestock for sale | Ticked if the shop has a one-time lifestock available for purchase. |
| Lifestock sold flag | The flag used to indicate if the lifestock has been sold. |
| Save Location String | The string used to indicate the save game location in the file load screen. |
| Island Location String | The string used to indicate the player's position on the island map. |
| Island Position | The position on the island map that will be marked. |
| Key | Function |
|---|---|
Esc |
Clear selection |
Tab, .
|
Select next entity |
Shift + Tab, ,
|
Select previous entity |
Ctrl + Tab, >
|
Select next warp |
Ctrl + Shift + Tab, <
|
Select previous warp |
Enter |
Open selection properties |
Up, W
|
Move selection 'up' (NW) |
Down, S
|
Move selection 'down' (SE) |
Left, A
|
Move selection 'left' (SW) |
Right, D
|
Move selection 'right' (NE) |
Page Up, Page Down
|
Entity: Move entity up/down vertically |
Page Up, Page Down
|
Warp: Change warp size |
+, -
|
Entity: increment / decrement type |
+, -
|
Warp: increment / decrement warp type |
R, Shift + R
|
Entity: rotate clockwise / anticlockwise |
P, Shift + P
|
Entity: change selection palette |
[, ]
|
Entity: change order in list |
Shift + Delete |
Delete selected item |
Insert |
Insert new entity |
Shift + Insert |
Insert new warp |