Dev_NewMessageTypes
This wiki page aims to explain how to add new message types in ROS#.
-
All ROS# messages and services are defined under the namespace the
RosSharp.RosBridgeClient.Message, and they implement the abstract classMessage.cs. -
All ROS# messages have a constant string called
RosMessageNameas the class property, which indicates their names in ROS (e.g."sensor_msgs/JointState","std_msgs/Float32"). Other message fields should be C# class properties (required by the .NET JSON serialization API). Make sure that field names are consistent on both ROS and ROS# side, especially the lowercase/uppercases letters. -
ROS services consist of a Request and a Response. In ROS#, they are separated into two different classes. For example,
std_srvs/SetBoolwill be split intoSetBoolRequestandSetBoolResponse. -
ROS actions consist of a goal, a result and a feedback. Following the ROS conventions of generating action messages, in ROS# action messages are split into 7 classes. For example, messages of
actionlib_tutorials/Fibonacciwill be split intoFibonacciAction,FibonacciGoal,FibonacciActionGoal,FibonacciResult,FibonacciActionResult,FibonacciFeedbackandFibonacciActionFeedbackmessage classes. -
Generated action message classes inherit corresponding base classes under
Libraries/RosBridgeClient/BaseMessages/Actions. -
Messages, services and actions will get their own folder after generation, under the folder named after their package name. For example,
Nav/msgandNav/srv. -
Naming message fields with words which are actually the C# keywords should be avoided.
Do not forget to select
ROS2 Messageif you are working with ROS2, as your version selection in the RosConnector component does not affect the message/action/service generation.
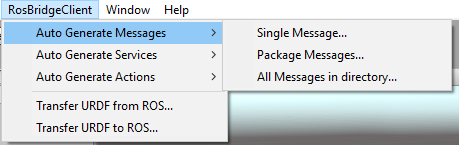
Select the appropriate submenu under the RosBridgeClient > Auto Generate Messages/Services/Actions menu, depending on the input file type. You can choose to generate a single message, messages of a package or all messages under a directory.
In the editor window, find your target by Browse File... and once the message file is selected, the package name will be extracted assuming the ROS folder structure, but you can set the package name manually as well.

The default output folder is Assests/RosSharpMessages, but you can change it by Select Folder...
When you are ready, just hit Generate and C# script for the message will be ready for you, under RosSharpMessages/PackageName
A similar procedure is applied here. The only difference is that this time, you will be selecting the folder of your ROS package, and the message files will be found.

When you are ready, hit Generate

The tool will take over package naming since there are probably more than one package under the directory.
Just select the folder that contains all the messages you want to generate, click Generate.
It is possible to generate custom messages without Unity3D. You can use your favorite console tool to auto generate custom messages.
1. Build RosSharp.sln in Visual Studio
- Open
Libraries\RosSharp.slnin Visual Studio - In Build > Configuration Manager select:
- Active Solution Configuration: Release
- Active Solution Platform: Any CPU
- Click Build > Build Solution
- On your terminal, navigate to
..Libraries/MessageGenerationConsoleTool/bin/Release - Enter
./RosMsgGen.exeto see instructions; - Add the following flags to enable different functions
-
-vor--verboseOutputs extra information -
-sor--serviceGenerate service messages -
-aor--actionGenerate action messages -
-ror--recursiveGenerate message for all ROS message files in the specified directory -
-por--packageTreat the directory as a single ROS package during message generation -
-nor--ros-package-nameSpecify the ROS package name for the message -
-oor--outputSpecify output path -
--ros1Generate for ROS1 instead of ROS2
-
- For example:
- Generate a single message at the current directory:
./RosMsgGen.exe <input file> - Generate a package service at a chosen directory:
./RosMsgGen.exe -p -s <input directory> -o <output directory> - Generate ROS1 Noetic actions under a directory with verbose at the current directory:
/RosMsgGen.exe -v -r -a --ros1 <input directory>
- Generate a single message at the current directory:
Add a new class in Libraries\RosBridgeClient\MessageTypes or any of its subfolders, and make it extend the Message class. Here is an example code for "std_msgs/Float32";
#if !ROS2

namespace RosSharp.RosBridgeClient.MessageTypes.Std
{
    public class Float32 : Message
    {
        public const string RosMessageName = "std_msgs/Float32";
        public float data {get; set;}

        public Float32()
        {
            data = 0;
        }
    }

}

#endif
2. Build RosSharp.sln in Visual Studio
- Open
Libraries\RosSharp.slnin Visual Studio - In Build > Configuration Manager select:
- Active Solution Configuration: ROS1 or ROS2
- Active Solution Platform: Any CPU
- Click Build > Batch Build. For more info see preprocessor directives.
- If you have configured the post-build events correctly, this will be done automatically after a successful build.
- Otherwise copy
Libraries\RosBridgeClient\MessageTypestocom.siemens.ros-sharp\Runtime\Libraries\RosBridgeClient\MessageTypes. Remove all Visual Studio related files as Unity may not like them and throw an error.
You can create a publisher or a subscriber script under the folder Assets\RosSharp\Scripts\RosCommunication;
Example Publisher Script:
namespace RosSharp.RosBridgeClient
{
    public class FloatPublisher : UnityPublisher<MessageTypes.Std.Float32>
    {
        public float messageData;

        private MessageTypes.Std.Float32 message;

        protected override void Start()
        {
            base.Start();
            InitializeMessage();
        }

        private void InitializeMessage()
        {
            message = new MessageTypes.Std.Float32
            {
                data = messageData
            };
        }

        private void Update()
        {
            message.data = messageData;
            Publish(message);
        }
    }
}
Example Subscriber Script:
namespace RosSharp.RosBridgeClient
{
    public class FloatSubscriber : UnitySubscriber<MessageTypes.Std.Float32>
    {
        public float messageData;

        protected override void Start()
        {
            base.Start();
        }

        protected override void ReceiveMessage(MessageTypes.Std.Float32 message)
        {
            messageData = message.data;
        }
    }
}
© Siemens AG, 2017-2025